So, in this article, we will explain GUI programming in Python, and GUI libraries and their pros and cons. So, if you want to explore Python software development with GUI, be with this comprehensive guide crafted by a renowned Python software development company.
A few GUI libraries in Python
There are quite a few GUI libraries for use with python, and all of them have their pros and cons. It would not be possible to go over each of them in this blog, so we will consider only those that are prominent enough (read “mostly used”). Specifically, we will be considering two libraries/frameworks to create GUIs in python. We will be taking a look at the following 2:
- TkInter
- WxPython
It doesn’t mean that the other frameworks available for use are not up to the mark. You can find a list of available Python GUI frameworks here https://wiki.python.org/moin/GuiProgramming
The other available frameworks are good enough to use, but as I said, it would not be possible to touch each of them within this post. Please feel free to check the frameworks we are not considering here, and I am sure you will find more than one that fits your needs.
Create a single screen GUI Application in Python
So, let’s get going. For each of the libraries that we are going to consider, we will create a single screen application that allows a user to compute the price of some commodities that a customer buys. We will be using a MySQL database at the backend, and the schema for that DB is as follows:
Table: Commodities
| serialId | commodityName | pricePerUnit |
|---|
We will be using this single table to use with our application. Let us call the database ‘guitest’. The SQL statements to create this database and the table are as follows. We are assuming that you have some exposure to MySQL, but if that isn’t the case, you can take a brief look at any one of the basic MySQL tutorials on the web, and it won’t take you more than 30 mins to understand what we are doing here. Please note that in the SQL statements mentioned below, the content after the ‘#’ character is either an explanation of what a command does or our intent to do something.
SQL Statements:
Please execute the above statements at the MySQL prompt, and we will be good to go. Next, you will need to install the python extension for the MySQL database, and we will use the mysql_python module for this. In this post, I strongly suggest that you create a virtual environment for this stuff. I have created one, and I have named it ‘guienv’. So, exit from the MySQL prompt by typing \q and run the following command in the directory where you would like to place your virtual environment:
virtualenv guienv
That will create a virtual environment for you by the name ‘guienv’. You may use any other name here, but for the sake of good programming practice, I would suggest you keep a name that suits the purpose of our exercise.
How to get into the virtual environment?
Next, in order to get into the virtual environment, please execute the following from the same directory where you placed the virtual environment ‘guienv’ (or whatever name you have given it):
source guienv/bin/activate
In addition, We are also assuming that you are using some flavor of the Linux system. In case you are using a Windows computer, please replace the above command with the following:
source guienv/Scripts/activate.
From here on, I will be targetting Linux machines, so windows users would require to find out the equivalent command syntax for their computers.
Once you have activated your virtualenv (named guienv), execute the following command to install the python extension for the MySQL database:
pip install mysql-python
It should install the MySQLdb module that you would be using in your programs. If you see any error here, you need to take care of it. Maybe by consulting StackOverflow.
Putting a remedy for each error
Explaining and putting a remedy for each error that might occur is not within the scope of this post, but one error that you might encounter is that the header files for python are not being found. To fix that, you would need to install python-dev(el), using either apt-get (Ubuntu and Debian), yum install (for centos, fedora, suse), or download the RPM file for MySQL-python and running the following command from the directory where your downloaded RPM file is stored:
TkInter:
It is python’s de-facto GUI library. That is possibly the reason behind its wide usage. However, the widgets of this library do not have a very sleek look, and it is kind of odd-looking (excuse me, but it is my personal opinion. You may have different opinions about it). That is also possibly the reason behind the parallel existence of all the other GUI libraries in Python Software Development. But first, let us delve a bit into some code that uses TkInter and demonstrate its basic capabilities. Let us create a TkInter window first:
How to create a TkInter window?
The above code will create a small window. We will see how to display all the controls needed in the window shortly.
Next, we would like to query the data from the database (guitest) and populate the window with a list widget, a text input widget, a label widget, and a button to display the cost of the item(s) selected from this list widget. The data from the database will be associated with the items in the list widget. The following code does this.
The following is the complete list of the codes to perform the desired task.
Well, what do we learn from this code?
Explanation of the above code
The first thing to note here is the way of handling each widget. There are two steps at least for each of the widgets:- i) We initialize the widget using its constructor (for example, “prompt_label = tk.Label(….)”), then comes an optional processing stage, where you might want to add or modify an attribute of the widget (for example ‘response_label[“text”] = str(total_price)’) and finally, calling the pack() method. The pack method finalizes the widget for being displayed. And beyond that, you would no longer be able to change that widget (you may be able to destroy it, though). If you wish to change a widget after pack() has been called, you would need to use “StringVar”, which will allow the value displayed on a widget to change as soon as the variable associated with that value changes. In the above code, we could have done the following to serve our purpose:
In the above case, every time price_var changes. And you will be able to see the change in the Label widget automatically.
The rest of the code is quite simple. We basically create a DB connection, extract the data from it, create a data structure to hold the data, and manipulate it using the widgets we create in the code.
By the way, the last statement, “win.mainloop()”, is a special statement, and it is needed for the widgets to stay on the screen as we perform operations on them. It is called the eventloop, and is a must to make the whole thing work.
There’s a lot of nitty-gritty to this topic that I’d love to cover, but I will keep that for a later post, maybe focussing on only this specific library/framework.
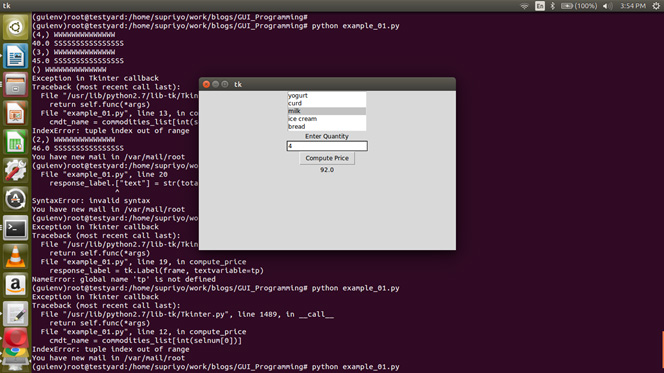
Here is a screengrab of the widget at work:
WxPython:
Firstly, to use this library, you would need to install it. Now, how do we do it? Well, I can think of 2 ways on a Linux system. And one of them applies to the Windows environment as well. One way to do it is to install it using pip. However, this method doesn’t always succeed. During writing this post, I made a python virtual environment (called blogenv), and I was trying to install this using pip, but it was failing pretty nastily. The issue was some incompatibility between certain libraries in my virtual env. Hence, I downloaded the wxWidgets-3.0.4.tar.bz2 entity and ran bunzip2 on it (bunzip2 wxWidgets-3.0.4.tar.bz2), which opened it up as a tar archive.
Next, I ran “tar xvf wxWidgets-3.0.4.tar” to untar it and then entered the source directory. The following steps were simple – “./configure” followed by “make” and finally “make install”. That set up the library alright, but the flipside of it is that it was installed in my global python environment, not on my virtual environment.
ALSO READ
However, it serves the purpose. I could have taken some more time to figure out the incompatible libraries in my virtualenv and eliminate them to install it using pip. But since it is not a production-level project, I didn’t do it.
Features of WxWidgets
WxWidgets is a very powerful cross-platform library for GUI programming using C++ and wxPython is an extension of it. The richness of this library partly lies in the fact that the widgets created are native to the platform on which it is run. Basically, it means that if you run your wxWidgets/wxPython program on a Windows system, the widgets will be Microsoft Windows-style, but if you run the same program on a Ubuntu or Debian Linux system (or, for that matter, any other flavor of Linux or Unix system), your widgets will look like normal Ubuntu/Debian widgets
I have done multiple projects using this library (using both python and C++), and the clients were always happy with the product. It makes it very popular among developers as a happy client means more business.
Anyway, now let us get our hands dirty with some code. We will be creating the same application we created using Tkinter, so we will need a widget that can hold all those components.
Create an application using WxPython
“wx” has an “Application” class, and to create any widget, we need to instantiate it. Next, we have “Frame”s and “Panel”s to utilize space in widgets. Let us look at the following code:
Explanation of the above code
The first argument to the Frame widget is the parent widget of the frame. In our case, the Frame does not have a parent widget, so it is “None”.
The arguments to the Frame widget are keyword arguments. There is an argument named Id: however, it is not necessary to assign any value to it. If you do not assign any value, it will take -1 as a default value.
However, the “title” argument is very important. It will contain the text that will be displayed on the widget’s title bar. So we supply it with the string “Commodities List”.
The “size” parameter sets the size of the widget. The format is (length, breadth). For our purposes, 600 by 400 should be enough.
I am putting most of my explanations as comments in the code. And I’m doing it because that is the context in which you need to understand what we are doing. I will follow this method in this post, but occasionally, I will come out of it and discuss the logic behind what we are trying to do. I will also give you a high-level view of the entire problem so that you have the right approach.
Things to do after creating the “Frame” widget
So now that we have created a “Frame” widget, what do we do with it? Of course, we would like to add some more widgets to it so that we can compute the price of commodities, as we did in our last example. I understand this is not a very interesting prospect, but to initiate this wonderful library, let’s do it one more time. Later on, after you have read through this post (I hope you will, though some might start snoring while reading this), you can take up more interesting projects wherein you can use the little knowledge that you might have gained by reading this.
The next thing that we are going to do is to add a “Panel” element. However, it is not necessary as we can directly add widgets to the “Frame” widget. The “Panel” widget actually allows us to arrange the other widgets and manage their alignment, something that the “Frame” widget” is not so good at.
Now, inside the panel widget (“pnl”), we need to put a list or dropdown list, a text entry widget, a button widget with some code to execute on clicking it, and a label widget. Let’s do that in code now:
The final version of the complete code
The final version of the entire code is as follows. Please take a good look at it before reading any further. Later, I will go over some parts of the code that are critical to the understanding of wxPython, and I will try to explain what is going on exactly.
Please DO NOT write global code. It becomes very cumbersome, if not impossible, to import such code elsewhere.
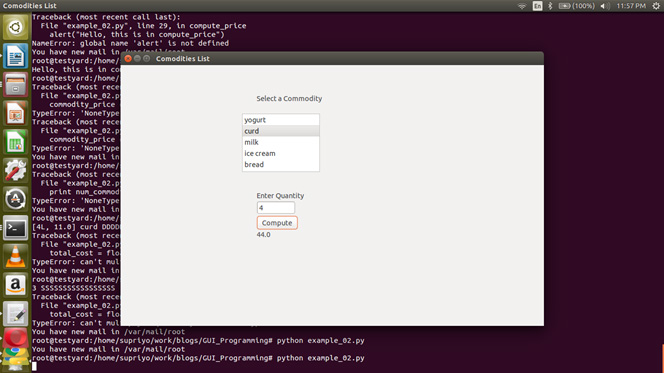
The widget looks like the following:
First, we create the “app” object that drives the event loop. I hope you are already familiar with this. Even in TkInter, we were doing something similar. Next, we create a frame and a panel widget within the frame for the reasons that we’ve already discussed above. We include a TextCtrl, a Button, and some StaticText widgets within the Panel widget.
The StaticText widgets allow us to write the text that will be displayed on the GUI, but the user of the application cannot change it. We mainly use it to write instructions and labels. The TextCtrl is a widget that provides an editable text field. And it allows the user to enter inputs. A word of caution here: The programmer should write code that scans the user input and sanitizes it before using it anywhere in the program. You will not want to trust everyone in this world.
The line “btn_compute.Bind(wx.EVT_BUTTON, compute_price)” actually binds a callback function with the Button widget. It allows the application to do some work when the user clicks on the button.
A Brief look at Kivy and PyGtk
Pros and Cons of Kivy
I once did a very small project using Kivy, and what fascinates me the most is the richness of features it offers and the number of platforms it supports. Kivy practically supports all the well-known and widely used platforms, both desktop and hand-held device interfaces (like android and iOS). Kivy is written in C. And it provides a python extension, and the calls that you make from python invoke the appropriate C routines. Hence it is fast. It is a very good candidate if you want to start a small to medium GUI project.
However, there are some drawbacks to Kivy too. Firstly, I normally prefer the UI/widgets to be native-looking (i.e, widgets on MS Windows systems should look like MS windows widgets, etc.), but Kivy doesn’t provide you with that. True, the widgets are not dull, but still, when a user is using an application on some platform, he would expect the app to display widgets that look native to that specific platform. Another drawback of Kivy is the application size. It can be a showstopper when you are creating apps for mobile phones that are android or iOS driven. The size of the application matters a lot in those scenarios. And hence, even though Kivy supports both platforms, you would not want to develop a large application using Kivy for those platforms.
Pros and Cons of PyGtk
PyGtk is a very stable and veteran candidate in the GUI programming world. It is built on top of the GTK framework (basically python binding of the Gtk library). It is object-oriented and easy to start using, but since it is a veteran, it has got a lot of nifty features and requires time to learn. That is to say that the learning curve for it is a bit steep. I have tinkered with PyGtk (and Gtk, in general, using C++), and I have found it very suitable for large multi-interface projects which are enterprise-class. You wouldn’t bother to use it for small or medium projects, as it would be overkill.
If you want to know more about it, you can find all about it at https://wiki.python.org/moin/PyGtk
Well, that’s all I could cover here. Maybe, I will write another blog on python GUI programming using other libraries. And I will include which I didn’t cover here, plus include PyGtk in it sometime later. I sincerely hope this helps someone.
Thanks for your patience if you have read this and have come to this line.


