
Appium is a free and open-source mobile automation framework used for mobile web, native, and hybrid application testing. Appium server is scripted in node.js and is compatible with leading languages such as Java, Python, Ruby, PHP and many more. It enables cross-platform testing on real devices, simulators and emulators for Android and iOS.
Appium has more or less the same architecture that was first adopted by Selenium/WebDriver. Appium uses the mobile JSON wire protocol, an extension of Selenium JSON wire protocol to drive mobile web, native and hybrid applications.
So this was a short introduction to Appium. Now let’s move to the configuration part concerning Ubuntu for running our first Appium Test.
Although we will cover everything from scratch, there are some prerequisites:
1) Java JDK
2) IDE - Eclipse or Intellij
3) Maven
4) Selenium (can be used as Maven dependency)
As mentioned above, Appium is scripted in node.js, hence, it should be our first step to download node.js with npm in our Linux system. Ubuntu 18.04 contains a version of Node.js in its default repositories that is stable and can be used to provide a consistent experience across multiple systems.
To get this version, you can use the apt package manager:
To check the version of node.js and npm you have installed, type:
Since you have set up the basic requirement of Appium, now we will directly install Appium from the terminal:
To check the appium version and start the server, type:
To start the appium server with optional flags, you can redirect to the appium official website
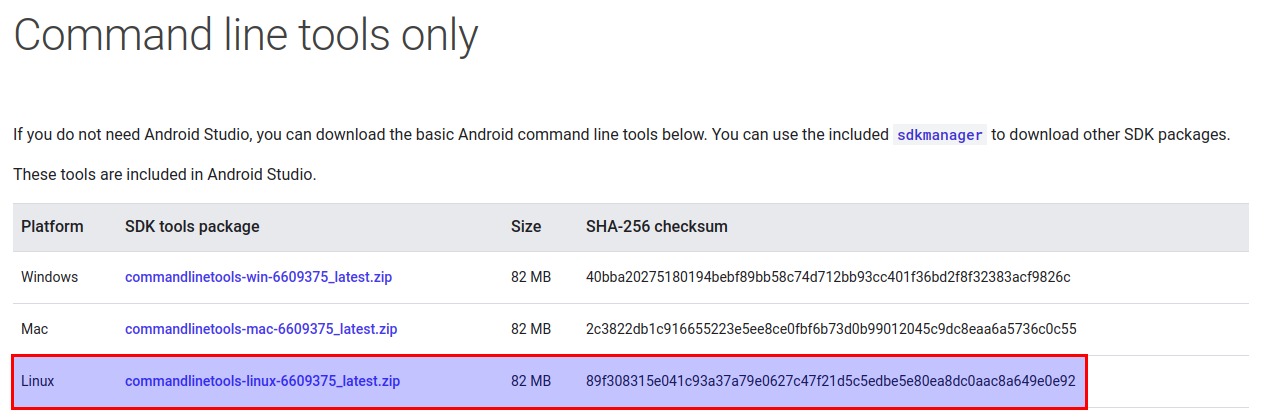
Now, if your Appium server is running fine, you are ready for downloading the Android SDK. For this, you need to redirect to the link and download the Android SDK Command Line Tools only for Linux.
Once downloaded, go to the downloaded folder and open the “tools” folder in which you will find the “android” shell script. Open the terminal from the same directory and type:
It will open the Android SDK Manager and show you the Android packages available for download.
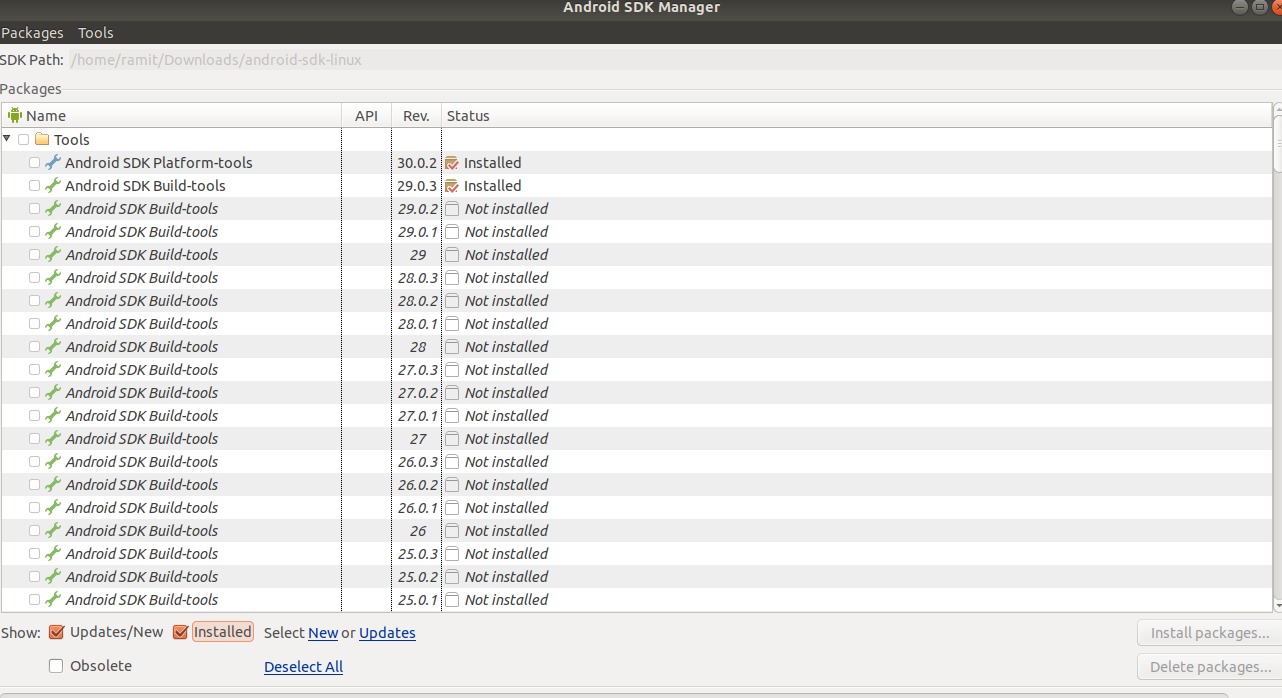
To install basic required packages, here you need to select:
- Android SDK Tools
- Android SDK Platform Tools
- Android SDK Build Tools
- Your required Android version SDK (Android 10, 9, 8.1, 8.0 etc)
Note: You can select multiple Android versions SDK to install.
After selecting, you need to click on “install packages”.
Since we would be working continuously with this android-SDK-Linux folder, let’s set its path in the home directory. For this, open the bashrc file using the below command via terminal:
Scroll down and make a entry:
To mirror/view and control your mobile screen from your desktop, you can download the Scrcpy tool via terminal:
And now, guess what? We are done setting up all the configurations and we are ready to shoot up our first appium automation test.
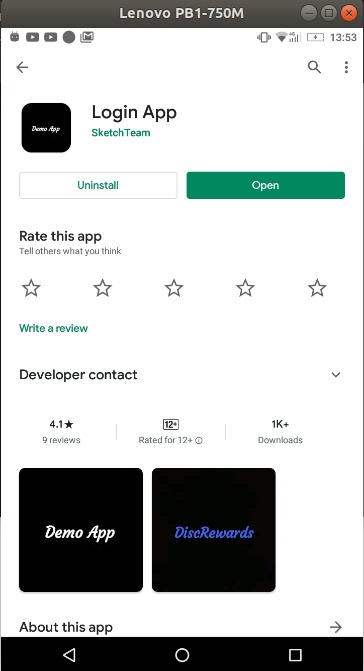
To brief the appium automation test, I have downloaded a sample “Login Demo App” on my device. To run the same example, you can easily open the Play Store and download it on your device, refer to the below screenshot for downloading the accurate app:
In this example, we would be performing test automation on login activity. Now, you might be worried about how we can get locators to access the username, password, etc of the login screen.
No, no, no, you don’t have to worry about this, we already have a tool downloaded in our system for this. You just need to open the same “android-Linux-SDK” folder in which you would get the “tools” folder, go to the “tools” folder and open the terminal and type:
It would open the UI Automator viewer, which would help in getting locators of your mobile elements. Make sure, your device is connected to the system and the screen is mirrored using “strcpy” or any other screen mirroring tool.
Note: In the below image, refer to the red highlighted button to take a screenshot of the attached device screen.
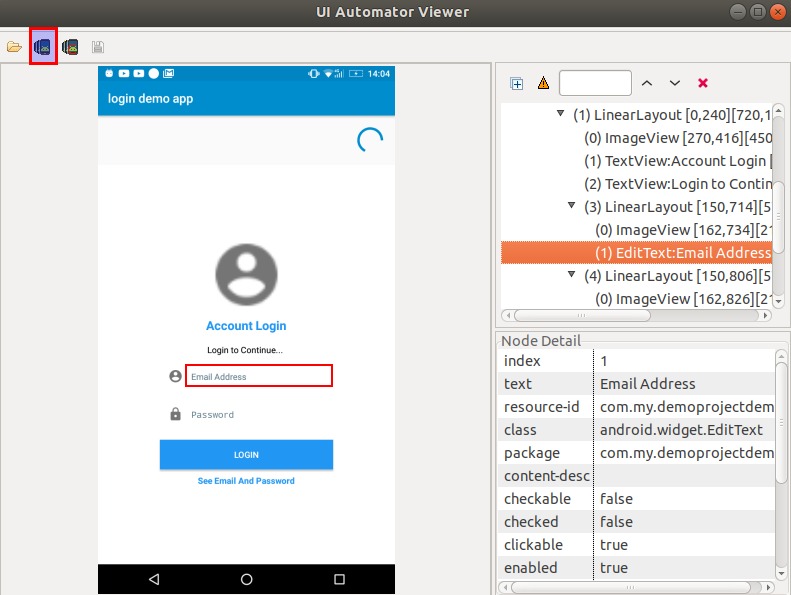
To get the locator of the username input field, just click on it and you will see various locators like ID and Class on the right.
In this example, we have used Page Object Model and hence we have created a separate class for locators and step functions.
Now, let's set up all the mobile capabilities that will be required to run our test on a real device. Below are some of the capabilities we used:
- deviceName : “my device name”
- platformVersion : “my device android version”
- appPackage : “my app package”
- appActivity : “my app activity”
Note: To get appPackage and appActivity, you can download another app called “APK Info”. This app would provide every detail of the applications installed on your device.
Here is the login class, where we have called all the functions specified in the "DemoLoginActivity" class and also for all the hard coded values and to add statements.
Conclusion
In this article, NEX Softsys leading software testing company cover appium automation test from the beginning, which includes the installation and the necessary configurations.
It is important to set up everything mentioned in this blog to run your appium test. And this is just a one-time setup hence investing time in this is more than just learning. So guys, give it a try, you would enjoy running your first appium test on Ubuntu!!


