Actually, in the microservice world, there are different ways in which we can introduce caching into an application architecture. The databases, caches, or the use cases, which I have explained here in this blog, are just for reference, but you have to be wise in choosing the right cache and the right database which fits your use case. The most common cache which we all use is the embedded cache.
Types of Caches in Java Applications Development
Embedded Cache
The embedded cache is used in applications where we need to do some mappings, or reference lookups, which could be adding more load to the database by interacting with the database frequently.
To reduce the latency between the application and the database, we have to get a copy of the data from the database and put it in the application in the form of a cache. In an embedded cache, a copy of the data from the database is taken, and then we keep it in the application and use it for reference mappings or private information.
There could be a case where we want to have an application-specific cache within that particular instance you can use embedded cache in that particular scenario.
Client-Server Cache
Client-Server cache, as the name suggests it follows a client-server architecture where you will have an application, you will have a database and the cache is between the application and the database. It acts as a server for the client or the application. If you compare this with the embedded cache the cache has now moved out of the application, and it is placed as a separate instance, which we can connect from our applications.
In many scenarios, we use these kinds of caches when we want to have multiple applications interact with the same cache so that we can reduce the memory used in terms of embedding these caches inside each application. That's why we have taken the cache from inside the application and kept it as a server where clients can interact and retrieve data from the cache.
Distributed Cache
Distributed cache as the name suggests, when we have multiple applications retrieve data from a server cache, we need to have multiple instances of the cache to serve multiple clients. That's when we go for a distributed cache, and there could be multiple nodes, where different instances of the cache are deployed into the cloud or servers, and they are served for our applications. So, where can we use distributed cache?
Distributed cash is popular when you want to have low latency and high-volume transactions to be processed and retrieved using a cache mainly in Microservices based applications. One other type or variant of a distributed cache is embedding the cache within an application and interacting with the other application, which just got deployed or which needs to be auto-discovered.

So, the cache is distributed, and it is shared between two different applications and is embedded. It's a flavor of embedded cache and a distributed cache within the ecosystem. The distributed cache again leads us to a challenging conversation on how we can add scalability when we want to dynamically scale up and scale down our caches.
Why Microservices Required Cache?
Microservices need a place to store hot data, and it is always best not to have a state in a microservice so that it can be scaled up easily. For a cloud-native application as you know, we store state in a separate service, which in turn can be scaled to handle many microservices talking to a cluster.
We can also provide the easy provision. Self-managed and distributed cache, which helps the application store data in a key-value format.
Distributed Cache
We use distributed cache in a distributed system. The main purpose of using distributed cache is to minimize operation latency by avoiding unnecessary network calls and avoiding the computation logic. Distributed cache increases the responsiveness of the service in Java application development.
We normally use cache in microservice applications in front of datastore to fetch some frequently accessed data to reduce the latency and to avoid unnecessary load on the data store. The distributed cache will minimize the computational load on the datastore. Also, we use cache to store user sessions or user states.
Read/Write Policy
I have mentioned, also the read/write policies on the Caches. Let’s say we have some arbitrary microservice that has multiple application servers. Also, assume that we have a database and a cache. In Cache Aside, all the writing happens to the database. So, let’s say when write happens then all the data from app servers are written into the database directly.
Then when the first time read happens then the read request will come to the app server and then the app server will call the cache and the cache server will return not found in this case as there is no data in the cache server as of now.
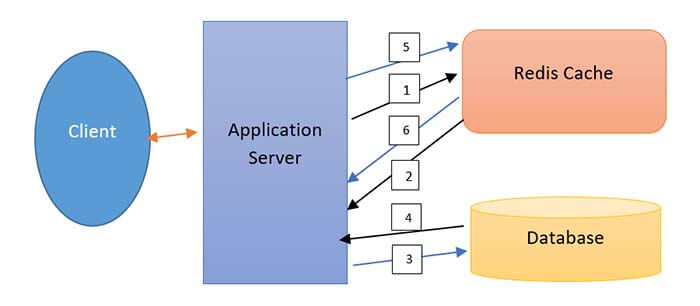
Then app server invokes the database service and it fetches the required data from the database and posts that the app server calls the cache server API to store the data into the cache. So, the app server finally returns the response to the user.
It is Cache Aside Architecture, and it is used where the data is not updated in the cache first time. In this architecture, the app server invokes the cache server twice as you can see from the above diagram. So, we can minimize the two calls to cache here by using Read through Architecture.
Read Through
In this case, when the write happens then it directly writes into the database. However, when a read request comes, if the cache does not contain data then the cache server calls the database and then the cache gets populated with the data.
So, after this, the cache server returns the data to the app server. In Read Through architecture, the app server only calls the cache server once only. Here the round trip to the cache is minimized by 50%.
Write Through
In this case, the app server writes data directly to the cache instead of writing into the database. Then the cache server internally updates the data into the database. In this type of architecture, the data gets populated to cache and the database at the same time.
Write back
Here, write happens to the cache first but not into the database. If the data is removed from the cache, then only it is uploaded to the database, or else if we modify the cache data and in this case, the cache and database will not be in sync.
Read Ahead
In this case, cache data is loaded at the time of user access it. Here we need some machine learning to decide which data to load into the cache ahead of time. Usually, most cache system implements Read ahead architecture.
What is Redis Cache?
Redis is extremely fast and it is an open-source in-memory key-value data structure. We can use Redis for publishing and subscribing to the client UI. We can’t compare Redis with any database as in a database, data is stored in a hard drive but in the case of Redis, the data is stored in the in-memory cache. Redis is written in C language and you can download Redis from the internet easily as it is open source.
Redis Cluster
Redis cluster is a data sharding and replication solution with automatic management failover. Data sharding is the practice of dividing up a large database into many smaller portions and distributing it across numerous machines to improve an application's manageability, availability, performance, and load balancing.
The reason for data sharding is because after a certain scalability point, scaling horizontally by adding more machines is cheaper and more reachable than scaling vertically by adding more servers. Cluster mode, like Sentinel mode, provides high availability, but sharding enables for more data to be kept in the cluster.
Cluster improves the scalability of your application as data continued to grow.
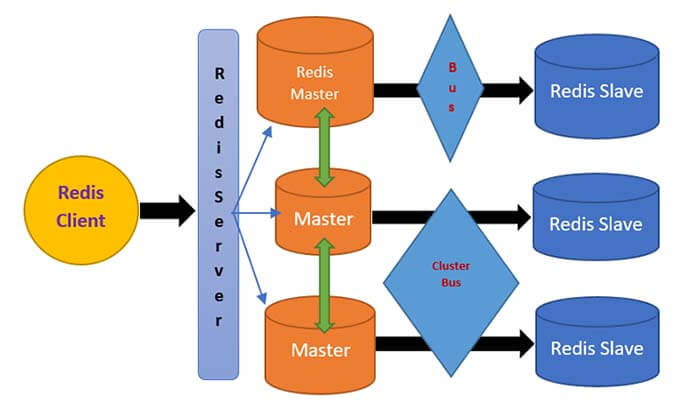
How does Redis's Cluster Work?
In a cluster mode, nodes communicate with each other all the time and they are aware of each other not similar to Sentinel as there is no dedicated monitoring facility. Every Redis cluster node has two TCP open connections. The standard Redis TCP port is used to serve clients for example 4579 plus the port obtained by adding 10000 to the data port.
So, 14,579 in this example, the port 14,579 is used for a cluster bus which allows a node to node communication. Actually, for failure detection, Nodes take the help of cluster bus and for updating configuration, failover authorization and so forth. The cluster keeps this state stored in memory and maintained by itself.
In my example, here is a cluster of three masters and each Messer has one slave, which is used to replicate the master. All nodes communicate with each other through the cluster bus. Once you set up a cluster the cluster will have a sharding which means once you add a key to Redis, a hash slot gets calculated.
Primarily Redis calculate the slot where the key is going to land by taking the CRC 16 of the key module 16384 as CRC is a cyclic redundancy check function, by finding the hash slot for the keys, your data will automatically be spread across all those three slaves nodes.
Cache Replication Example
Note:
It is easy Setting up a Redis cluster in AWS for scalability and high availability is fairly simple. AWS ElastiCache for Redis can be used to set up a Redis cluster. With cluster mode enabled, Redis cluster offers increased scalability, allowing you to easily scale your Redis cache data as your application grows by setting up replicas in multiple availability zones.
How to Use Redis in Spring Boot Applications?
Spring caching provides an abstraction around the different caching mechanism, and it makes easy to change your implementation through configuration. You have to make sure that the Redis server is available for you. Spring boot only provides Redis integration, but you have to download the Redis server and configure it so that we can access it through our Java spring boot application development.
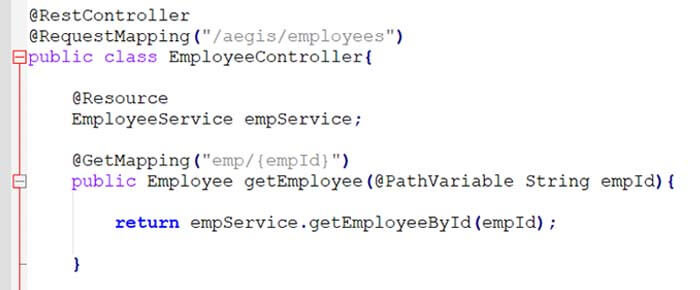
I have crated my controller class as below:
Don’t worry about how complex is your server layer, but in the end, we have to deal with requests and responses only. Our caching mechanism works on top of it. If the app server request finds the data inside the cache based upon the key, then it gets the information from the Cache.
If it does not find the data, then let the service layer do the complex functions to save the data into the cache so that next time the data gets retrieved from the cache.
Redis Integration in Spring boot Application
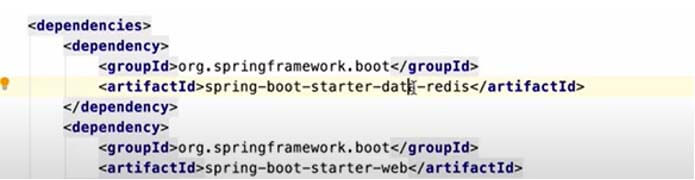
First, you need to include @EnableCaching annotation in your spring boot main class. Spring boot will automatically scan your classpath and will try to find out what kind of cache you are using in the application. We have to add the Redis starter dependency in the pom file as below:
Spring will identify the Redis as your underlying caching mechanism and then it provides the autoconfiguration to connect to the Redis server. You don’t have to write Redis client code separately.
All you have to do is to add few additional configurations into your application.yml file. Now, I am explaining some generic annotations.
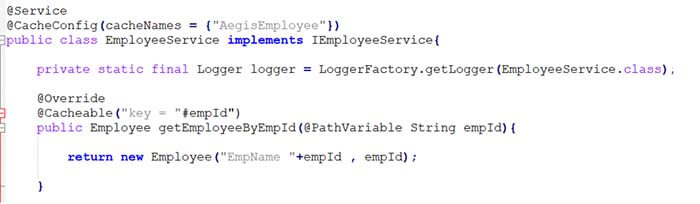
Here I’ve used @CacheConfig annotation for defining the cache name and this is a class-level configuration. Another annotation I have used for the method level i.e. @Cacheable to enable the caching in the method level. Let’s say if your service class is having 10 methods and you want to have the caching for 5 methods and to do that you have to add the @Cacheable annotation to those 5 methods only.
Here I have used key = “#id” which is optional and if you don’t method then spring will automatically provide the default key. As I am using Employee Cache here and usually, we identify employees through employee ID only, so I am using the expression language here as key = “#id”.
Application properties configuration
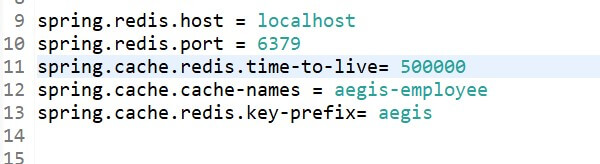
These are the configuration for the Redis server host port and cache name. This Redis time-to-live is for specifying the time in milliseconds up to which the key should be active.
Now, instead of storing all the data into the cache, we can load the data into the cache based on some conditions. Let’s say we want to cache those employee details whose age is less than 30 years. It is our condition and based on this we will populate the cache. And the rest of the data will be fetched from the database. We have to write the below annotation for this.
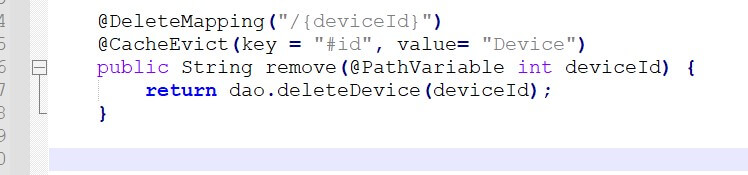
Now next scenario is we want to delete all the records from the DB, and once the records get deleted from DB and then all those data should be deleted from our cache as well. In this case, we have to use @CacheEvict annotation, and we have to pass the key and value to this. So, now if you delete any record from the database, the same record will now get deleted from the cache.
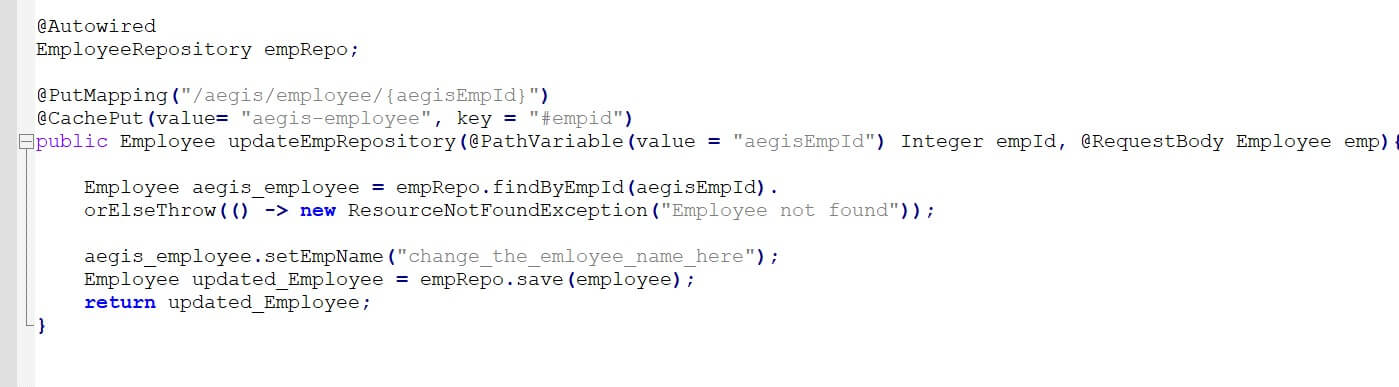
Here in the below example, I have added @CachePut annotation for updating or adding the particular entity in the cache. Mainly I have put in the repository layer just before the DB entry so that the required data should be stored in the Redis Cache.
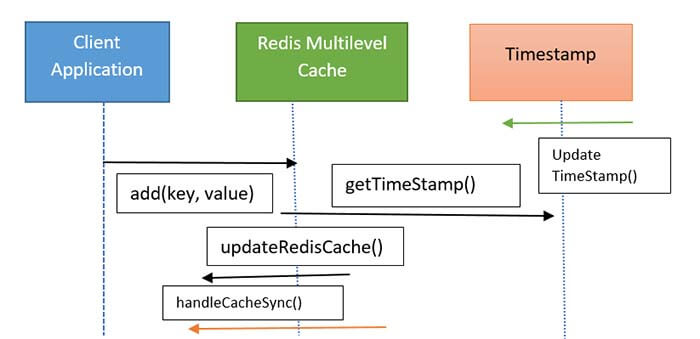
Here I am using an incrementing timestamp to determine the order operations that occurred and it would require Redis to write, sync message publishes, and sync messages handling within a few hundred nanoseconds. Updating Redis consists of two Redis commands where one is to update the value and the other is to send a publish/subscribe message to notify the other client of the change.
Frequently Asked Questions
Distributed cash is popular when you want to have low latency and high-volume transactions to be processed and retrieved using a cache mainly in Microservices based applications.
Embedded cache is used in applications where we need to do some mappings. Client-Server cache as the name suggests it follows a client-server architecture and then distributed cache as the name suggests when we have multiple applications retrieve data from a server cache.
Microservices need a place to store hot data and it is always best not to have a state in a microservice so that it can be scaled up easily. For a cloud-native application, as you know we store state in a separate service
Redis cluster is a data sharding and replication solution with automatic management failover. Data sharding is the practice of dividing up a large database into many smaller portions and distributing it across numerous machines to improve an application's manageability.
Please refer to this entire blog to understand how to implement Redis in your spring boot application, and you will get an idea about all these annotations.

Recent Blogs
Categories


