Have you ever thought about learning the best way to create and bind Kendo Stack100 chart with remote data in MVC? A leading Asp.net Development Company India is here to let you know about the same. Through this article you will find great tips and steps that will help you in developing and binding Kendo Stack100 chart.
Introduction
This article explain how to create and bind Stack100 chart with remote data in MVC. Simply I have created Stack100 Chart in MVC view and bind with remote data.
Code Behind:
Follow the following steps.
Step 1:
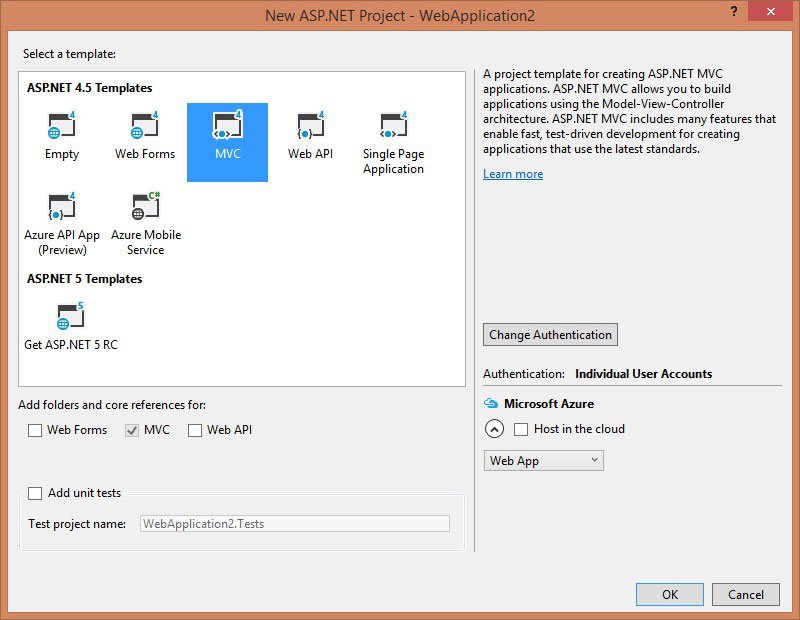
Create a simple MVC application. Currently I am going to create MVC application using Visual Studio 2015.
Step 2:
Download Telerik UI for ASP.NET MVC and add reference “Kendo.MVC.dll” in your solution. You can download Telerick UI for Asp.NET MVC here("https://www.telerik.com/download-trial-file/v2/ui-for-asp.net-mvc")
Step 3:
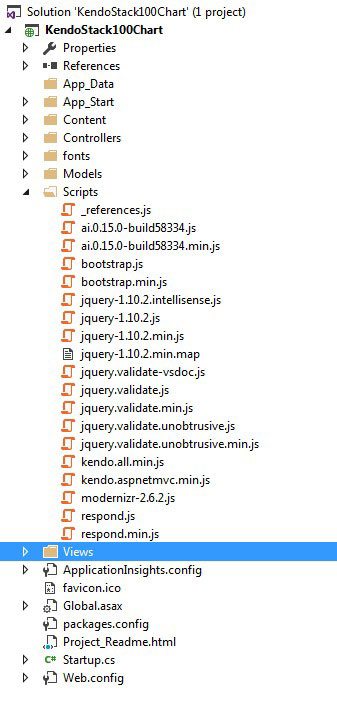
Download following javascript file from here(“https://github.com/telerik/kendo-ui-core/tree/master/src”) and put in script folder as below.
You can see in above image I have added following kendo javascript files.
- kendo.all.min.js
- kendo.aspnetmvc.min
Step 4:
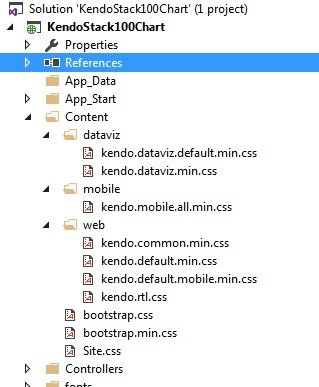
Download following CSS file from here(“https://github.com/telerik/kendo-ui-core”) and put as like below.
As you seen in above image I added 3 folders in Content folder
1) dataviz
- Put kendo.dataviz.default.min.css and kendo.dataviz.min.css file
2) Mobile
- Put kendo.mobile.all.min.css file
3) Web
- Put kendo.common.min.css, kendo.default.min.css, kendo.default.mobile.min.css and kendo.rtl.css file
Step 5:
Add following code in App_Start => Bundle.config file under RegisterBundles method.
bundles.Add(new ScriptBundle("~/bundles/kendo").Include(
"~/Scripts/kendo.all.min.js",
"~/Scripts/kendo.aspnetmvc.min.js"));
bundles.Add(new StyleBundle("~/Content/kendo/css").Include(
"~/Content/web/kendo.common.min.css",
"~/Content/web/kendo.rtl.min.css",
"~/Content/web/kendo.default.min.css",
"~/Content/web/kendo.default.mobile.min.css",
"~/Content/dataviz/kendo.dataviz.min.css",
"~/Content/dataviz/kendo.dataviz.default.min.css",
"~/Content/mobile/kendo.mobile.all.min.css"));
bundles.Add(new StyleBundle("~/Content/mobile/css").Include(
"~/Content/mobile/kendo.mobile.all.min.css"));
Step 6:
Add above bundle configuration in _Lalyout.cshtml file as shown below.
<!DOCTYPE html>
<html>
<head>
<meta charset="utf-8" />
<meta name="viewport" content="width=device-width, initial-scale=1.0">
title tag - @ViewBag.Title - My ASP.NET Application
@Styles.Render("~/Content/css") @Styles.Render("~/Content/kendo/css") @Scripts.Render("~/bundles/modernizr") @Scripts.Render("~/bundles/jquery") @Scripts.Render("~/bundles/kendo") @Scripts.Render("~/bundles/bootstrap")
</head>
<body>
<div class="navbar navbar-inverse navbar-fixed-top">
<div class="container">
<div class="navbar-header">
<button type="button" class="navbar-toggle" data-toggle="collapse" data-target=".navbar-collapse">
<span class="icon-bar"></span>
<span class="icon-bar"></span>
<span class="icon-bar"></span>
</button>
@Html.ActionLink("Application name", "Index", "Home", new { area = "" }, new { @class = "navbar-brand" })
</div>
<div class="navbar-collapse collapse">
<ul class="nav navbar-nav">
<li>@Html.ActionLink("Home", "Index", "Home")</li>
<li>@Html.ActionLink("About", "About", "Home")</li>
<li>@Html.ActionLink("Contact", "Contact", "Home")</li>
</ul>
@Html.Partial("_LoginPartial")
</div>
</div>
</div>
<div class="container body-content">
@RenderBody()
<hr />
<footer>
<p>&copy; @DateTime.Now.Year - My ASP.NET Application</p>
</footer>
</div>
@RenderSection("scripts", required: false)
</body>
</html>
Now all configuration is done which is required to work with Kendo UI MVC.
Step 7:
Create Stack100Model.cs class under Models folder. This class is helpful to store and display data in Stack100 chart.
public class Stack100Model
{
public int Year { get; set; }
public int GoldMedals { get; set; }
public int SilverMedals { get; set; }
public int BronzeMedals { get; set; }
}
Step 8:
Create a ChartController in Controller folder and add following code on it.
public class ChartController: Controller {
public ActionResult Stack100() {
return View();
}
public ActionResult Read() {
List < Stack100Model>
model = GetList();
return Json(model);
}
public List < Stack100Model>
GetList() {
return new List < Stack100Model>
() {
new Stack100Model {
Year = 2001, GoldMedals = 10, SilverMedals = 8, BronzeMedals = 7
},
new Stack100Model {
Year = 2002, GoldMedals = 8, SilverMedals = 9, BronzeMedals = 5
},
new Stack100Model {
Year = 2003, GoldMedals = 5, SilverMedals = 7, BronzeMedals = 3
},
new Stack100Model {
Year = 2004, GoldMedals = 7, SilverMedals = 7, BronzeMedals = 6
},
new Stack100Model {
Year = 2005, GoldMedals = 8, SilverMedals = 2, BronzeMedals = 8
},
new Stack100Model {
Year = 2006, GoldMedals = 3, SilverMedals = 10, BronzeMedals = 2
},
new Stack100Model {
Year = 2007, GoldMedals = 5, SilverMedals = 5, BronzeMedals = 8
},
new Stack100Model {
Year = 2008, GoldMedals = 4, SilverMedals = 6, BronzeMedals = 7
},
new Stack100Model {
Year = 2009, GoldMedals = 6, SilverMedals = 4, BronzeMedals = 3
},
new Stack100Model {
Year = 2010, GoldMedals = 8, SilverMedals = 2, BronzeMedals = 8
},
};
}
}
Step 9:
Create a Chart folder under View folder and Create a Stack100.cshtml view. Put below code on that.
using Kendo.Mvc.UI
@using KendoStack100Chart.Models
@{
ViewBag.Title = "Stack100";
Layout = "~/Views/Shared/_Layout.cshtml";
}
<h2>Stack100</h2>
<div class="chart-wrapper">
@(Html.Kendo().Chart<Stack100Model>
()
.Name("stack100Chart")
.Title("")
.Legend(legend => legend
.Visible(false)
)
.SeriesDefaults(seriesDefaults =>
seriesDefaults.Bar().Stack(ChartStackType.Stack100)
)
.DataSource(ds => ds.Read(read => read.Action("Read", "Chart")))
.Series(series =>
{
series.Bar(model => model.GoldMedals).Name("Gold Medals").Color("#f3ac32");
series.Bar(model => model.SilverMedals).Name("Silver Medals").Color("#b8b8b8");
series.Bar(model => model.BronzeMedals).Name("Bronze Medals").Color("#bb6e36");
})
.CategoryAxis(axis => axis
.Categories(model => model.Year)
.MajorGridLines(lines => lines.Visible(false))
)
.ValueAxis(axis => axis
.Numeric()
.Line(line => line.Visible(false))
.MajorGridLines(lines => lines.Visible(true))
.Labels(labels => labels.Rotation("auto"))
)
.Tooltip(tooltip => tooltip
.Visible(true)
.Template("#= series.name #: #= value #")
))
</div>
As you can see in code of Stack100 view we are calling Read method of ChartController and bind data to the chart.