In this tutorial, we will check how to easily deploy the Spring Boot application in AWS EC2. Nowadays, Spring Boot and AWS have gained a lot of momentum, and a lot of projects are being deployed in AWS with the built-in framework as Spring Boot. We will today see a simple application and check the steps in detail on the configuration part so that the application got deployed smoothly.

What will we do in the hand-on section?
Spring boot project can be easily deployed in AWS using an AWS service called Elastic Beanstalk, which is a PaaS provided by AWS, which can take care of provisioning and deploying our application in AWS with a few clicks.
Today we will not go the Elastic Beanstalk path, rather we will manually deploy the application using the EC2 User data script to automate the environment setup and a few more steps.
In today’s demo, we will mainly do the following things to test our application:
- Create a Spring boot project from scratch.
- Create one sample application, this could be any application, but for simplicity, we will expose one simplest REST Api and deploy that in AWS EC2.
- Test the application locally.
- Develop the required configuration components for AWS.
- Deploy and test the application from AWS deployed URL.
Few Key Terminologies
Before we start the actual hands-on part, let’s first familiarize ourselves with the technology we will use today. Hopefully, readers who have reached this section of the article will know the terminology, there are still some bullet points about it below:
AWS
Amazon Web Service is a cloud offering from Amazon and is currently very popular. Currently, there are around 100 services available under the AWS umbrella, which covers many technical domains like IaaS, Paas, SaaS, Networking, Compute, Storage, Bigdata, Machine Learning, AI, etc. AWS currently the market leader in the cloud offering domain. And many companies are adopting AWS for cost-effectiveness and other cloud parameters like easy scalability, High Availability, and Fault Tolerance. AWS cost model is mostly paying per use, so customers have to pay only for the services they have used based on the attributes of pricing for that service.
EC2
Elastic Compute Cloud is the AWS offering for Infrastructure as service (IaaS). It provides virtual servers in the cloud, which is very cost-effective and highly customizable based on the demand.
Spring Boot
Application framework based on Spring Framework with many additional features. Currently, web development is one of the most popular frameworks for building a particular microservice.
So let’s start with the steps mentioned above.
Creating Spring boot project
Everybody doesn’t know the complex things related to the spring boot. So, as a first step, companies hire Java developers for one spring boot project, which will be deployed in AWS EC2. The easiest way to do that is to.
- Go to https://start.spring.io/, and generate one spring boot project skeleton by providing the Artifact id, Group ID, and required dependencies for our testing, we need to select web starter dependency. After entering all that information, we can generate the project using Generate Project button below.
- Once we have downloaded the project, we need to unzip that in a suitable location and import that project in eclipse or your favorite IDE as a maven project. Now try one initial mvn clean install command on that project to ensure that all the spring boot-related jars got downloaded properly.

Adding sample Rest Controller
Now we will write one simple REST endpoint for our testing. The code is simple, it is just the famous hello world, so here it is:
Test the Rest Controller in Local
Now, we need to test this Rest API to verify that everything is working as expected. To do that, run the application as a spring boot application from eclipse by running the @SpringBootApplication annotated class present in the same package, which is automatically got generated, while we created the project in the earlier step.
Once the application runs on the local machine, it will run on the 8080 port by default and access the URL below from the browser, you should get feedback if everything goes well.
http://localhost:8080/hello?msg=sajal
Create Required Configurations for AWS deployment
As we have already highlighted at the beginning, we will not use Elastic Beanstalk to deploy the application in AWS, rather we will go with the conventional way to deploy the application manually by using one script that will be provided while we create the EC2 server.
For this, I have created one script in file EC2_USER_DATA.md placed in the home directory of the attached project. Below is the content of that file. In short, it will do the following steps while creating the EC2 Server.
- Install required updates to the Ec2 operating system, so that we don’t face any OS-related issues.
- yum update -y
- Install Java 1.8 and httpd server in EC2.
- Remove old version of Java
- Create a directory in Ec2 server
- Copy the Spring boot application jar from the S3 service to a directory in the newly created EC2 server
- Give the required permission to the newly copied application file.
- Now do the necessary changes in HTTP to redirect 80 port traffic to 8080 as our actual application will run in 8080, but from EC2 we will access that from port 80 externally.
- Then start the HTTP server as a service, so that EC2 restart can again start the application automatically.
- And finally, start the spring boot as a service as well, so that while EC2 restarts, the application comes up properly.
We need to do another configuration in pom.xml to make the jar executable by adding this section in the pom.xml
Here is the user-data script. User data is the textual script provided while creating the Ec2 server so that a few things can be automated in the newly created server.
Now do the final build and Upload the file to the S3 service
Now we will deploy this application to AWS, to do that, we first need to upload the deployable artifact to S3, where the above-mentioned script will copy the jar and place it in the EC2 server.
To do that
- first build the artifact in local machine by maven command mvn clean install
- Now we need to create one bucket called springbootprojects in AWS S3 and upload the jar file generated in the target directory of the project
- Make sure you create the bucket in ap-south-1 region in S3, as our user data script is written, as per that only, if you create it in a different region. Then please change the region in the User data script, otherwise, Ec2 will not be able to copy the file.
- Here is the guideline on how to create and upload files in AWS S3. https://docs.aws.amazon.com/AmazonS3/latest/user-guide/upload-objects.html
Create EC2 role for S3
Now we need to create an IAM role for S3, which we need to assign to the Ec2 server to access the S3 bucket we created earlier. It will enable the Ec2 server user data script to copy the application executable jar file to the EC2 directory for deployment. I am not mentioning it in detail AWS has good documentation please follow and create once EC2 role for S3 read-only access.
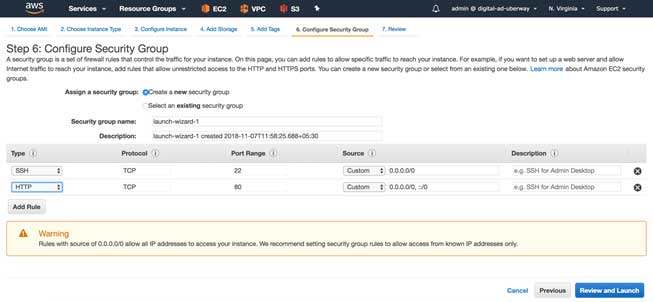
Create one Security Group for accessing the Application from outside AWS
The next prerequisite step is to open port 80 to the outside world. It is a kind of standard firewall open in networking terminology. In AWS, this can be achieved by creating/modifying one Security Group and assign to the EC2 instance. In the security group, we should only expose the required ports to the outside world for security reasons. For our scenario, we will only expose 80 and 22 for HTTP access and TCP access so that log in to the Ec2 instance through the terminal. And also access the web application from browser/REST client/another, outside client application.
AWS has good documentation as well on how to create a security group you can follow the below links or any other links that are available online.
https://docs.aws.amazon.com/vpc/latest/userguide/VPC_SecurityGroups.html
https://aws.amazon.com/premiumsupport/knowledge-center/connect-http-https-ec2/
ALSO READ
EC2 instance and deploy the application
Now we have completed the required prerequisite like unloading the jar file in S3 and creating a security group to open the port for access application, and finally the Ec2 role for S3 access.
Now we need to create one EC2 instance and deploy the application. To create an EC2 instance we need to do the below steps:
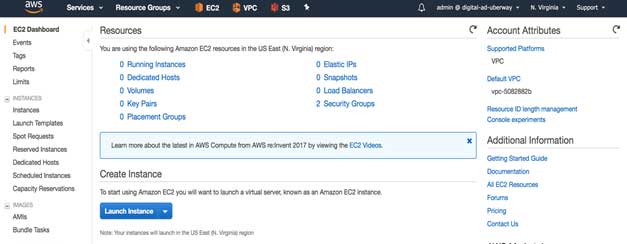
Login to AWS console and select EC2 service
Now create Launch Instance button from the EC2 landing page
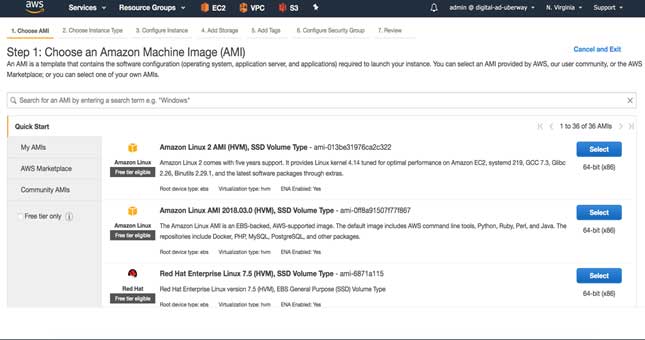
Then select the AMI and go to the next page
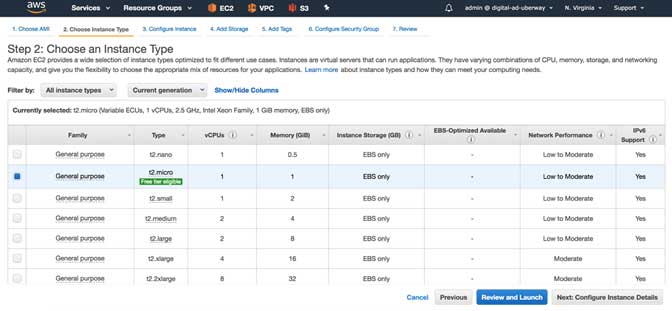
Now select the instance type (Choose only the free tire eligible, else charges will apply)
Now in the instance details page, we need to select two important things, rest of the things you can keep as default like VPC, subnet, etc.
On this page, first select the IAM role that we have created earlier, in my case, I named that role as AmazonS3FullAccess
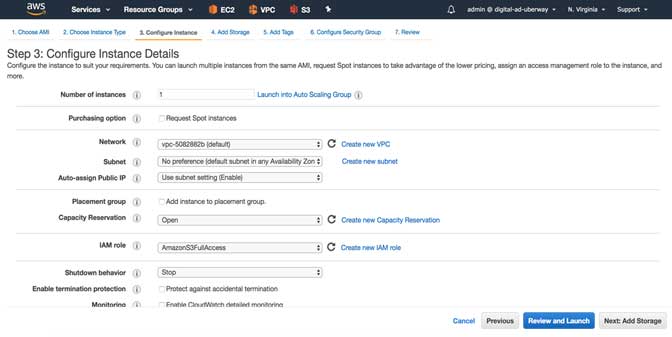
Then we need to paste the USER DATA into the Advance Details section. You can copy the whole code as motioned above/attached code base.
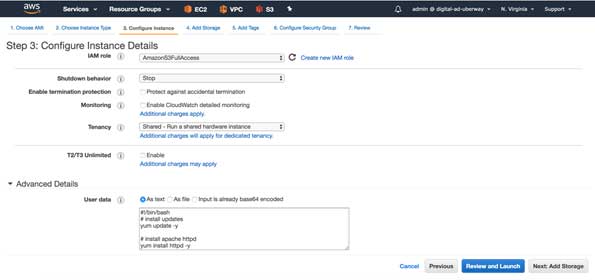
Now choose/edit the security group to allow HTTP traffic to port 80
Finally, choose one key pair and finish the instance creation step by clicking the Launch Instance button

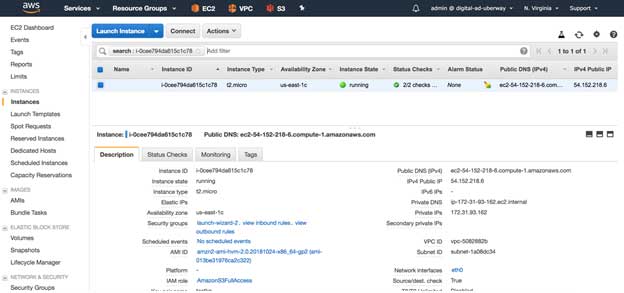
Now go back to the EC2 landing page, and you will see an instance is being launched. Wait till the instance state is running and all status checks are completed. You can see those on the EC2 page itself
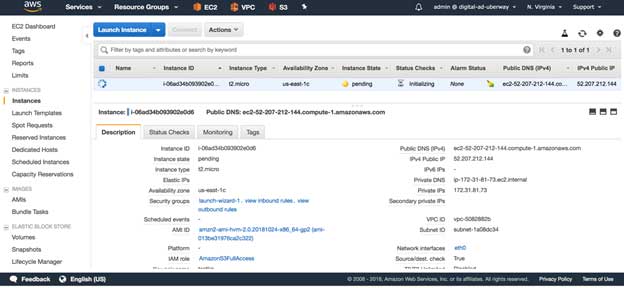
Now note down the public DNS/IP address from the instance description tab of the same page, we will use this DNS/IP to access the application
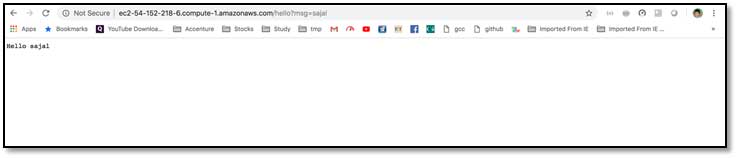
Access the application deployed in AWS
As we had noted the IP/DNS of the server where the application has been deployed, we can easily access the application with this IP/DNS.
How to modernize a Java Spring application, refactor to #microservices on AWS using EC2 Container Service: https://t.co/9dLjP1unMQ pic.twitter.com/J8mpZAttcD
— Nathan Peck (@nathankpeck) July 11, 2017
Final Note
Congratulations, if everything goes well, you have now developed one sample spring boot REST web service, deployed it in a single EC2 instance, and can access that application from outside AWS. It is one way of deploying an application to EC2, there are other ways as well, which we will see in the next articles.


