
Now, I am going to explain how we can use Spring Cloud Bus to apply configuration changes dynamically to applications while they are up and running. I believe you will be aware of Spring cloud Config which serves sets of configuration information. The configuration file themselves can be backed by source control. Spring cloud clients connect to it automatically over HTTP and retrieve the configuration settings at the start-up time.
But what if we have a configuration change that we need to make after an application has already been running. What if we want to increase the size of our DB connection pool or increase metaspace memory or change the Logging level? The traditional approach is to repeat the Spring startup process. The solution to this problem can be “Polling”. In this Polling, our apps will periodically pull the Config server or some other source for changes. But for configuration changes, if it has to pull every time then it is not a good idea because the config changes are rare.
A cleaner approach is to be to somehow push the changes out from the server to the client. And this is exactly the space that Spring cloud bus addresses.
Anatomy of Spring Cloud Bus Configurations & Dependencies
Spring cloud bus is used to push configuration changes from the config server to the client applications using “Messaging Technology”. Spring cloud bus is a solution that enables a Spring Cloud Config Server to broadcast changes to spring cloud clients. So, it eliminates any need for clients to poll the service periodically. It is based on messaging technology.
The spring cloud config server publishes messages to the message broker and the client becomes the subscribers to the changes.
Spring Cloud Bus Setup:
Setting up the Spring cloud bus is easy. You have to add the below dependency to your Spring Cloud config server’s pom file.

On the client-side, you have to add the same dependency. The code on the dependency is smart enough to understand that if it is on the client-side or the server-side and it works fine. Now, this presumes that your client is otherwise unable to use the spring cloud parent.
The next step is we need an AMQP(Advanced Message Queuing Protocol) server ( Such as Rabbit MQ) to provide reliable messaging. Rabbit MQ is a nice Message broker which is open source and easy to install and run. Spring Cloud Bus works automatically with Rabbit MQ on the localhost. So, this means Spring cloud bus enabled client and server will know automatically how to connect to Rabbit MQ.
Broadcasting Changes:
So, when we have to make changes to our running application, we have to do the following things:
First, we have to make changes to the relevant files in the repository.
Now, when we commit the changes, there is nothing in the config server that notices these changes. It does not do any polling or listening to the repository. But, if we were to make a rest call to the config server, it would reread our file and pick up those changes.
Next, we would do is that we will make a POST call to the “/bus/refresh/” endpoint on the config server. Notice that this is a post request. So, we have to use curl or some type of rest client.
When the refresh is requested, the config server is going to refresh, and it is going to post a message to the message broker. The message broker ensures a delivery to all the subscribers which is all of our clients that have the spring-cloud-bus dependency. There are ways to fine-tune which clients get what.
Then finally each Java application development goes through its refresh process. And now I am going to explain more details about this Refresh Process.
How Refresh Process Works Exactly?
Spring boot applications can be refreshed at runtime. Spring boot contains a starter called “actuator” and this provides several useful web endpoints. The actuator provides an endpoint that we can use for a health check. When we have an actuator on our classpath, we also have a refresh endpoint. Now, if we have to make a POST call to this refresh endpoint then this would be interpreted as a command to refresh the application. We can use Curl or RestTemplate for this.
Our application might be up and running and processing hundreds of HTTP requests with many database connections, but the Refresh only affects the Beans that are marked with “@ConfigurationProperties” or “@RefreshScope”. The only other thing that is affected is the logging level. This is because logging level is something that we could change fairly often in production and there are no consequences for changing this on the fly.
Now, I am explaining to you about these other two annotations “@ConfigurationProperties” and “@RefreshScope”
@ConfigurationProperties Example
This annotation is not new, but it comes to us from spring boot. It is an easy way to set multiple properties quickly instead of putting the value annotations on each one. So, if we have a dozen variables to set using “@Value” annotation, this can get old and fast.
So, instead, if we annotate the entire class with “@ConfigurationProperties” annotation and supply a prefix and provide a setter method, then Spring boot at startup time, automatically populate these properties with corresponding values from the property source that match the prefix and name of the property. Please see the example code below:
In our YAML file, there will be a section that will match the prefix that we are using here in the above code. Also, it will match the properties line up what we need to set. Extra properties would be ignored and anything without the setter method would be ignored. YAML file will look like as below:

You can see that the spelling of the “name” in the above YAML file is not matching with the properties that we have set in the code (name). This is ok. This is called “Relax Binding”. Spring boot understands what we mean here. Camel's case will also be ok, and all caps letters would also match this property without any issue.
Now, if we do a POST call to “/refresh” URL, then any beans with @ConfigurationProperties properties will have their properties rebound. But still, there is a limitation here. It is not enough just to reset those properties. But instead, we might have some initialization logic that needs to be rerun. Now, for our “ProfileController” example here, rebinding the properties is completely fine. Because the property is just used in the controller. Now, something new got introduced in spring cloud but not in spring boot is “Refresh scope”.
@RefreshScope Example
RefreshScope gives us the ability to safely incompletely reload the bean without having to worry about the effect that it will have on the other beans that are presently referencing. Refresh scope allows for hot-swapping of old and new copies of the bean at runtime. So, when we make a POST call to refresh, the entire bean is reloaded. It is not limited to property rebinding like the case of @ConfigurationProperties. Now it is reloaded in a Safeway. Please see below the snippet of code:
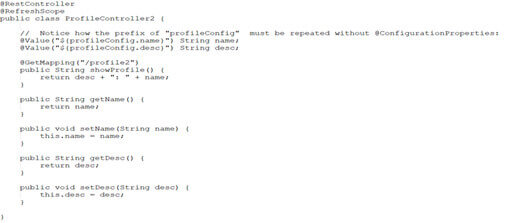
The side effect of the refresh scope is that the bean becomes lazy meaning that it is not reloaded until the first time that it is used. This is ok but any configuration issues or any post construct issues will not be discovered until the first time the bean is used. Now, you can see from the above code that our bean uses @RefreshScope. You can also see that I can revert to the “@Value” annotation. We can use also @ConfigurationProperties with @RefreshScope. With the @Value annotation, I do not need getters and Setters methods, but I will lose here the “Relax Property Binding” that is provided by Spring boot.
Refresh scope works by using the Proxy pattern and it is one of the useful use cases for the Proxy pattern. When the application context loads, Spring creates a proxy for the actual target bean. The proxy either implements the same interface as the target bean or it extends it depending upon whether an interface is present on a target Bean. It has the same method signature as the Target Bean.
The main point is that the proxy looks exactly like the Target Bean to anyone referencing it from outside. Now when we do dependency injection, other beans do not get the original bean but then get a reference to the Proxy. When the caller makes a method call, the proxy simply turns around and calls a method on the original bean.
Now on refresh what happens is a new replacement bean is created and the target reference on the proxy is switched to the replacement. That means on refresh, the “target” bean is changed to the newly created bean. Older bean is dereferenced. Any calls to the original bean that are currently executing are unaffected. But any future calls to the method will go to the new bean. Please look at the below diagram for a better understanding:
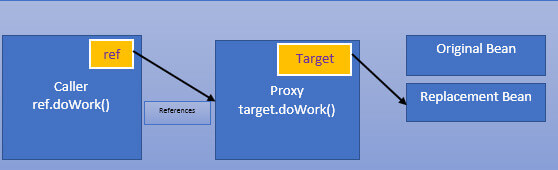
So, the beauty of the refresh scope is that the proxy makes it safe for the existing threads to finish up whatever they are working on while the future gets switched over to the new version.
Now, we will implement this in our example demo. I am going to setup our spring cloud config server to use the Spring cloud bus and also I am going to setup Rabbit MQ.
Demo on Spring Cloud Bus:
Setup the Message Broker:
1. First, we have to setup our Rabbit MQ broker. You can download it from internet.
2. Start the Rabbit MQ and leave it in the running state.
Setup the Server Application:
3. Create a Simple Spring boot server application called “demo-config-server” and in the POM file of the application, you have to add the “spring-cloud-starter-bus-amqp” dependency to include the cloud bus. Example:

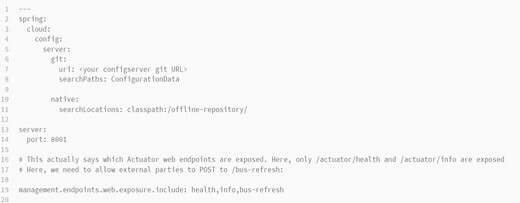
4. Now, go to your “application.yml” file and edit the file with your config server git URL. I have set the “server.port” to 8001. In this application YAML file, the spring cloud config server is using a git URI so that it will go out to GitHub to obtain the config. Information. When the Native profile is active, then "native" is used for local testing with a classpath repository. Also, we have to add the entry for “management.endpoints.web.exposure.include: bus-refresh”. This permits external parties’ POST requests to trigger the refresh.
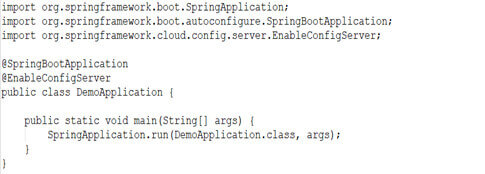
5. Then you have to create your main application configuration class with “@EnableConfigServer” annotation. Example:
6. Now, save all your changes and run the demo-config-server application.
Setup the Client Application:
7. Create a Simple Spring boot server application called “demo-client-app” and in the POM file of the application, you have to add the “spring-cloud-starter-bus-amqp” dependency to include the cloud bus.
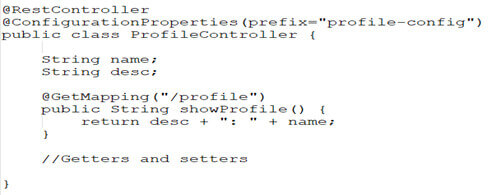
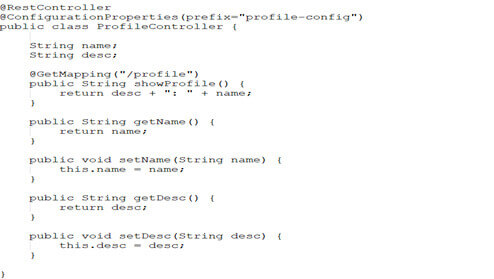
8. Now, create a Rest Controller class called “ProfileController.java” and add a @ConfigurationProperties annotation with a prefix of “profile-config”. I have created two fields (desc and name for profile) and also added the getter/setter Method for those values. Example:
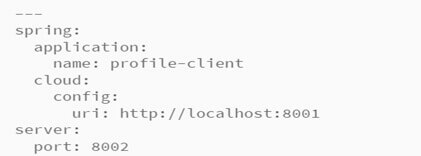
9. Create your bootstrap.yml. I have given the application name “profile-client”. Now, I will mention the file i.e. required in our Git repository to hold properties for this application. Example:
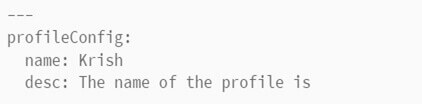
10. Now, in your Git repository, create a profile-client.yml file. Then add a level for “profileConfig:” and entries within it for “name:” and “desc:” Add a value for name, something like “Rakesh” or “Harsh” or “Krish”. For “desc”, you have to add a value such as “The name of the profile is”. Now, save your files and issue the commit command to the repository. Example:
11. Now, start your “demo-client-app” n that we just created above. (You have to create the Main application main class to run the spring boot application. I have skipped that as that is a very common and basic step for every application.)
Test our application:
12. Open any browser and access the URL to “http://localhost:8002/profile”. Then You should see output such as “The name of the profile is: Krish”.
Testing Configuration Changes
13. Now, again we will go to your Git repository and modify our profile-client.yml file. I am modifying the “name: Krish” to some other values(“name: Ayush”). Save the file and commit. The interesting thing is Will this new change that I did now will be visible if I refresh this URL “http://localhost:8002/profile“? Why our changes will not reflect?
14. Now, I will have to make a POST request to “http://localhost:8001/actuator/bus-refresh”. You can do post requests using a “curl” command in Linux (curl --request POST
15. Then after step 14, we have to refresh this URL http://localhost:8002/profile”. Now our new changes should be visible. This is due to the Spring Cloud Bus.
Implementation of @RefreshScope
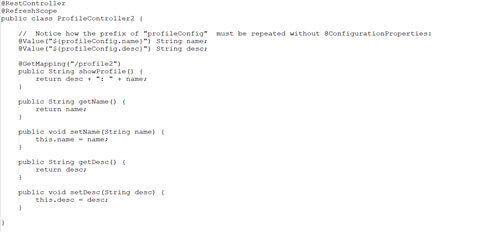
16. Let’s create another controller class called (ProfileController2.java) inside of our demo-client-app project. Add the @RefreshScope annotation to the controller class. Example:
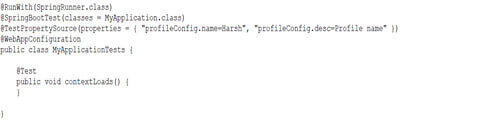
17. Now, you can test this refresh scope by writing a Junit class using @SpringBootTest annotation. And you can pass the “name” and “desc” property using @TestPropertySource annotation. Example:
18. Now, you can open a browser and verify our application by accessing the URL http://localhost:8002/profile. You can keep on changing the value of name and desc properties through your JUnit class and then access the URL and verify if your changes reflect or not. This will work with the Refresh scope.
API Gateway: Spring Cloud
I am going to explain to you about the API Gateway and Spring Cloud Zuul and show you how it can be used to easily implement basic routing.
The need for an API Gateway:
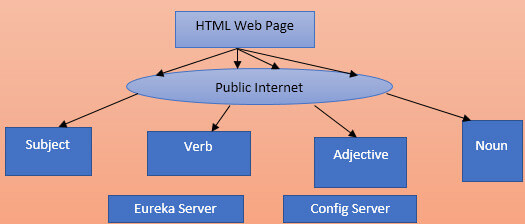
Let’s assume about the applications that we have implemented will look like the below structure:
We have introduced lots of concepts like Eureka and Config server to help services find each other, configure themselves, update themselves and call each other. This works fine with the assumption that our network is high speed and secure and that bandwidth is unlimited, and latency is zero. But always you cannot assume a fast-secure network. So, we have to make some improvements.
In the above diagram, our services are being called over the public internet. There can be several concerns. First, we are exposing our internal API over the public internet and we do not want to do this. So, we will have to add security but that will mean our clients which is a web page (in my example) will have to authenticate with five different servers and we have cross-origin resource sharing issues which we must address. This is because all browsers will have a built-in security precaution that disallows JavaScript calls to domains other than the one from which they are originated. So, we can get around this CORS issue.
Another fundamental issue is that multiple HTTP calls are made to get each sentence in the above example diagram. The client needs to get the response back in a jiffy.
We could have a dissimilar client having different needs. What if some of the services are not relevant for some of the clients. The issue here is that the Microservice is built to be focused and simple, but the clients have specific needs to assemble the content or use the services in the ways that our services should not have to concern themselves with. We need something in between like an Adapter. So that can serve the clients directly by taking care of the various backend calls on their behalf. This is exactly where the “API Gateway” fits in.
API Gateway Fundamentals
An API Gateway provides a server-side backend i.e. custom-made for the needs of the client applications. It simplifies their access needs by providing a single point of contact for calling into the backend Microservice. It provides an API customized specifically for what the client needs. It provides a single place in the architecture where the security can be applied at least for authentication purposes. It eliminates the CORS issues because we have only one domain on the backend as far as the client is concerned.
Also, we can reduce the number of trips to the backend if we have the gateway consolidate several individual backend calls into one call. We can implement the caching in the API gateway. We can one Gateway or more than one also depending on the client's needs. If clients are identical then one gateway would be fine.
So, the API gateway is built to address the remote client needs. It is a one-stop-shop for the client to access. It serves as a façade to the real API. API gateway lives on the server-side. It reduces the number of remote calls. API gateway routes the call to the real backend services, and it handles security and caching. Also, an API gateway can handle protocol translation. This means that Microservice might be set up to work with messaging protocols or TCP or some other protocols other than HTTP.
The API Gateway would take care of taking the client's HTTP request, putting it into a message and waiting for a reply message and returning a response. The client application does not need to deal with any of the messaging APIs. The API Gateway can also optimize calls to the backend API by expanding the hyperlinks found within restful resources.
So, the API Gateway is a key piece to the Microservices Architecture at least from the client’s perspective. Now, I am going to explain to you the options for implementing the API Gateway. We can use Zuul from Netflix to implement the API gateway in our application. Spring cloud provides an easy way to use Zuul.
Zuul can serve as a router and a load balancer. The routing is going to easily take care of some of our API Gateway needs. Routing means a client can make a request that goes to the API gateway. And Gateway will immediately send that request to the real server that is responsible for it. This is also known as a reverse proxy as we are proxy and calls to various backend services.
ZUUL Basic usage:
It is easy to make our own Zuul server. Just we have to make a spring boot application with “spring-cloud-starter-zuul”. All needed dependencies will be brought in including Ribbon and Hystrix circuit breaker. We only need one annotation to switch the Zuul on. This annotation is “@EnableZuulProxy”. The default behavior is that it registers itself with Eureka along with all of the other clients which of course implies that it is configured with the URL to Eureka. And it also collects all the client ids reported by Eureka. The client ids are used to build URIs to the actual backend services.
So, in our example, Zuul would collect the service IDs and find one called “Subject”. It would then find a URL mapping to “/subject” that would call the subject service. The verb service(“/verb”) would be encountered and it would set up a URL mapping to the “verb” service and any traffic sent to those URL mappings would be immediately routed to real service. Since “Gribben” is involved here, the calls are automatically loaded balanced whenever there is more than one backend service available for a given type. And also, above that, since Hystrix is also involved, so each call is made within a Hystrix command and so we get simple circuit breaker behavior.
When we start up a Zuul proxy server and you can take a look at the below image closely.
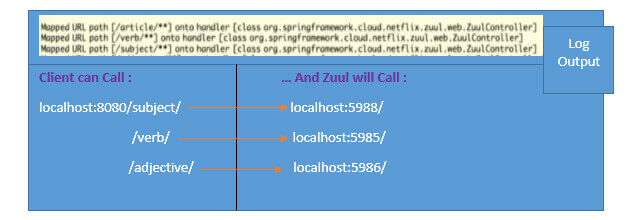
You can see what it is doing behind the scenes. After it registers with Eureka and learns all of the client names, it defines Spring MVC handler mappings. See the above image. What it is saying is that the URL pattern for the “/article/**” and “/verb/**” and the others are mapped to a special controller called the “ZuulController”. This controller is provided by the framework and the logic within it simply turns around and around and calls the actual Eureka identified servers.
Now assuming that the Zuul proxy server is running on localhost 8080, a request for “/subject” would be routed to wherever the subject server service is running. Then now how the Zuul proxy server knows where the subject server is running? It finds that from Eureka.
Zuul Features:
Zuul proxy that wraps client calls to the actual backend services. We can also exclude services as we might not want to expose all services known to Eureka. By default, all Eureka services are available for routing. Simply list out which services you want to ignore, and they will be blacklisted.
You can backlist everything by setting “zuul.ignored-services = *”. And then you can explicitly whitelist the Eureka client IDs that you want to provide routing to. You can also provide a prefix using “zuul.prefix”. This is a good way to distinguish backend services from any others defined explicitly by the Gateway itself. Also, you can adjust the URL. Please see the sample YAML file:
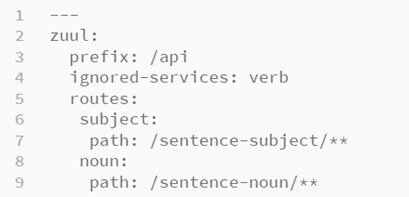
In the above YAML file, I have added the “/API” prefix and told Zuul that calls to the “verb” service should not be forwarded. Also, the URL pattern to access the Subject and Noun Services should be altered from the default to be “/sentence-subject/**” and “/sentence-noun/**” respectively.
Conclusion
Here, the Java application development services provider has explained to you the real-time implementations of the spring cloud bus with Eureka and the config server. If you are not familiar with Eureka and Config Server, please read our dedicated blog on Eureka and Config Server. Try to implement yourself as the API gateway in your project. You can also read our more advanced blogs to learn about the implementation of the Spring API Gateway.
References
- https://cloud.spring.io/spring-cloud-bus/reference/html/
- https://spring.io/projects/spring-cloud-gateway


