Hello Friends, This blog aims to solve the problem new developers face when they are customizing the Magento frontend. Magento 2 javascript libraries are pretty heavy as the number of files has increased a lot than in Magento 1. Earlier it was only "Prototype JS" and you could add jQuery to Magento to modify the DOM.
Now Magento Web Development Company is using a framework for loading several javascript libraries. This is called "RequireJS", it is both good and bad.

Good because Jquery and many more libraries are already there and it is easy to include in your "phtml" files. But it is a little more complex as we have "KnockOut JS" (KO for short).
This is the funny part, Magento 2 uses knockout but it has its version of ko which is customized only for Magento. So there is not very good documentation around it. But at the end of the day ko is nothing but javascript. And if you can spend time with it, it is not that difficult.
Now coming to the point, how can we override html and js in Magento 2 to customize it or build new themes? We will explore this by creating a new module.
Let call this module "ModuleOne"
And the first step would be to create the registration.php file. So open your editor of choice and create this file in the Company_ModuleOne directory inside the app/code directory. The contents of this file are below:
\Magento\Framework\Component\ComponentRegistrar::register(\Magento\Framework\Component\ComponentRegistrar::MODULE,'Pravams_ModuleOne',__DIR__);
Now we can create module.xml in etc folder with the below contents.
Now we have our module registered so we are free to run magento setup:upgrade command. This will list our module in Magento 2
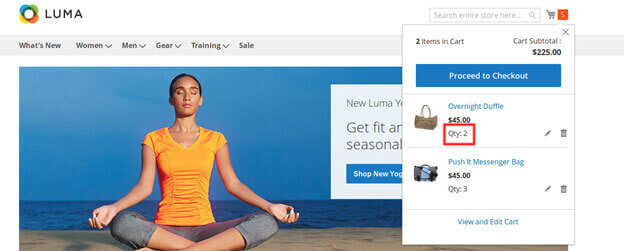
Now for this blog, we are taking a very simple example of customizing the Magento top menu "minicart" block. We will see that it has a qty input field, where we can change the qty and update it. To show the override feature, we will show the qty as plain text, and display the input field when we click on it. So to implement this feature we would need both html and js changes.
Please note that we are not covering CSS here, as it is a big topic in itself and will be covered in the next article. So first we will see the screenshot of what we are trying to do. Check the below screenshot where the qty input field is in a red box, we want to hide that box and show plain qty.
So the code for rendering the qty is in vendor/magento/module-checkout/view/frontend/web/template/minicart/item/default.html on line 74. Change the display to none with the below code.
Please note that the line numbers may differ. At the end of this blog, I will share the complete code for this article.
Now we will copy this file to app/code/Pravams/ModuleOne/view/frontend/web/template/minicart/item/default.htmlAnd then add the below code below line 82, add a "span"
Here we have attributed to the span tied with data-bind. The first one is "id" which is the element id, then we have the "data-cart-item" this is set to be the cart item id, which is unique for every cart item. After that, we have "text" which is set to qty variable that is how we are getting the qty value in the span text. This will add a span next to "Qty". Now Magento does not know that you have customized this file. For that requireJS comes to help.
Create requirejs-config.js in app/code/Pravams/ModuleOne/view/frontend/requirejs-config.js and below code
Here first we tell the file from Magento which is to be overridden then ":" and then the updated file from your module.
Now clear your cache with these commands Magento cache: clean and Magento cache: flush
We should see the change when we refresh the page. If not, you can try Magento setup: upgrade. The best part about this command is that not only does it register the module, it will also clear the pub folder for you.
If you can see the qty plain text, the override has worked for you. The next step would be to add a click event to this text and show the input field. And when the user updates the qty and clicks on the "Update" button. It updates the qty using ajax.
The span we have created has to be declared in the vendor/magento/module-checkout/view/frontend/web/js/view/minicart.js so we can add a click event to it. To override this file copy it to app/code/Pravams/ModuleOne/view/frontend/web/js/view/minicart.js. Now online 67, there is an item object with qty and button as its properties. We will add span here with the below code.
'span':'span.cart-item-qty-span'
ALSO READ
Note that "cart-item-qty-span" is the name of the span class we created in the html file.
Also the requirejs config has to be updated with one more entry with below code
'Magento_Checkout/js/view/minicart':'Pravams_ModuleOne/js/view/minicart',
Please note that for JS override there is no ".js" in the end like it is in html file
The next step would be to add the click event code. For the minicart, all such events are in vendor/magento/module-checkout/view/frontend/web/js/sidebar.js. So let’s copy this file to app/code/Pravams/ModuleOne/view/frontend/web/js/sidebar.js. And add another js entry in requirejs config like below.
'Magento_Checkout/js/sidebar': 'Pravams_ModuleOne/js/sidebar'
I did the same thing, but guess what Magento did not respect this override :). So it took me another couple of hours to figure out that this was because sidebar js was renamed by Magento in another requirejs config file vendor/magento/module-checkout/view/frontend/requirejs-config.js
sidebar: 'Magento_Checkout/js/sidebar',
So we update our requirejs config by respecting this change from Magento again, like below
'sidebar': 'Pravams_ModuleOne/js/sidebar'
This should make things clear how overriding js works in Magento. Now in sidebar.js, we want to add our click event. So in _initContent(), we have all those events. At the end of this function, we will add our function below.
"this.options.item.span" refers to that span we created through minicart.js. "$(event.target)" will give us the cart item id. By using this id we set the display of the span and input fields accordingly.
So now after refreshing the page, we should have the ability to inline edit the qty from the minicart with our custom modifications.


