We already have discussed an Azure API integration on a previous blog. This blog will guide you to Azure API with policy parsing capabilities. But before that: to give you a recap:
Azure API: a recap
Azure APIs is a stub of reliable connecters to any external world that can let you connect your application to talk to any 3rd party appliance. Azure API in itself is a huge sea of possibilities:
- a. letting you parse a web request using its rich NEWTON-SOFT based policies
- b. letting you further call a function app
- c. letting you further call a logic app
- d. letting you further call another openApi/SOAP based web service
The most appreciative features of Azure API are:
- a. high availability: owing to being an integral part of MS Azure offering, Azure APIs can offer you an undisrupted service
-
b. flexible payment options like
- i. Developer/no SLA: choose this option as long as you are in a developer/preproduction environment
- ii. Basic: 99.9 SLA %
- iii. Standard: 99.99 SLA %
- iv. Premium: 99.95 % SLA
- v. Consumption: 99.9 SLA %
-
c. Security: You can implement various security models like
- i. Bearer token based(oAuth2.0)
- ii. OCP-APIM subscription key based
- iii. Also custom security in the APIM policy itself
- d. Role based accesses: when I request for a product based API → /home/products, only the products based details would be shown. But when I request/home/HR, only human resource based operations would be shown. Access Control (IAM) is a smart way to leverage the capability of role assignments to API.
- e. Enable change logs to trace out versioning and editions
- f. Enable Metrics and activities to understand all the activities that your API participates (the calls made to your API, the administrative services that were carried onto your API, etc.)
- g. Certificates: you can install certificates into your API so as to make it to access a restricted URL seamlessly
-
h. Virtual network management: you can setup your own virtual network using your API management:
- i. External: selecting your VNET and subnets
- ii. Internal: selecting your VNET and subnets
- i. Adding a LOCK and thereby sanctioning a ‘resource group’ and subscription only to access it.
- j. Managed identities: a system managed identity enables Azure resources to authenticate to cloud services without storing credentials in code
- k. You can simply scale up and control your pricing by visiting ‘Scale and pricing’ tab.
- l. Identities: they let you manage authentication methods for users of the developer portal. By default, API management requires a username and password authentication, but you can also configure online identity providers like AAD or AAD B2C.
-
m. Support + troubleshooting:
- i. Health history tells you if your API is running as expected by analysing your resources
- ii. New support request: you can upfront raise a ticket by providing your issue details like(basics, solution, details, etc.)
The API operation circuitry

Creating an Azure API
Create a new Azure API
Browsing down to Azure portal → API management → you can reach out to the API management corner of the portal→ create new:
- Name: give a proper name(without beginning with _ sign)
- Subscription: select a proper subscription
- Resource group: ideally a resource group is what which lets you keep all the similar resources together under one umbrella for all related payments.
- Location: choose where would you like to use the GEO of your service provider.
- Administrator Email: This is by default the same email of your organization/email Id with which you have logged on.
Click create to continue. It takes around 15 minutes to deploy and make the API up and running.
Create a service operation
You can now create An API operation from a host of available options:
- Blank API → create an empty API and then keep on adding your crops as per your needs
- OpenAPI→ Standard, language-independent interface to rest {API}
- WADL → standard XML representation of your RESTful API
- WSDL → standard XML representation your SOAP API
- Logic App → you can invoke an already created logic app as a API URL as scalable hybrid integration and workflows
- App service → API hosted on App service
- Function App →serverless, event driven utility on App service
For our example purpose, let us create a Blank API
- Display name: give a suitable name here(avoid using an _ sign)
- Name: by default this is same as Display name
- Web service URL: this is by default the backend service that you will be redirecting. Or else you can create this as empty.
- API URL Suffix: this should be the subdirectory that will be created and exposed.
Click ‘Create’ to validate/finish.
Settings
You can validate various information provided in the previous step
- Display name: described above
- Name: described above
- Description: you can optionally provide a description as to what your API is actually doing
- Web service URL: this is the backend URL you are connected to
- URL scheme: specify here if your API is leveraging HTTP or HTTPS or both
- API URL suffix: described above
- Tags: you can class all your APIs under one hood of a tag for easier searching and references
- Product: give it Unlimited so as not to limit the API calls
- Gateways: this is by default saved as Managed
-
Subscription:
- If you mark this as subscription required then mandatorily you need to provide a
- Header name: this is how the calling party needs to provide the ‘OCP-apim-subscription-key’
- Query parameter name: you can give a custom name to query parameter name
Security:
You can optionally set up an oAuth2.0 security. Selecting this option, the system will ask the oAuth 2.0 server(you can set this in the oAuth2.0 tab of the Azure API)
Policies
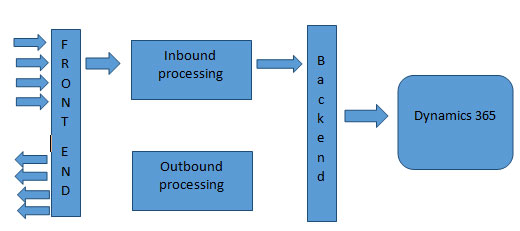
Policies are a collection of statements that let you control the demeanor of the API through configuration: either run time or design time. To see/edit the policies, you need to click on the box named: base from either inbound/outbound/backend processing.
Examples:
We have a requirement to pursue an incoming JSON payload that contains an ‘URL’ node. Consider an example like this:
For that, you can declare a variable called msg URL and then store the value of the parsed message in it. Browse down at the inbound section of the URL:
Visiting another URL: suppose we need to visit another URL as a part of the process. Several websites do that, eg: to obtain a token, cascaded calls → one API calling another API. And you need to pass on a payload as a body when making the request. The following example gives you an idea whereby you can set a variable URL on a call( for example the URL obtained from the above example):
Alternately you can specify an authentication thumbprint as:
<authentication-certificate-thumbprint = “****THUMBPRINT_VALUE***” /> this value you can obtain by uploading a CERT file in the azure API → CA certificates section. These kinds of activity is more applicable for visiting APIs that do not allow open/direct calls.
POST calls: you can also make a post-call to another API and analyze a response:
Analysing the response:
Difference between Send-Request and send-oneway-request:
A Send-request is an asynchronous call to an end URL, letting you receive a response and analyze it for further use. A one-way request is more like an asynchronous call with no return response.
Conclusion:
Azure API is a vast ocean of opportunities letting you connect to any dynamics 365 for finance and operations third-party services. Please consider the following points while using Azure API.
- If you want to use a third party connecter that uses a real-time integration, Azure API is the best option.
- If you want to use a low volume- low frequency connectivity even then also Azure APIs are a good solution.
- If you wish to use a high volume, high frequency – then unfortunately Azure APIs are not a good solution. In all such cases, it's better to use azure storage which could be read by a Dynamics 365 for finance and operations batch class.
Recent Blogs
Categories


