Sometimes we may have a requirement where we do not want to delete the inactive activity. So, to do that, we need to show/hide the ribbon button based on status value. Here you can see in a dynamics CRM community we have a very similar requirement: click here
As per the requirement, we need to hide the entire delete button for inactive activity type entity records. But unfortunately, we cannot do this by customizing only one entity. However, the question is clear because we can see all the activity type records in the same grid and open each activity type record from the navigation. But you may have noticed that when you navigate or click on each activity type entity it basically renders the ribbon of that particular entity.
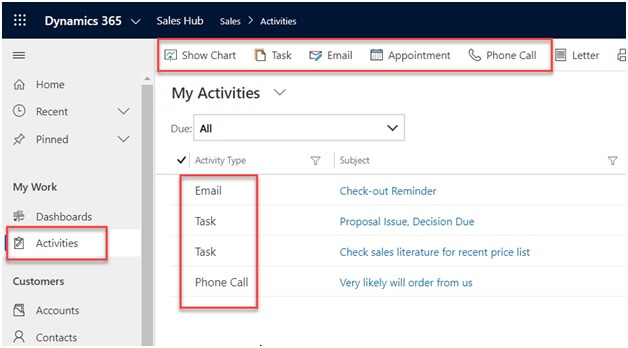
Email, appointment, phone call, etc. all are activity types of entity and they have different ribbons and not the same common activity ribbon. In the screenshot below you can get a clear picture of what the activity type is.
Therefore, hiding the delete button in the activity entity will not work for you. To hide the button you need to customize each activity type entity ribbon, hiding the activity type entity ribbon button is similar to the hidden button using the ribbon workbench depending on the position of any other entity.
In this article, I will take the Email entity and hide the delete button in the form.
When the state code has a “completed” status. So, to do that we need to understand what the state codes available in an entity. Here you can see, that we have the state code is equal to 1 for all completed emails with the status reason like Completed, Sent, Received, etc. So, I will hide the delete button and email record state code = 1.
| E-mail (email) | |
|---|---|
| Status (statecode) | Associated Status Reason (statuscode) |
| 0 Open | 1 Draft |
| 8 Failed | |
| 1 Completed | 2 Completed |
| 3 Sent | |
| 4 Received | |
| 6 Pending Send | |
| 7 Sending | |
| 2 Canceled | 5 Canceled |
Let’s Start How to Hide Delete Button Only For Completed Email Record Form
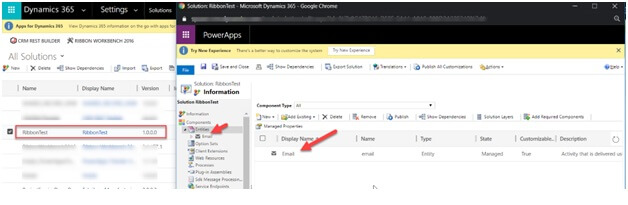
We will use the Ribbon workbench display rule with the steps value rule here in this scenario, and this is a no-code solution. Here I have created a solution and that solution includes an email entity. Take a look at the screenshot below.
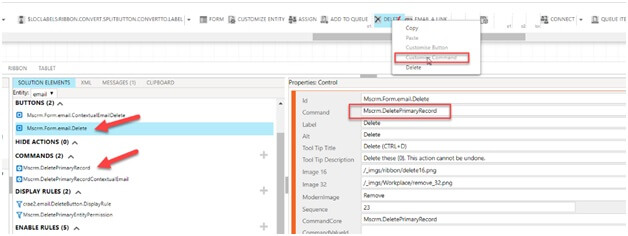
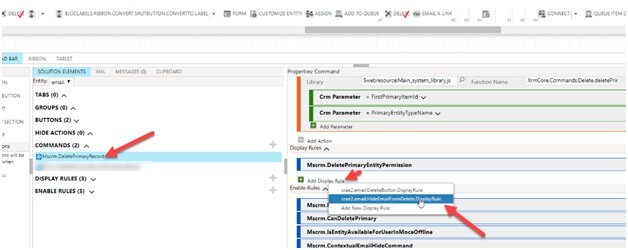
Now open the solution using Ribbon Workbench. Once you open the Ribbon workbench, find the delete button in the form area. Be careful you can find two buttons, so here is the button where you need to include the value rule.
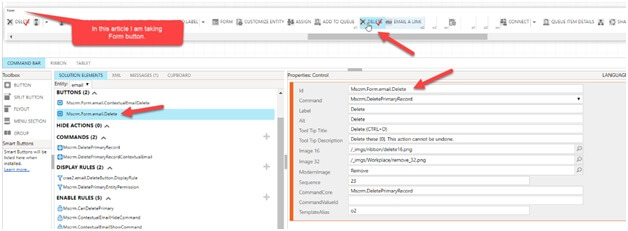
As you know, this is a powered OOTB button, so you need to first click on the “Customize button” in the screenshot below, and then right-click on the button again and click on the “Customize command” to modify the ribbon.
In the next steps, we will add the display rule by right-clicking on the display rule header.
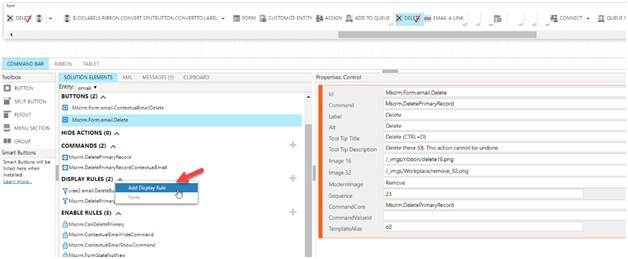
You will find in the right section of the screenshot, give a nice name.
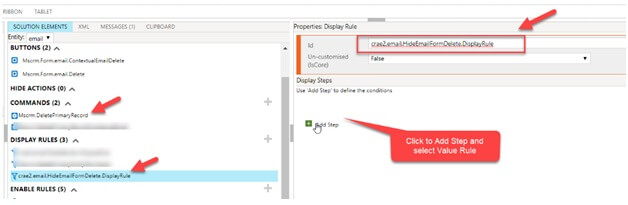
Click on “Add Steps” to add the Value Rule.
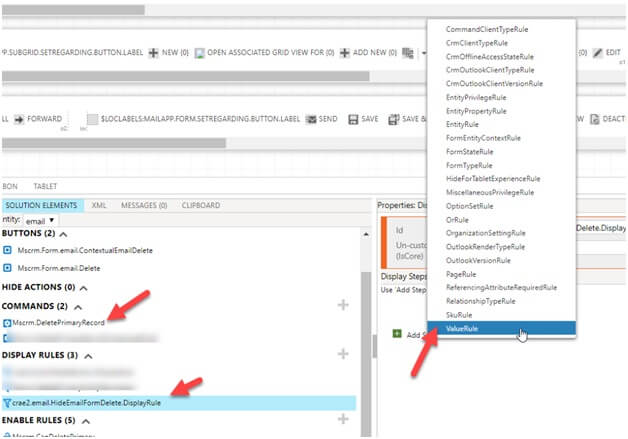
Here in the below screenshot, you can see the value Rule section, you will find 4 options there, we need to understand first which options are for what.
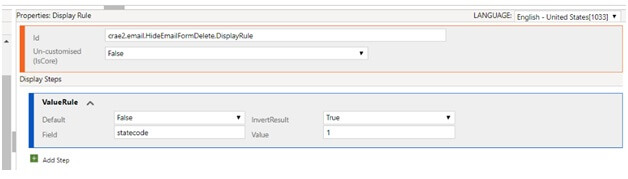
Default:
These options talk about what will the default behavior for this particular rule, for example, if we want to hide the button, we have to select false otherwise true.
InvertResult:
I think this is one of the confusing options, just remember this option is optional but it’s needed when you have several else parts for the value which you sleeted in the value rule, for example in our scenario we don’t want to show a button only for state code=1 and for others state code (1, 2) value we should display the button so even we set button visibility Default=false in the Value Rule, it inverts the result here which is true.
I don’t want to go other two options field and value. Put Field logical name in the field options. Make sure we choose the specific field value by which we are implementing the logic as we don’t have options to select multiple fields in a single value rule.
So, in our case, the Value Rule should look like this:
See the below screenshot, you need to add the Display Rule to the command and do publish.
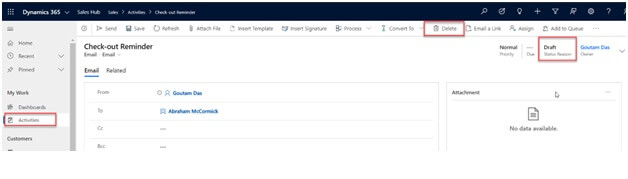
Here is the result, I have viewed one Email record with the Draft state which means statecode=0 and I can see the button.
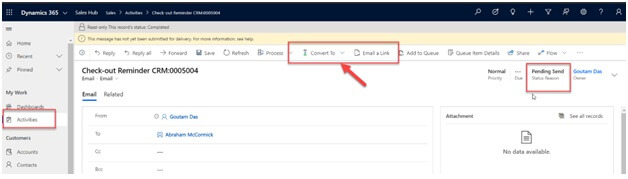
Look here for the completed Email I cannot see the delete button.
We like to share such resources as Microsoft Dynamics CRM Company! Hope this is useful for you.

Recent Blogs
Categories


