
Introduction of Test Driven Development (TDD) & Behavior Driven Development
Test Driven Development (TDD) is one of the major keys of agile development techniques. TDD concept can increase the quality of code, faster the development process helps to enhance programmer confidence and improve bug detection.
Earlier it was very hard to automate web applications due to a lack of testing approaches and supportive tools and frameworks, so developers relied only on manual testing, which was such a tedious and lengthy process. But now, it can be possible to test entire standalone services and REST API by TDD. Even we can also automatically test rich User Interfaces with the help of headless browsers and other most used browsers.
Well, talking about TDD, another concept that comes to our mind is Behavior Driven Development. And we called it BDD in short. BDD is TDD based, and it differs from TDD in language, which encourages collaboration between product owners and programmers.
In Software Development Life Cycle (SDLC), Testing is one of the main steps we have to complete before deploying the end product and before it becomes available for use. We are applying various types of Software Testing Services to the product to achieve quality and confidence, like Unit Testing, Integration Testing, Smoke, Sanity, Regression Testing, etc. To achieve this, Software Engineers need some framework that can maintain the test suites, run the test scripts and populate the test results.
Mocha and Chai: At a Glance
Mocha is one of the widely used JavaScript test frameworks running on Node.js and the browser. It makes asynchronous testing simpler. It provides accurate test reports and the stack trace of any uncaught exceptions.
In other hand Chai is an assertion library we can pair with any JavaScript testing framework.
Source code: In this entire article, whatever examples we are going to discuss is available on the GitHub repository. For a better understanding, please clone the repository link and follow the below instructions
Agenda: In this article, we will discuss the below topics.
- Setup Mocha
- Understanding a TDD based basic mocha spec
- Understanding the actual code execution with mocha
- Brief discussion on Hooks
- Managing test suite in mocha
- Getting started with Chai
- Testing Promises with Chai
- Mocha Reporter
Prerequisite: Before starting with mocha, make sure that your machine should have node and npm installed.
You can install the node LTS version from the nodejs website, and npm will install automatically with node.
To check the versions of the installed node and npm, run the below commands.
Setup to Install Mocha
To install mocha, run the below two commands sequentially.
- -global helps to install mocha at global level in your system, that means mocha test can be run from command prompt
- -save-dev helps to add mocha as a dependency in package.json file for the perticular project.
Note: Mocha is compatible with Node.js v4 or newer.
Understanding a TDD based basic Mocha Spec
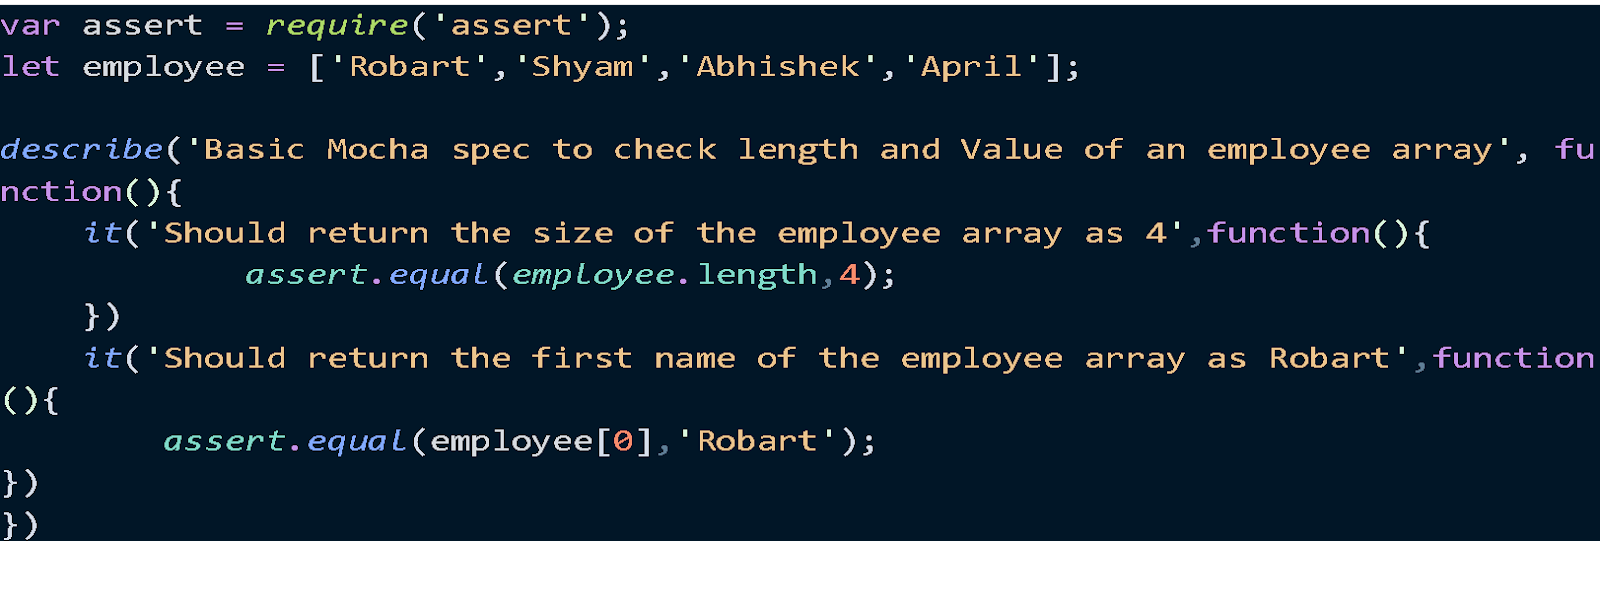
assert : ‘assert’ helps to determine the test status. It determines the test failure.
describe : ‘describe’ is a function that holds the collection of tests, or we could set a test suite. And It has two parameters, the first one is the meaningful name that describes the functionality under the method, and the second one is the function which basically contains one or multiple tests. A nested ‘describe’ can also be declared.
it : ‘it’ is a function that holds the actual test or test steps that need to be executed. It has two parameters as well, the first one is the meaningful name of the test and the second one is the function that contains the body or steps of the test.
Step to Execute the Mocha Scripts
- Download or Clone the project from gitHub
- Navigate into the project folder via command prompt
- Run the command ‘npm install ‘ to download all the required dependencies.
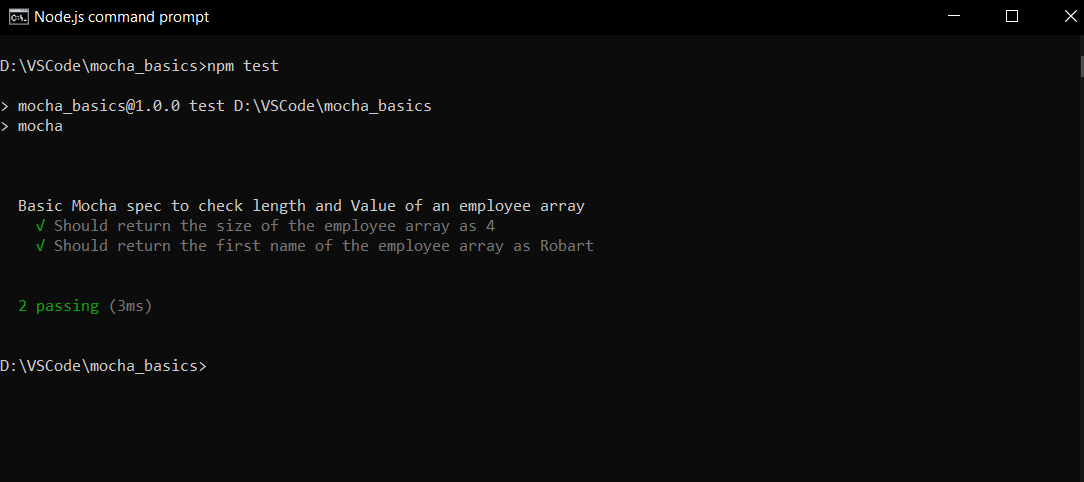
- Run the command ‘npm test’ to run all the test scripts or specs.
Note: Commands called mocha test, or only mocha, can also be used to run the test specs. Those commands, along with ‘npm test’, are working as the below script is mentioned under the ‘package.json’ file.

Once the execution gets completed, you will see the below output on the console.
Understanding the actual code execution with mocha
In this section, we will discuss actual code execution with mocha, where we will see how mocha can perform test execution for various kinds of functions in JavaScript.
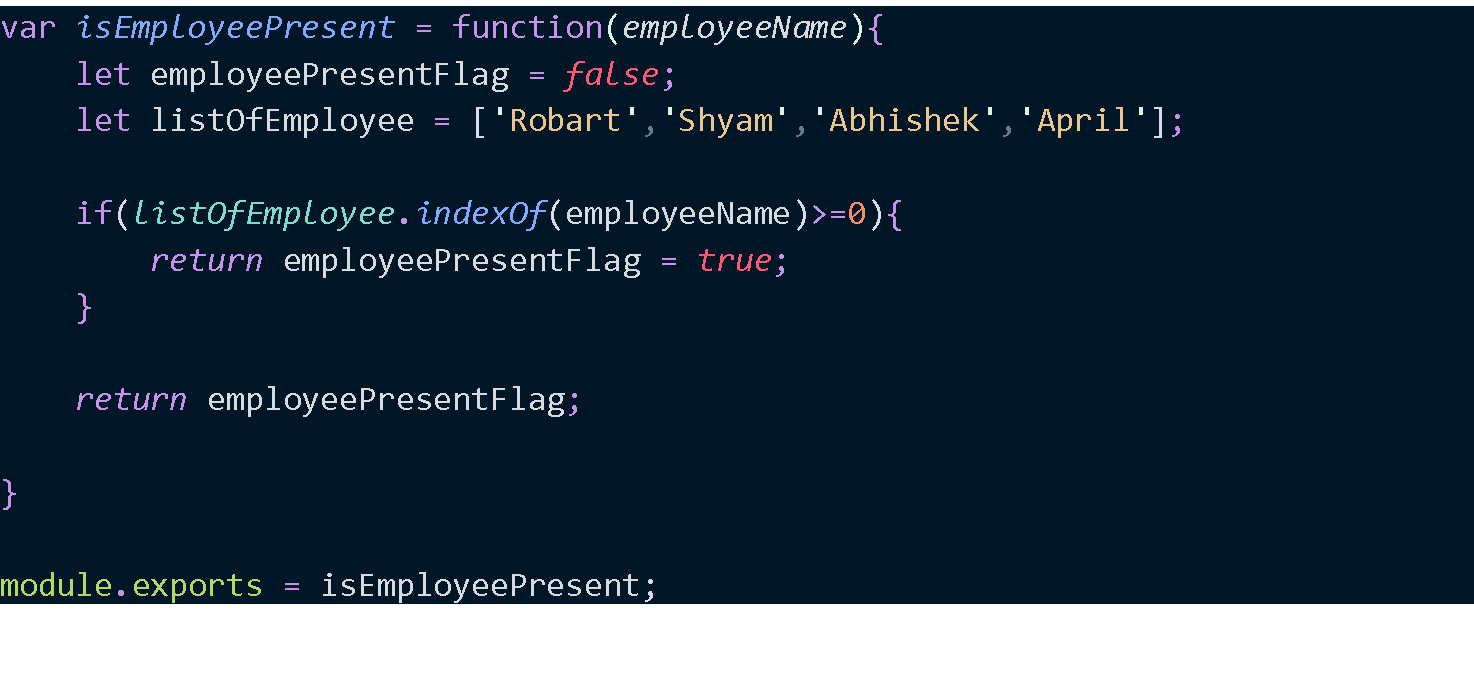
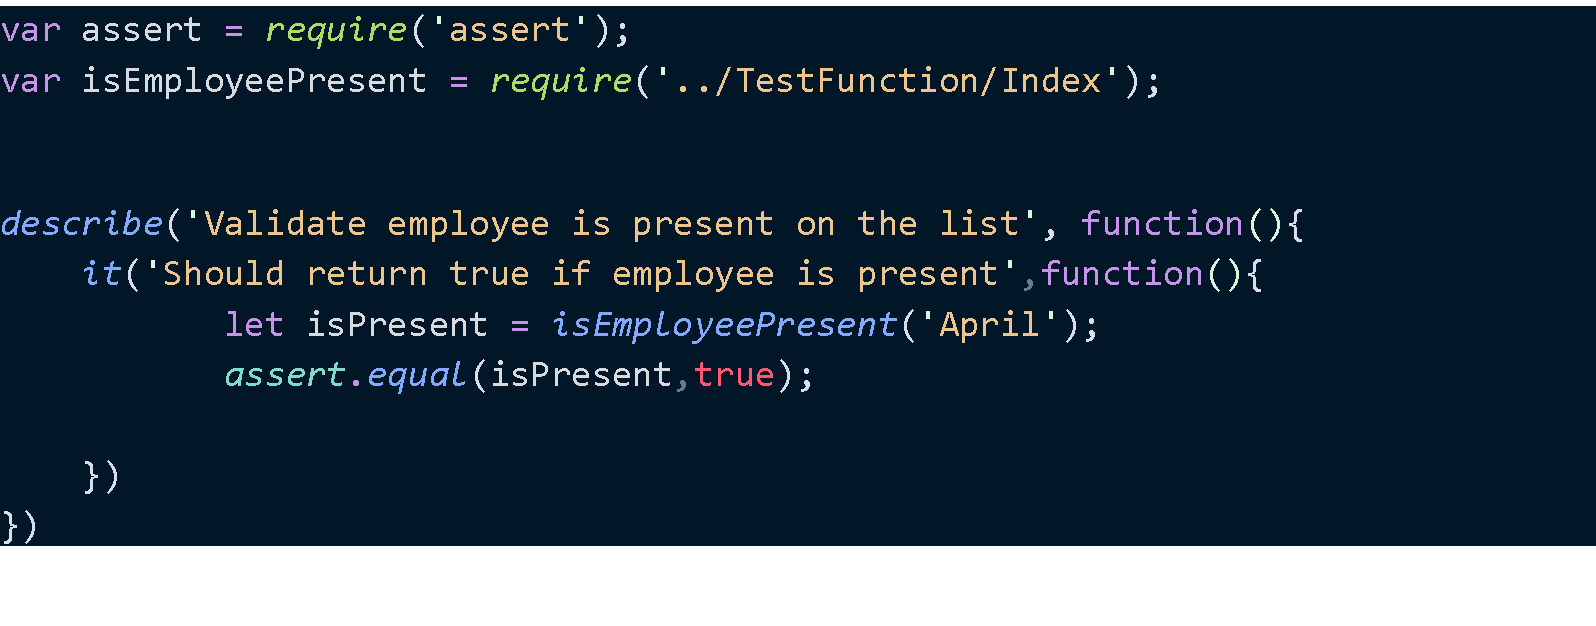
Testing a function with mocha: Every function holds some specific instructions to complete specific tasks. And to test those tasks, the defined function needs to be a call from mocha specs along with required input parameters if applicable.
Snapshot 1, the function which needs to be tested
Snapshot 2, mocha test spec to test the function
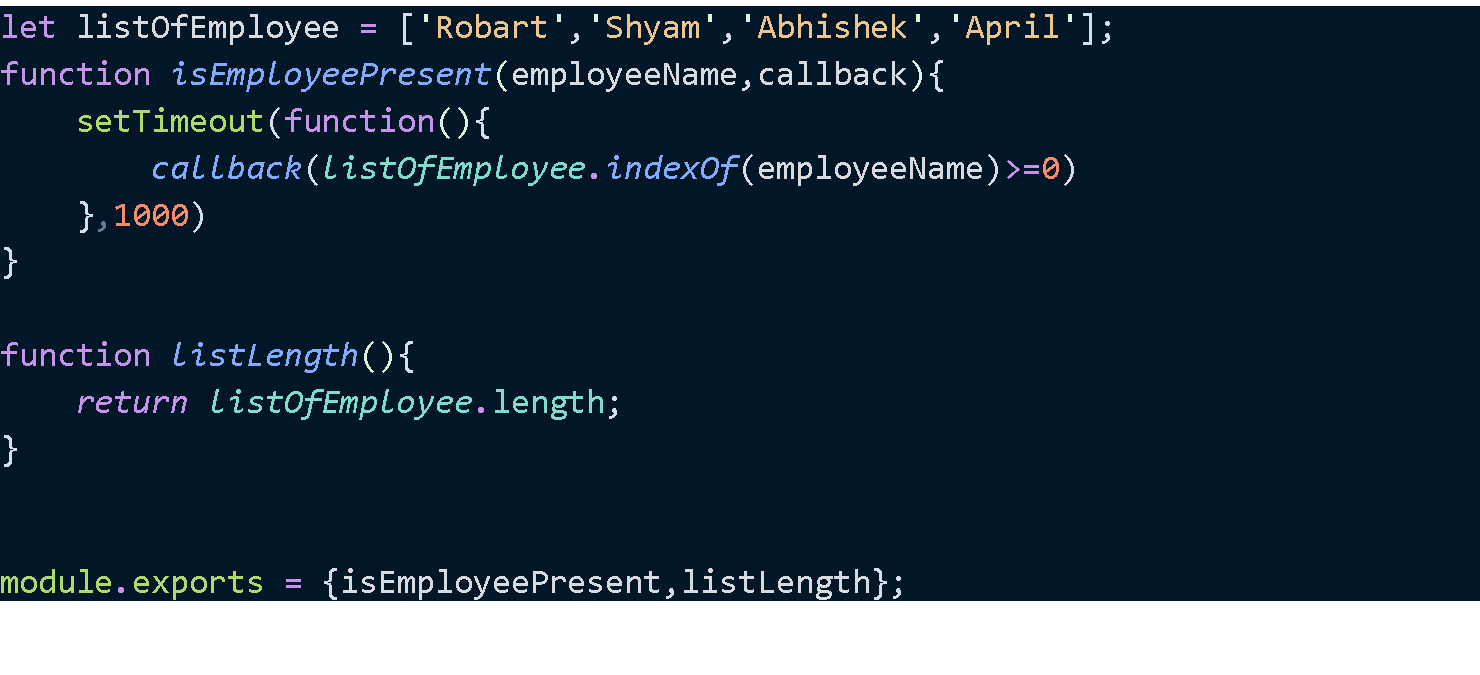
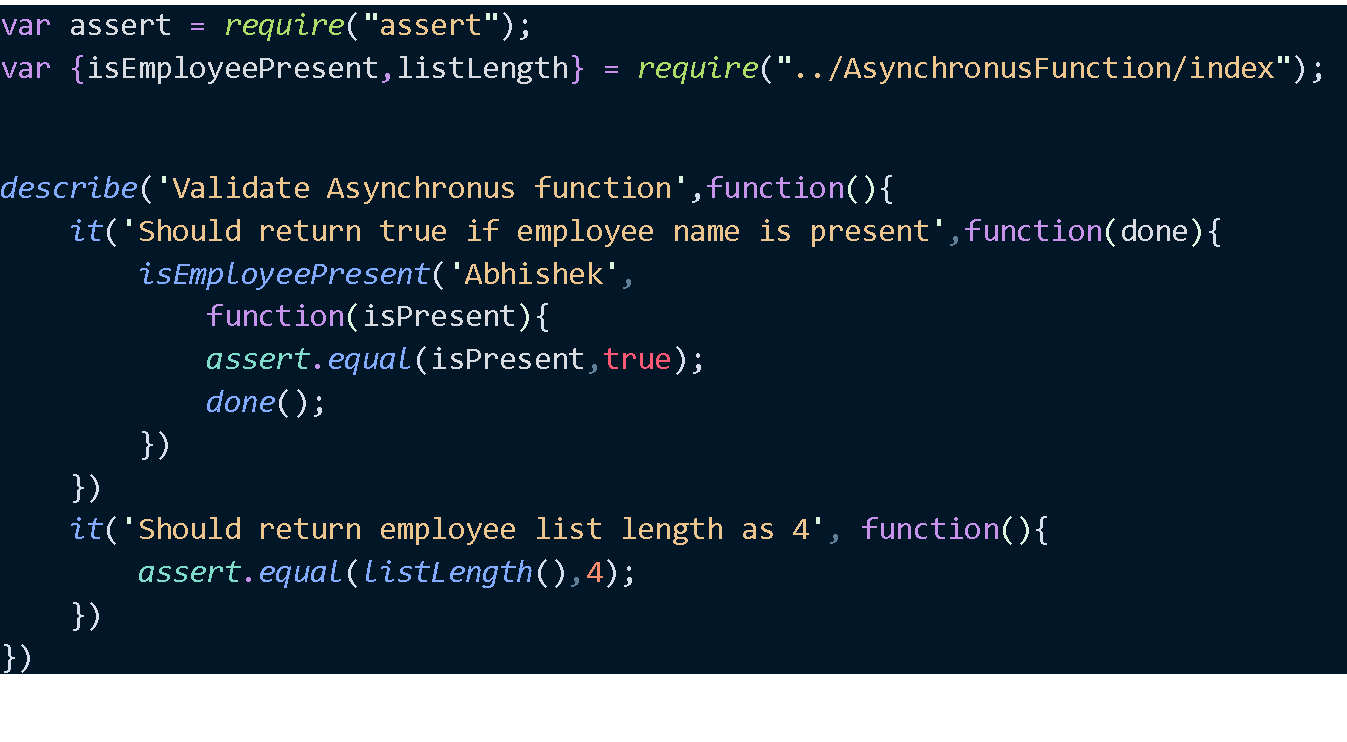
Testing Asynchronous function using mocha : The basic difference between asynchronous function testing with mocha is that we need to tell mocha once the test gets completed because of the async nature of function under test. So, we need to define a callback (i.e. ‘done’) to ‘it()’.
In the below example, we can see mocha waits for the ‘done()’ function to be called to complete the test.
The Asynchronous function which needs to be tested
Mocha specs to test asynchronous function
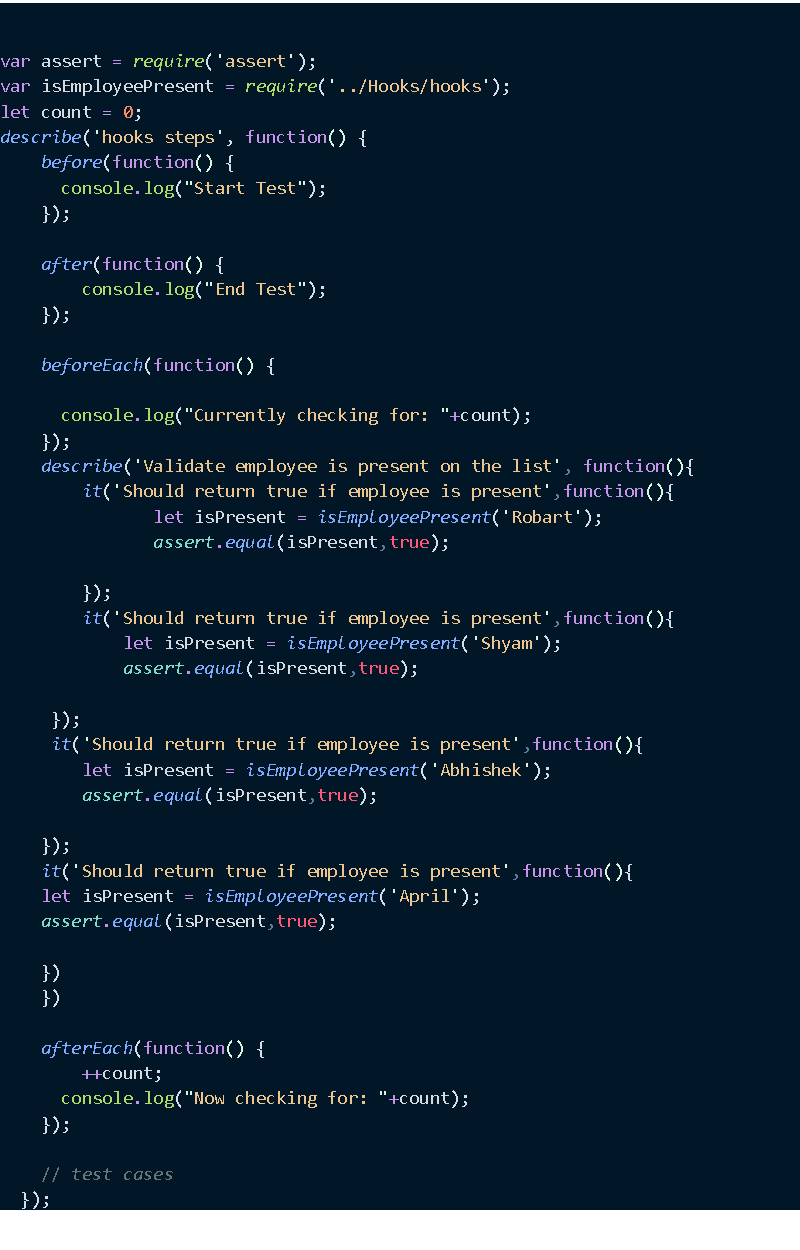
Hooks Understanding:
- We might need to execute a few of our codes before or after the actual business logic validation. In such cases, we can invoke mocha’s hooks like ‘before()’, ‘after()’, ‘beforeEach()’, and ‘afterEach()’, which are by default BDD – style interfaces.
- You can use Hooks to set up preconditions and clean up after the test execution.
- It describes each test step with valid step definitions, which helps identify errors quickly.
- Hooks will run in their order they are defined.
- Steps defined under ‘before()’ will execute once
- And Steps defined under ‘beforeEach()’ will execute whenever a new test step is about to start execution.
- Steps defined under ‘afterEach()’ will execute whenever a test step is completing execution.
- Steps defined under ‘after()’ will execute once
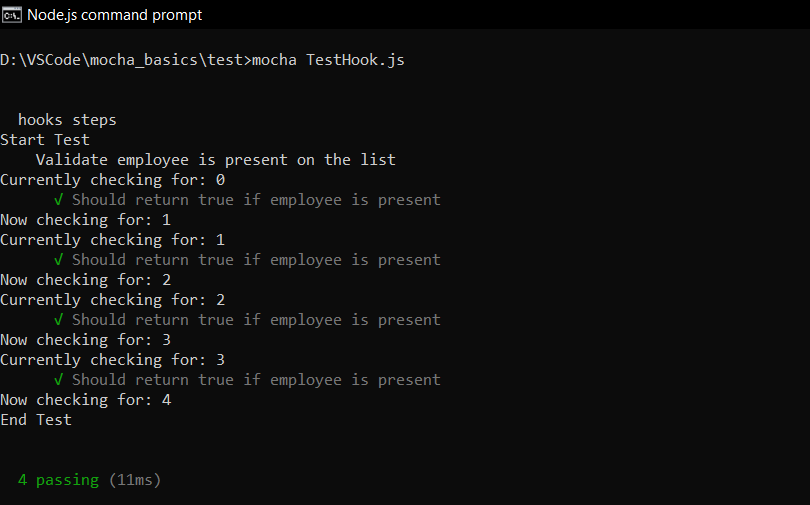
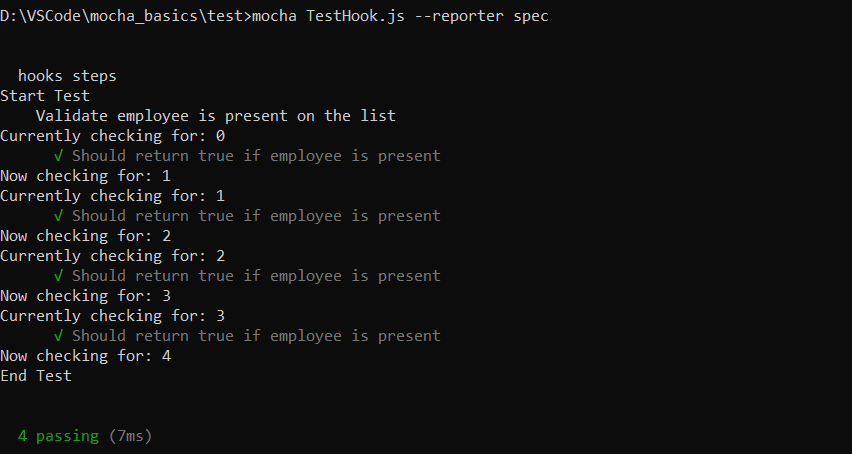
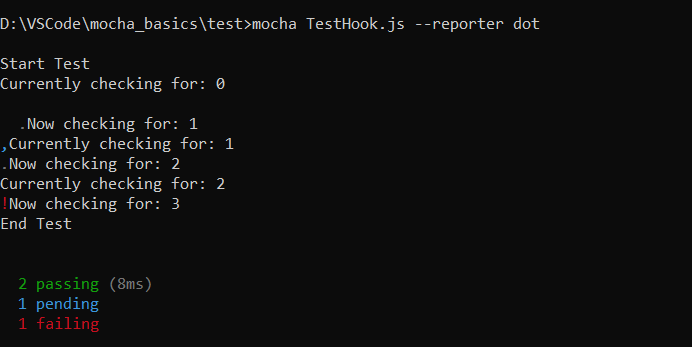
The below example will demonstrate the mocha specs using mocha hooks.
Output of the above spec looks like below
Managing test suite in mocha
In this section, we will discuss test suite management in mocha. Sometimes it may require running only a few specific test specs or suites instead of running all at a time, or we may want to skip some specific test specs or suites during execution that we can achieve in mocha.
Mocha has one exclusive feature called ‘only()’, which is basically a function that allows users to specify a suite or test that they want to test, among others. And that means instead of running entire test suites or entire tests within a suite users can specify which particular test suite or test cases they want to execute by using this ‘only()’ function.
The below example will demonstrate the use of ‘only()’.

The output of the above mocha specs shows up below.
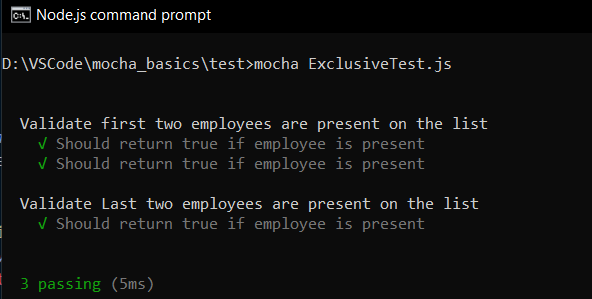
From the output, we can see mocha. Consider only those test or suite which has been enabled by ‘only()’.
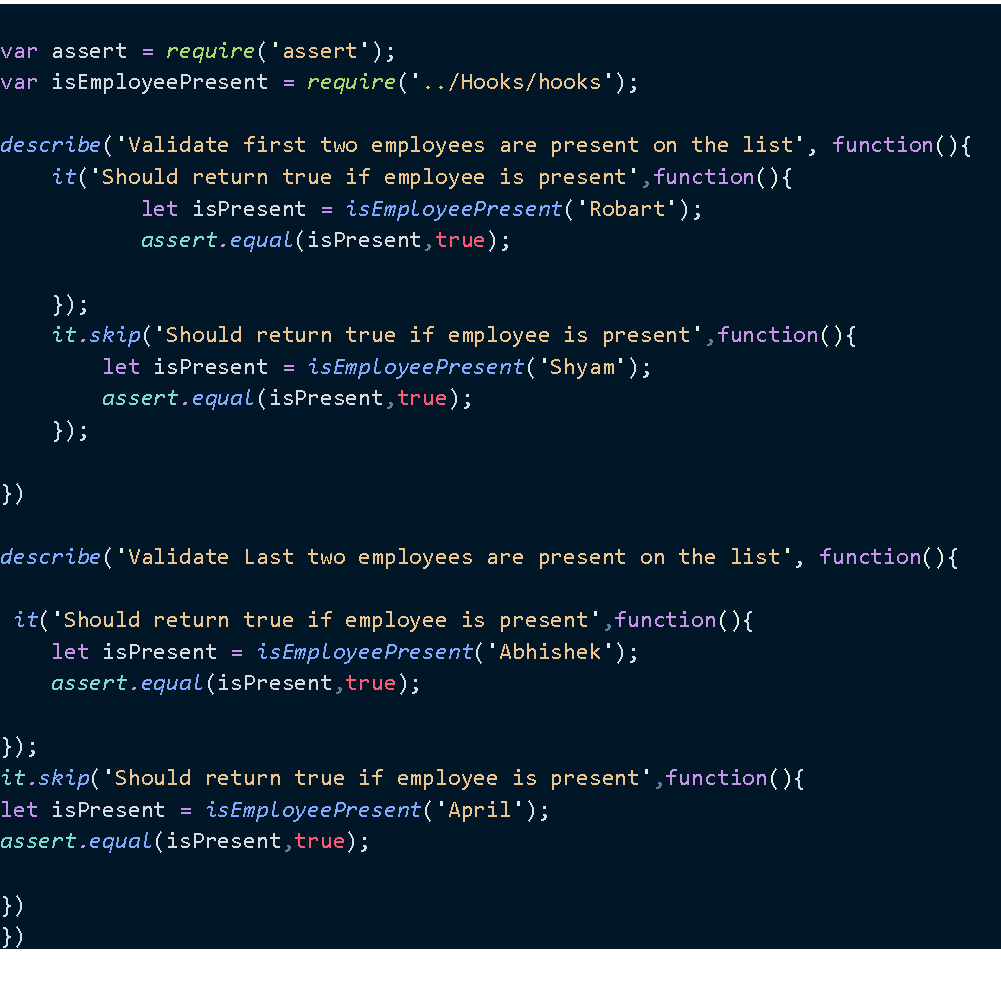
Like ‘only()’, mocha has another inclusive feature called ‘skip()’, which is the inverse of ‘only()’. Instead of including test suites or individual tests, it simply tells us to ignore that specific test suite or test case where ‘skip()’ function gets appended.
The below example will demonstrate the use of ‘skip()’.
The output of the above mocha specs shows up below.

Note: From the output, we can see mocha ignored those tests or suites where ‘skip()’ is appended.
Getting Started with Chai
In the introduction, we have got a sight of Chai assertion library. Here in this section, we will talk about several interfaces of Chai, which are ‘Should’, ‘Expect’ and ‘Assert’. Chai provides an expressive and readable style of writing test followed by BDD, which is helpful to understanding the test flow and actual validation point. Let’s understand through examples.
Installation of Chai
Installation: Before starting with the examples, We have to install Chai into the system. So, to install chai, run the below command on the command prompt.
Assertion Style: As per the Chai documentation we can divide the assertion style into two categories.
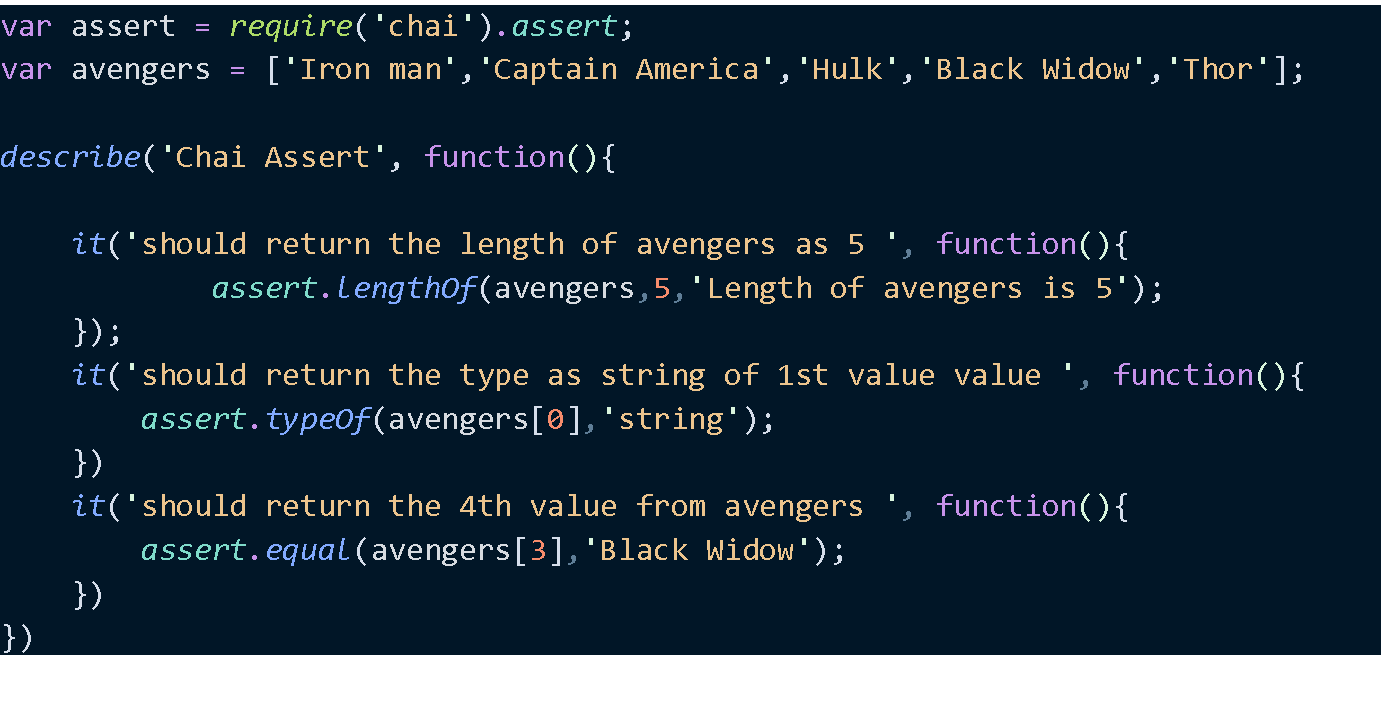
1. Assert
- Exposed through ‘assert’ interface
- Provides assert-dot notation
- Allows you to provide an additional message as last parameter, which will include as error message.
The below example will demonstrate the use of ‘assert’.
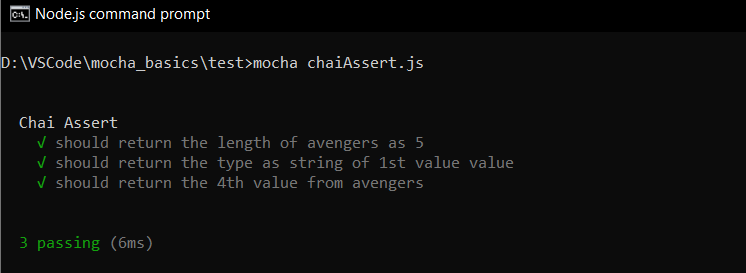
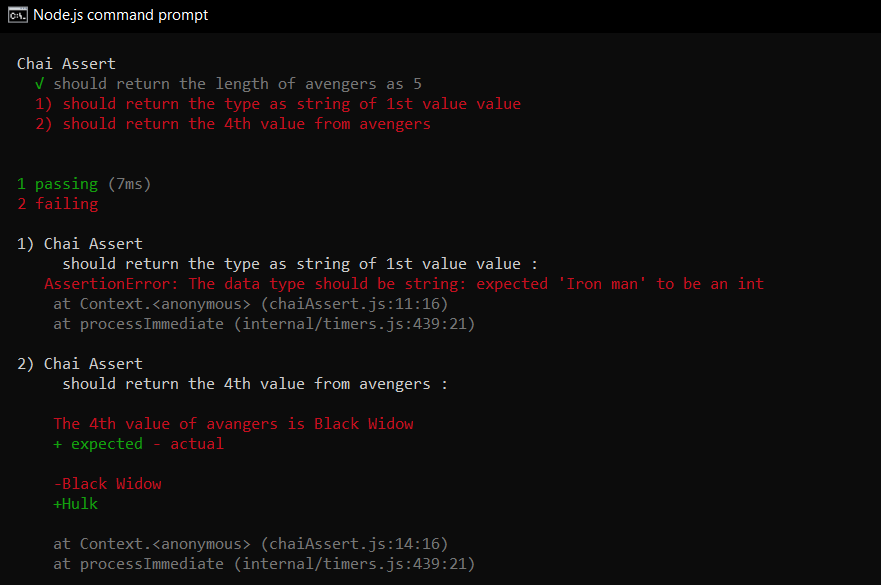
The output of above spec is below
*In case some test is failed, then the output will be like below
2. BDD: BDD is the second type of assertion style in chai. BDD style comes in two flavors.
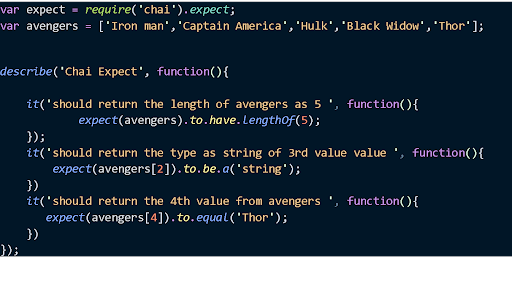
Expect: Expect is one of the interfaces by which BDD style is exposed in chai. Users can chain together natural language assertions.
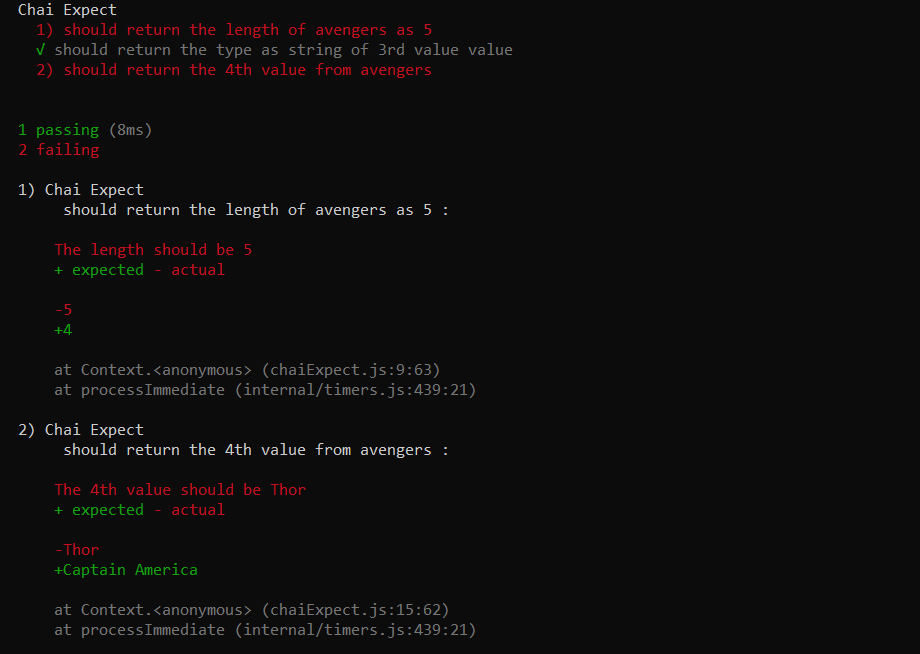
The below example will demonstrate the use of ‘expect’.
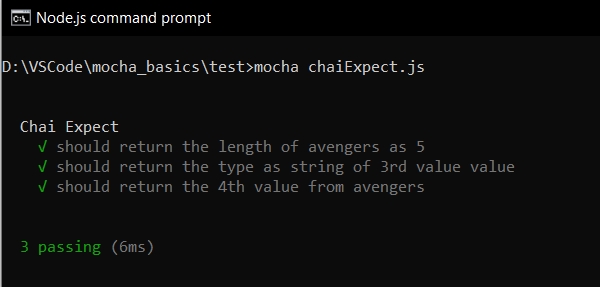
Below is the output of the above spec
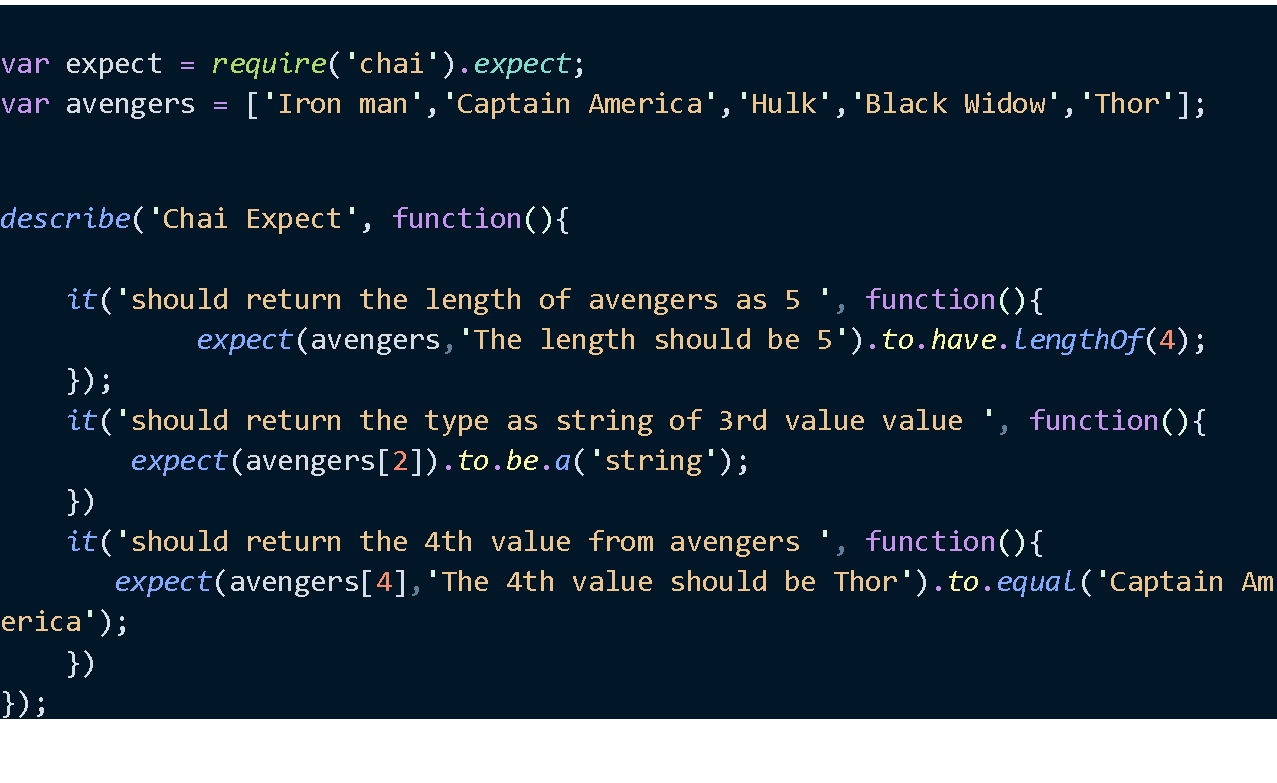
*expect also allows to add arbitrary messages, which will be displayed as an error message if the test gets failed. Refer to the example below.
The output of the above spec is below
Should: ‘Should’ style allows the same assertion as the ‘expect’ interface. However, it extends each object with a ‘should’ property to the assertion chain.
The below example will demonstrate the use of ‘should’.

Below is the output of the above spec

- The basic differences between ‘expect’ and ‘should’ are mentioned below
- ‘expect’ requires is just a reference to the ‘expect’ function, whereas, with the ‘should’ require, the function is being executed.
- The ‘expect’ interface provides a function as a starting point for chaining your language assertions. It works on node.js and in all browsers, whereas the ‘should’ interface extends ‘Object.prototype’ to provide a single letter as the starting point for your language assertions. It works on node.js and in all modern browsers except Internet Explorer.
var expect = require('chai').expect; var should = require('chai').should();
Testing Promises with Chai:
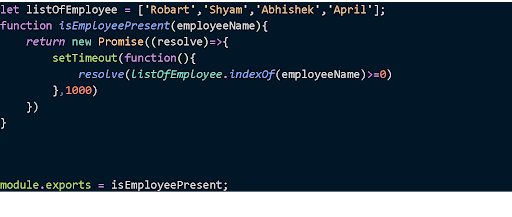
After testing an asynchronous function with a callback, here in this section, we will talk about testing a promise with chai.
Promise is asynchronous in nature. On a simple note, the promise is like, let’s say we are trying to get some value through some code once it is executed, but instead of the actual value, we are getting something else (i.e. Promise), which says we will get the actual value once it is ready.
We will install one more chai library called ‘chai-as-promised’ to test the promise.
Installation: To install chai-as-promised, run the below command.
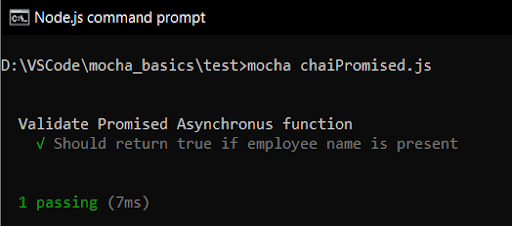
Let’s understand through an example:
Below is the output of the following specs
Mocha Reporter: So, in the last section of this article, we are going to discuss mocha reporters. Mocha is coming with some default reporters, and below, we have discussed them.
SPEC
Alias: SPEC, spec (it is the default reporter)
DOT MARIX
Alias: DOT, dot (it displays failure status with ‘!’ and pending status with ‘,’ on the console)
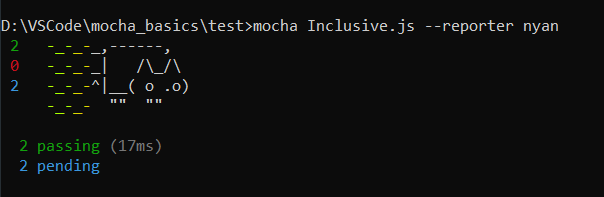
NYAN
Alias: Nyan, nyan
TAP
Alian TAP, tap

LANDING STRIP
Alias: Landing, landing

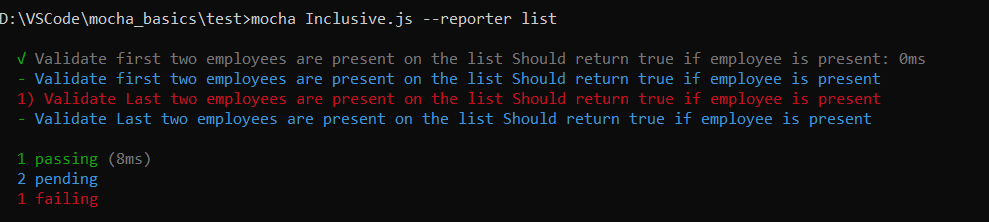
LIST
Alias: List, list (it displays a simple specifications list as test cases pass or fail)
PROGRESS
Alias: Progress, progress. (It implements a simple progress-bar)

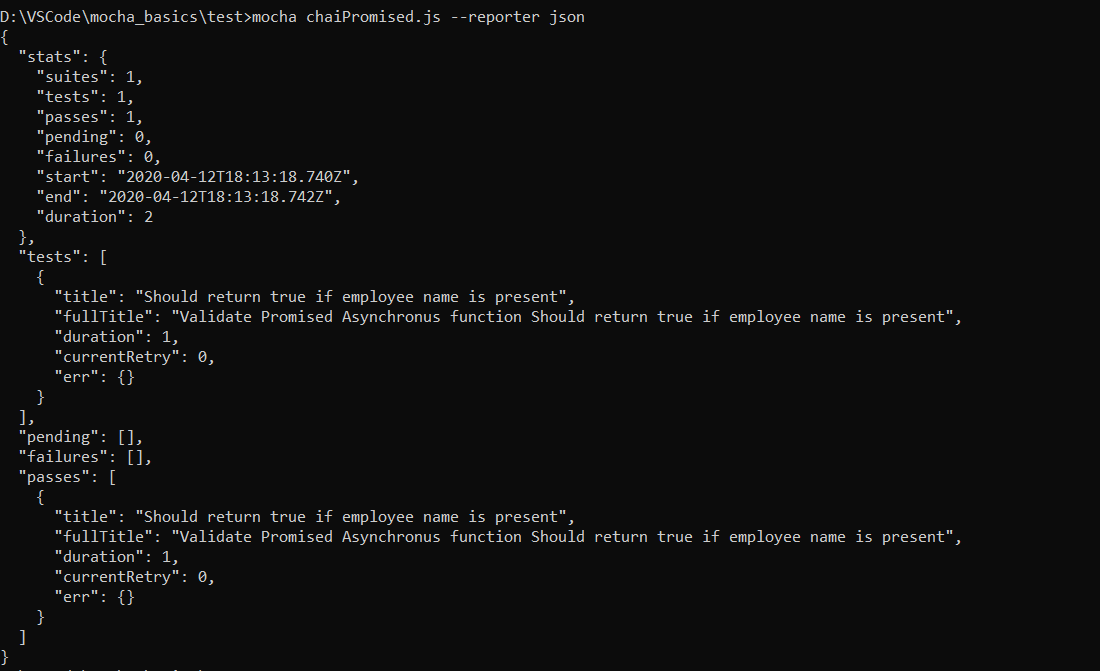
JSON
Alias: JSON, json (It displays a single large JSON object)
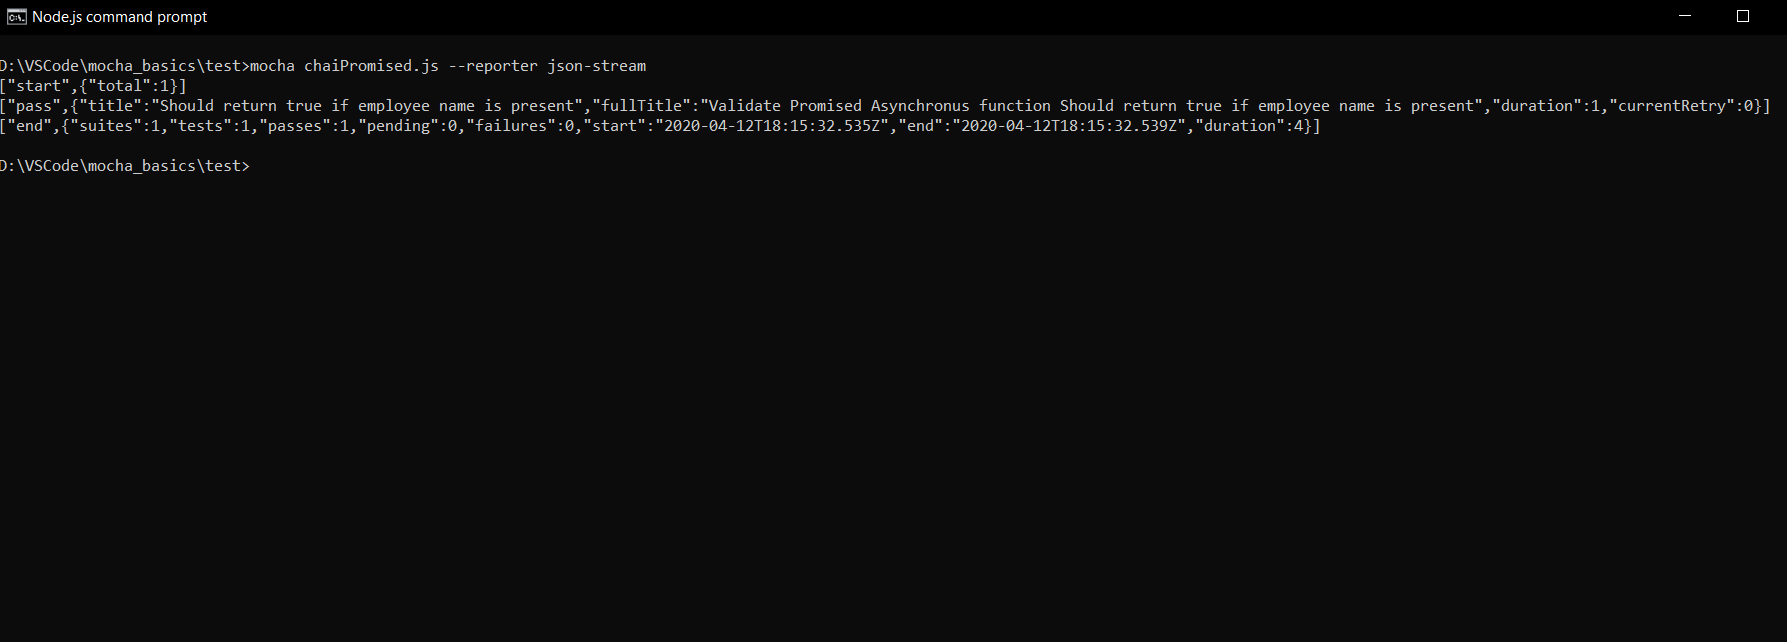
JSON STREAM
Alias: JSONStream, json-stream
MIN
Alias: Min, min (it displays only the summary on the console)

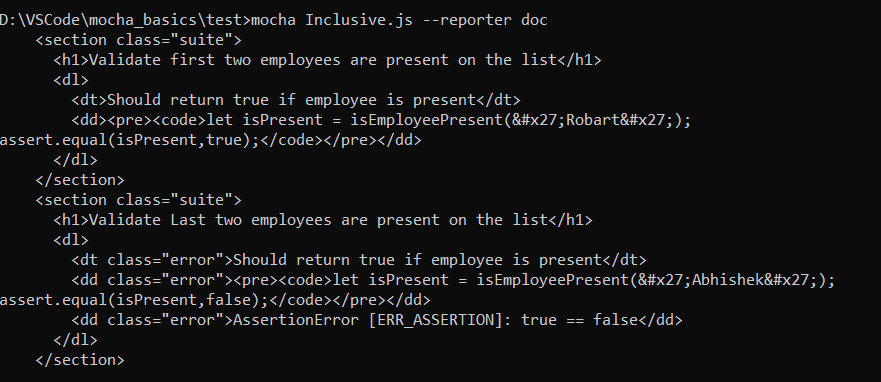
DOC
Doc, doc (it outputs a hierarchical HTML body)
*Note: Apart from these reporters, mocha also supports some third-party HTML reporters, like mochawesome, mocha-junit-reporter, etc.
Summary
In this article, we have discussed the concept of TDD and BDD with examples, and we got to know about the mocha test framework along with chai.
In the current situation where product quality is the major focus of any type of software development activity, there correct testing is necessary, that can be unit testing or integration, or any other type of test. When we try to implement Test Driven Development, it can be a very good choice to satisfy those requirements of testing test frameworks like mocha.


