
Power Automate is no code low code way of automating the repetitive business processes that could involve different apps and systems, be it cloud-based or on-premise. This is made possible through more than 350 different connectors available for all the popular applications out there - Dataverse, Dropbox, SharePoint, OneDrive, Adobe Creative Cloud, Google Calendar, Outlook, etc. and the list keeps growing.
Check the list of connectors here:
https://powerautomate.microsoft.com/en-us/connectors/
And for the applications for which connectors are not available, especially custom applications or legacy applications, you can write a custom connector and register the same and use it the same way.
Steps on how to create a custom connector:
https://docs.microsoft.com/en-us/connectors/custom-connectors/
Now consider a business requirement where you need to loop through multiple records or rows based on certain conditions and take action on it.
In such a scenario you can make of Do Until function.
Here Microsoft Dynamics CRM Development Team explains how the Do until looks like

The first thing you do in the Do Until specifies the condition that must be true to come out of the loop.
For example, you can specify the condition that it should come out of the loop when the status of a record is marked as completed.
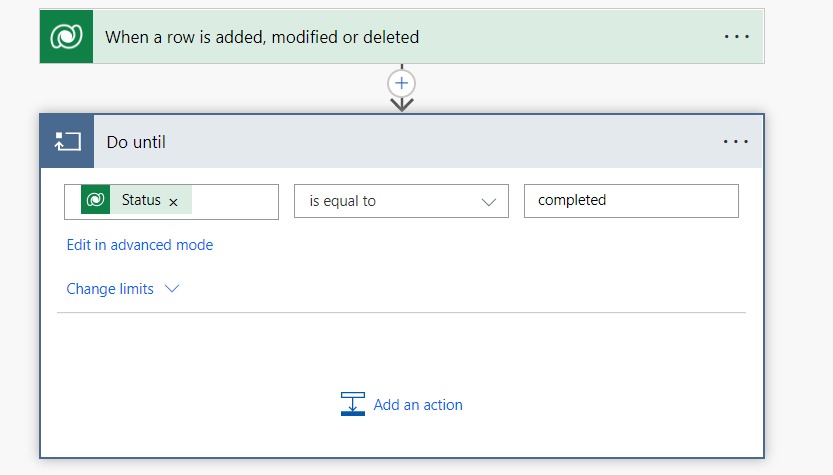
Apart from the condition, we can specify Change Limits.
It can be of two types either Count or Timeout.

By default, Count is set to 60, which means that loop will execute a maximum of 60 times if the loop condition is not met.
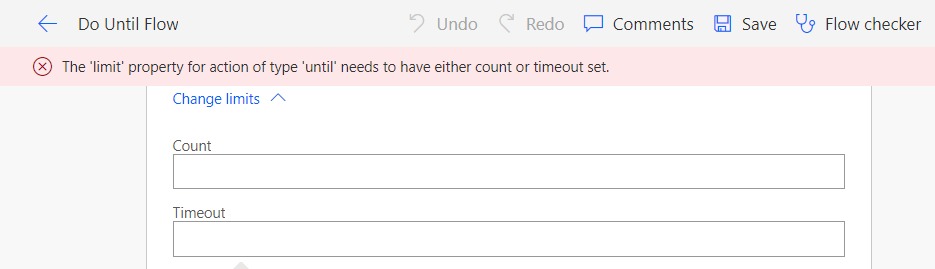
Do until loop action allows a maximum of 5000 counts. For example, if you specify the Count to be greater than 5000 we will get the below error.
“The provided 'until' limit count value '100000' is not valid. The count must be a positive integer no larger than '5000'”

Similarly to the Count property, we can specify the Timeout value to stop the loop if the loop condition is not met.
By default, its value is PT1h, which means 1 hour. It accepts ISO8601 format. So basically flow will timeout after 1 hour if the loop condition is not met.
ISO8601 format can be defined as follows
P(n)Y(n)M(n)DT(n)H(n)M(n)S
- P refers to the duration
- Y refers to the year.
- M refers to the month designator.
- W refers to the week.
- D refers to the day.
- T refers to the time.
- H refers to the hour.
- M refers to the minute.
- S refers to the second.
You can either define both the Count and Timeout limit or at least one of them.
In case, if you want to loop for a fixed amount of time, then instead of specifying the condition based on a specific field’s value, you can make us of a variable. You can initialize the variable, and check for its value in the condition part of the Do Until action and increment it within the Do Until.

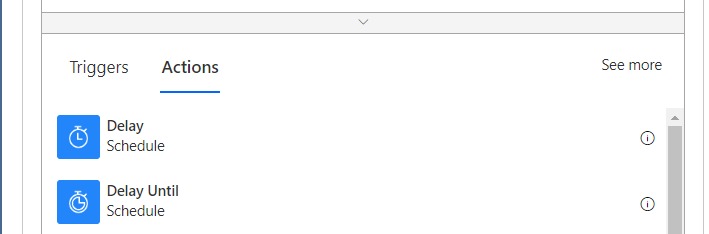
You can also use Delay and Delay Until within the Do Until to introduce a delay in the flows.
Thus we covered the usage as well as different properties of the Do Until function in Power Automate and learned how we can use it for performing certain actions either a fixed number of times or till the condition is met.

Recent Blogs
Categories


