Understanding the Basics of Helm in Kubernetes
In this blog, I have explained clearly and in detail how to create your helm charts. You can create helm charts to deploy your applications. It's the recommended way to deploy your application on Kubernetes. Packaging the app using helm, allows you to deploy the app in one command, instead of using kubectl create or apply. Helm allows for upgrades and rollbacks.
Your helm chart is also version-controlled. To create the files necessary for a new chart, you can enter the commands helm create and then the name of your chart. Here, for example, mychart, and will create a directory called mychart, and in this directory, it will create the files that you need. It will create a Chart.yml, values.yml, and a folder template.
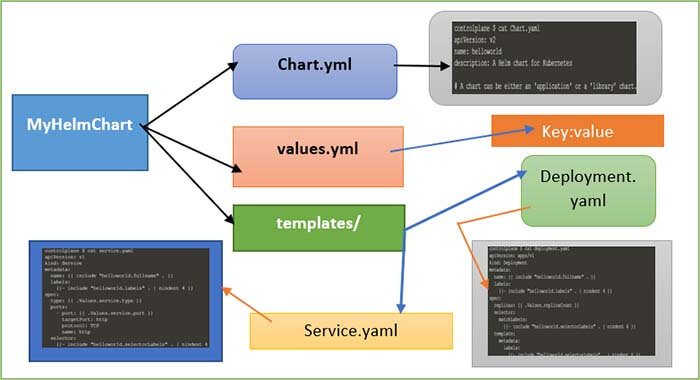
In Chart.yml, you'll find some metadata like the apiVersion, the appVersion, the description, the name of your chart, and the version of your chart. It is just some basic information that you can fill out. The values.yml contains the values that you want to use in your chart using YAML format. I will show you the default one in the next demo. The default one is already quite long, and it contains things like the image name, the image tag that you define in the values.yml and can then use in the templates.
So then, let's have a look at the templates folder. In the templates folder, you will find things like deployment.yaml, service.yaml, and those are files that you are familiar with. These are the Kubernetes YAML files, but you can use variables in them. You can use a templating mechanism to create dynamic YAML files, and helm will interpret these, and when you do helm install, it will install these YAML files. In the next demo, I will show you a little bit more detail.
In this blog, I have explained all the main concepts of Helm so that, you will be able to use them in your projects. Also, helm changes a lot from version to version. Understanding the basic common principles and more importantly its use cases to when and why Java Full Stack Developers use Helm will make it easier for you to use it in practice no matter which version you choose.
So, the topics I have covered in this blog are: What is Helm? What are the Helm Charts? How to use Helm? And finally, in which scenarios Helm is used? Then next is What is Tiller? and what part Tiller plays in the Helm architecture?
What is Helm in Kubernetes and why it is required?
Helm has a couple of main features that it's useful. The first one is as a “Package manager for Kubernetes”. So, you can think of it as apt, yum, or Homebrew for Kubernetes. It is a convenient way for packaging collections of Kubernetes DML files and distributing them in public and private repositories. Now, these definitions may sound a bit abstract so, if we break them down with specific examples like this way:
Let’s assume you have deployed your application in the Kubernetes cluster, and you want to deploy elasticsearch additionally in your cluster that your application will use to collect its logs. To deploy elastic stack in your Kubernetes cluster, you will need a couple of commands components so, you would need a Stateful Set, which is for stateful applications like databases. Then you will need a config map with the external configuration you will need, a Secret where some credentials and secret data are stored.
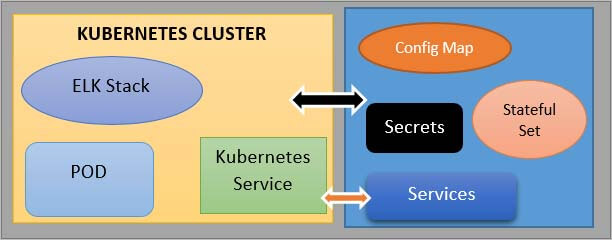
Next is, you may need to create the Kubernetes User with its respective permissions, and also, you may need to create a couple of services. Now, if you were to create all of these files manually by searching for each one of them separately on the internet then it is going to be a tedious job. So, until you have all these Yaml files gets collected and tested and then get is tested - it will take some time and since elastic stack deployment is pretty much the standard across all clusters, other people will probably have to go through the same.
Therefore, it makes perfect sense that someone created, these Yaml files once and packaged them up and made them available somewhere so that other users who also use the same kind of deployment could use them in their Kubernetes cluster, and that bundle of Yaml files is called Helm chart.
Helm Functionalities
So, using helm, you can create your helm charts with bundles of those Yaml files and then push them to some helm repository to make it available for others, or you can consume them. You can download and use existing helm charts as well when other people push and make their helm charts available in different repositories. So, commonly use deployments like database applications, elasticsearch, MongoDB, MySQL, or Service Monitoring Applications like Prometheus, Grafana that all have this kind of complex set up, all these have helm charts available in some helm repository.
Using a simple “helm install <chart_name>“ command, you can reuse the configuration that someone else has already made without additional effort and sometimes that someone is even the company that created the application and this functionality of sharing charts that became pretty widely used was one of the contributors to why helm became so popular compared to its alternative tools.
Now, if you have a cluster and you need some kind of deployment that you think should be available out there, you can look it up either using the command line. So, you can trigger the command “helm search <keyword>” with a keyword or you can go to either Helms on a public repository like Helm Hub or Helm charts pages or other available repositories.
Now, apart from those public registries for helm charts, there are also private registries because, when companies start creating those charts, they also started distributing them internally in the organization. So, it made perfect sense to create registries to share those helm charts within the organization and not publicly. So, to achieve this, there are a couple of tools used as helm charts private repositories as well.
Another functionality of the helm is that it's a templating engine. So, what does that mean? Assume that you have a microservice application that is made up, of multiple microservices and you're deploying all of them at your convenience Kubernetes cluster and deployment and service of each of those microservices are pretty much the same but, with the only difference that the application name and version are different or the docker image name and version tags may be different. So, without a helm, you would write separate YAML files configuration files, for each of those microservices.
So, you would have multiple deployment service files where each one has its Application name and version defined but, since the only difference between those YAML files are just a couple of lines or a couple of values using helm, what you can do is that you can define a common blueprint for all the microservices and the dynamic values or the values, that are going to change replace by placeholders and that would be a template file.
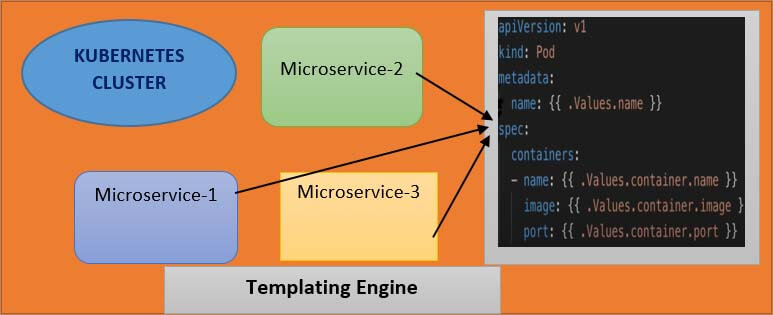
So, the template file would look something like the above diagram. You will have a template file, which is a standard YAML file but instead of values in some places, you will have the syntax which means, that you're taking a value from external configuration and that external configuration if you see the syntax here dot values(“.Values”) that external configuration comes from an additional YAML file, which is called values.yml file.
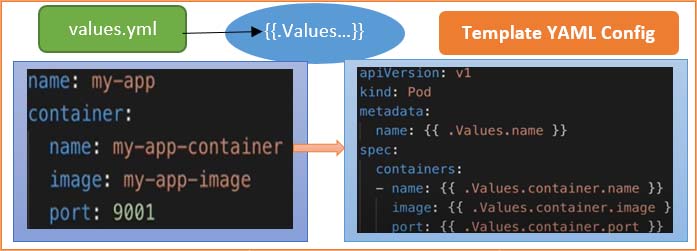
Here above, you can define all those values that you are going to use in that template file. For example here, those 4 values are defined in a values YAML file and “.Values” is an object that is being created based on the values that are supplied via values YAML file and also through the command line using the “- - set” flag. So, whichever way you define those additional values that are combined and put together in. Values object that you can then use in those template files to get the values out.
Structure of Helm Chart
Now, instead of having YAML files for each micro-service, you just have one and you can simply, replace those values dynamically and this is especially practical when you're using continuous delivery continuous & integration for application because what you can do is that in your build pipeline you can use those template YAML files and replace the values on the fly before deploying them.
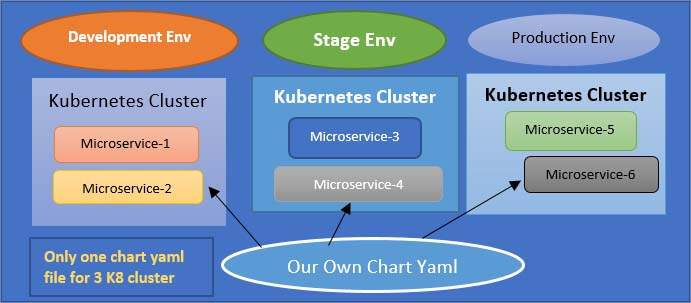
Another use case where you can use the Helm features of the package manager and template engine is when you deploy the same set of applications across different Kubernetes clusters. Consider a use case where you have the microservice application that you want to deploy on development, staging and production clusters. So, instead of deploying the individual YAML files separately in each cluster, you can package them up to make your application Helm chart that will have all the necessary YAML files that particular deployment needs, and then you can use them to redeploy the same application in different Kubernetes cluster environments using one Command which can also make the whole deployment process easier.
Now that you know what helm charts are used for it. Then next is I have explained with an example helm chart structure to have a better understanding. Typically Helm chart is made up of such a directory structure, so it has the top level will be the name of the chart and inside the director, you would have the following:
myOwnChart/
- 1. Chart.yaml
- 2. values.yaml
- 3. Charts/
- 4. templates/
- deployment.yaml and service.yaml
So, “Chart.yml” is a file that contains all the metadata information about the chart it could be named, and the version may be a list of dependencies, etc. “Values.yml” that I mentioned before is a place where all the values are configured for the template files and this will be the default values that you can override later.
The “charts” directory will have char dependencies inside meaning that, if this chart depends on other charts then, those chart dependencies will be stored here, and the “templates” folder is basically where the template files are stored. So, when you execute the “helm install” command to deploy those YAML files into Kubernetes, the template files from this directory will be filled, with the values from “values.yml” producing valid Kubernetes manifests that can then be deployed into Kubernetes.
Optionally you can have some other files in this folder like readme or license file etc. So to have a better understanding of how values are injected into Helm templates, consider that values.yml file which is a default value configuration you have following three values:

Image name port and version, and as I mentioned, the default values that are defined here can be overridden in a couple of different ways. One way is that when executing the helm install command, you can provide an alternative values.yml file using the --values flag.

For example, if values.yml will have the following three values, which are “image name”, “port” and “version” then you can define your values YAML file called “my-test-values.yml” file, and you can override one of those values, or you can even add some new attributes there and those two will be merged which will result into “.Values” object that will look like as below image:
So, you will have the image name and port from the values.yml file and the one that you override with our test YAML file. Alternatively, you can also provide additional individual values using the “Set flag” where you can define the values directly on the command line, but of course, it's more organized and better manageable to have files where you store all those values instead of just providing them on a command line.

Real-time Example of Microservice Deployment using Helm in Kubernetes


Another feature of the helm is Release Management which is provided based on its setup. But it's important to note here the difference between helm versions 2 & 3. In version 2 of the helm, the helm installation comes in two parts. You have the helm client and the server. The server part is called ‘Tiller”.
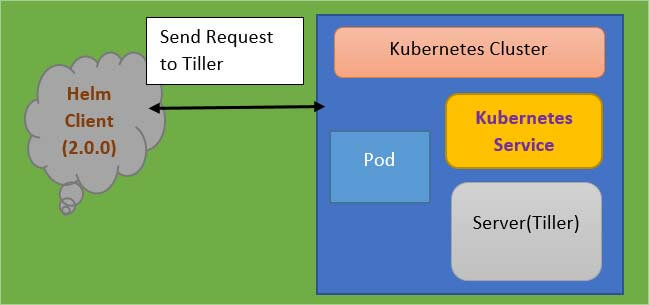
This architecture offers the additional valuable feature of the helm which, is Release management. So, the way the helm client-server setup works is that whenever you create or change deployment Tiller will store a copy of each configuration client and for future reference. Thus, creating a history of chart executions. So, when you execute the command <helm upgrade chart_name>, then the changes will be applied to the existing deployment instead of removing it and creating a new deployment, and also in case the upgrades go wrong for example some YAML files were falls or some configuration was wrong, you can roll back that upgrade using “<helm rollback chart_name>” command.
All this is possible because of that chart execution history that, Tiller keeps whenever you send those requests from the helm client to Tiller. However, this setup has a big caveat which is that the tiller has too much power inside the Kubernetes cluster. It can create, update, delete components, and it has too many permissions and which makes it a big security issue and this was one of the reasons why in helm 3 they actually removed the Tiller part and it's just a simple Helm Binary now, which was solving the security concern but loses the release management feature of the helm or makes it more challenging.
Use case Implementation of Kubernetes HELM Deployment
If you do not have a Kubernetes cluster, then do not worry. Just navigate “katacoda.com” in your browser and visit the Kubernetes playground. Assuming that you have setup your Kubernetes cluster, you have to install the Helm package. But in Katacoda playground, Helm has already been installed so, no need to do anything.
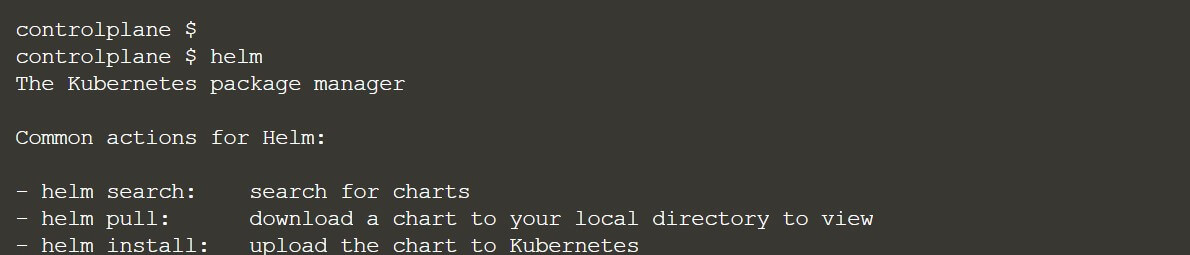
To verify you can run the command “helm” and as you can see this is the by default help documentation which is available and how you can use the helm chart.
I have pasted the command “helm version”, and as you can see Katacoda has already installed version 3.1.2 after the installation step

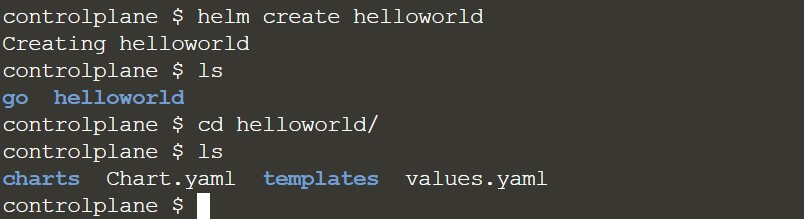
I have explained and given a demo on a hello world helm chart. To start with step number one is you need to create your first helm chart and the command for that is
<”helm create helloworld”>
You can copy this command and paste it over the Katacoda playground command line. So, as you can see we have now created the hello world helm chart and this is my hello world helm chart it will create a directory and which you can verify using this command also if you are not sure whether where it has been created then you can just paste this below command and as you can see this is the hello world helm chart which we have created. Inside that HelloWorld directory, we have two YAML files present that are Chart.yml and values.yml.
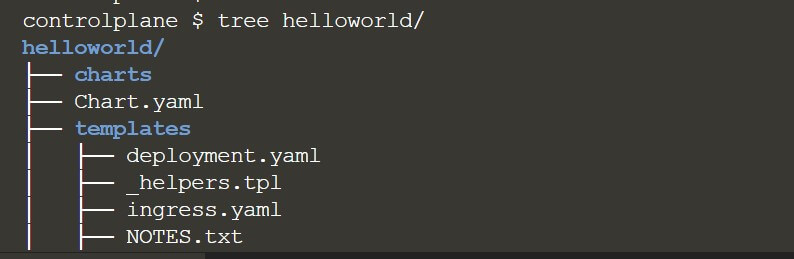
Alternatively, there is one more way where you can use the “tree command” to verify the structure of your hello world helm chart. I have typed the command “tree HelloWorld” and as you can see once you run the command, it is going to create all the directories along with all the minimal YAML files, which is needed for creating your helm chart. So, this is our helm chart structure, and this is my hello world directory as shown below screenshot:
I would like to highlight in the helm chart world we don't run the application. We install the helm chart. In this blog, I am going to prepare a hello world helm chart and then, will install that help chart, but before that, we need to go into that our directory that, is “helloworld” which is our helm chart and inside that directory, you should see values.yml.
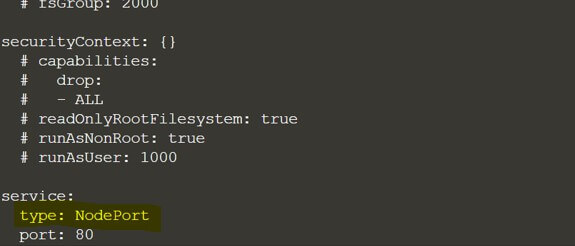
We need to update some values inside the values.yml and in our case, we need to update from cluster IP to the node port and why we need to change is because, whenever we are going to run any application that application needs to be exposed, as a service and to expose that service we need to assign.
It should be a noted port, not a cluster IP. Why? Because we are running a virtual environment and to access that application, we need to expose that as a node port. Otherwise, we will not be able to access it, so, that's why we need to update this values.yml, and we need to change from service type from cluster IP to NodePort.
Since it's our hello world helm chart, so we don't need to do anything extra. So, this change is sufficient enough to test our helm chart. Moving to the next step what, you need to do is you need to install your helm chart using the command helm install. As I already explained, we need to install every helm chart which we are going to prepare. So, for that, the command is helm install and then your first argument i.e. the release name because, whatever helm chart you are going to install, we need to assign some release name and then the actual chart name and that is going to be your second argument. So, our final command looks like as below:
Just remember we need to get outside of this Helloworld directory. So, we are sitting outside of the hello-world directory now which, is our helm chart and then I have pasted this command and executed it on the Katacoda playground and as you can see if you see this message that means your helm chart has been installed successfully)
<helm install aegisghelloworld helloworld >
Here aegisghelloworld is the release name and then helloworld is our actual helm chart name
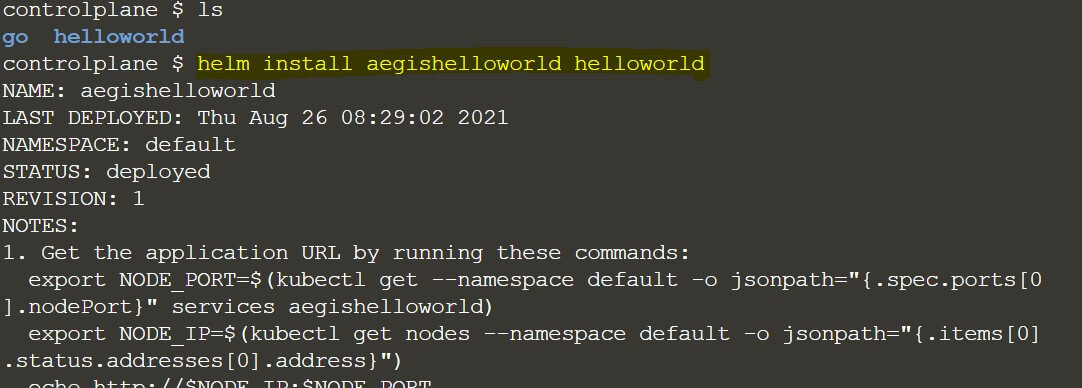
Now we need to verify whether our helms chart installation has gone properly or not. So, for this, I have mentioned a command <helm list -a>. You have to run this command and you will be able to see this is our Aegis Hello world: that is our release name which we have installed or we can say that our helm chart has been installed with the release name.

Here you can see our “aegishelloworld” service: so that means our helm chart installation is successful and our release name is “aegishelloworld” and since this is the first installation of our helm chart, so the revision number is 1. Please refer to the above screenshot.
Now how to access our application since it is a very basic hello world application, but it is not going to output a hello world text or something. Because we have installed the Nginx server provided by a helm chart package. So, what we need here is to run the command: “<kubectl get services>” so this will tell us which service we are going to expose. As I told you earlier, we need to change the service type from cluster IP to NodePort, so you can see in the below screenshot that service type which is now NodePort and the helm chart application( with release name which we have provided) that is “aegishelloworld” that is running on a node port service type and the port is 30593 but inside the cluster, we can access it through 80 port.

With port 80, we will not be able to access this service outside of the Kubernetes cluster. Now in the next step, I am going to access this Nginx home page on this port 80 inside of the cluster. Now, as you can see the cluster IP here is “10.104.210.42”. So, to check if our application is running fine or not then, just inside your Kubernetes cluster, access the curl command with host and port 80 as shown below image.
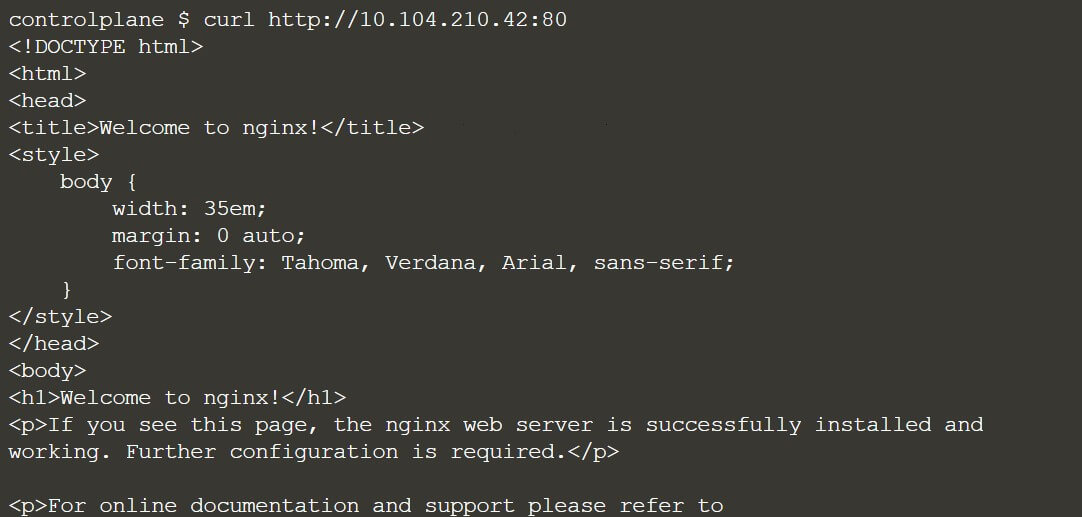
You can see in the above snapshot, this is our Nginx default page so, that proves that our first helm chart has been installed successfully. To check in your browser, you can just use your node IP and the node port, and you will be able to verify.
Frequently Asked Questions
Helm has a couple of main features that it's useful. The first one is as a "Package manager for Kubernetes". So, you can think of it as apt, yum, or Homebrew for Kubernetes. It is a convenient way for packaging collections of Kubernetes DML files and distributing them in public and private repositories.
We can utilize Helm features of the package manager and template engine is when you deploy the same set of applications across different Kubernetes clusters. Consider a use case where you have the microservice application that you want to deploy on development, staging and production clusters.
Typically Helm chart is made up of such a directory structure, so it has the top level will be the name of the chart and inside the director, you would have the following:
myOwnChart/:
- 1. Chart.yaml
- 2. values.yaml
- 3. Charts/
- 4. templates/ :deployment.yaml and service.yaml
You need to create your first helm chart and the command for that is <”helm create helloworld”>. Then the next command is <helm install aegisghelloworld helloworld> :(Here aegisghelloworld is the release name and then helloworld is our actual helm chart name). Please refer to the complete blogs for more details.
The entire step for helm chart creation to microservice deployment, I have clearly explained in this blog with detailed steps. Please refer to the entire blog for knowing the detailed deployment steps using Helm Chart.

Recent Blogs
Categories


