Introduction to Travis CI Pipeline
In this section, I am going to discuss the travis.YAML file that I am going to put together to build all of our different images and then eventually deploy our application to our Kubernetes Cluster. Please find the below flow diagram to give you an idea of what we are going to be doing inside of our config file to eventually deploy our application.
Travis Config File Internals
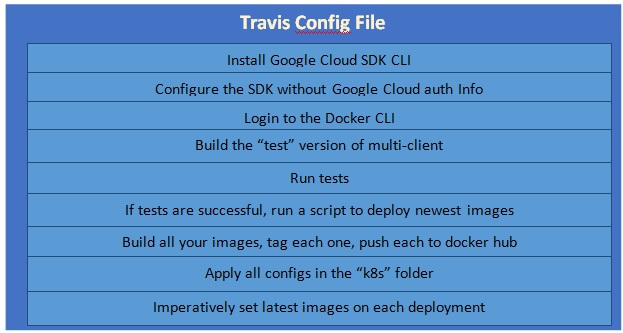
So, here everything is going to start inside of our config file by installing a Google cloud SDK. Remember, the entire purpose of Travis is to not only test our code but then to also deploy our application after our tests run successfully. So, we need to make sure that Travis can somehow reach out to our Kubernetes cluster and make changes to it or essentially run a series of configuration files and apply them to our cluster. So, we are going to install Google Cloud SDK to do this. This is a CLI i.e. going to allow us to remotely interact with and configure the Kubernetes Cluster by applying different config files.
But the SDK does not come kind of preconfigured with Travis. We have to actually download and install thBut the SDK does not come kind of preconfigured with Travis. We have to download and install the SDK every time we run our Travis built. After we download SK, then we have to configure the SDK with some information from our google cloud account. We are going to authorize this CLI to make changes to our Google Cloud account and more specifically the Kubernetes cluster i.e. already being created.
I am going to log in to docker CLI and then build the test version of the multi-client image and then run tests. If all the tests run successfully, I am going to run a script. It is a separate script outside of Travis.YAML file. All these steps you can find in the above diagram.
Creation of “.travis.yml” file:
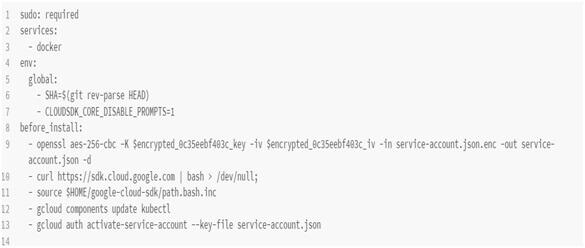
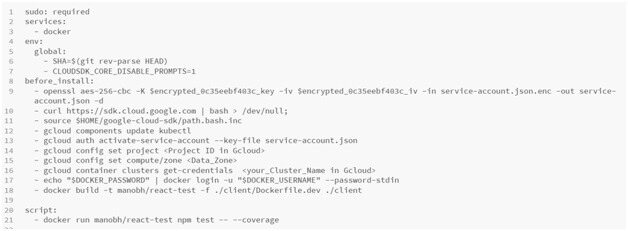
- I am going to create a Travis configuration file(.travis.yml) file. The first thing, I am going to add is “Sudo: required” because we are making use of docker. Then we require the docker services to be pre-installed as soon as we try to run our build. Because we need Travis to build our images and even run that test container.
- Then we have to add the first_install flag. It's going to be a series of steps. The first step is to download the Google Cloud SDK and then the next step is to look up the default install directory of the Google Cloud SDK, which is basically in the HOME directory. It is going to source the file path.bash.inc. It means there is some configuration i.e. going to modify our shell inside Travis CI and we are going to apply that additional configuration through the source command.
- Then the next step is to install the kubectl inside of Travis's environment. Eventually, we are going to use this kubectl to apply all those different configs. Files. Then the next step is authentication. To tell Gcloud who we are and give access to our account, we have to activate a service account and then provide a set of credentials through the “service-account.json” file. The credentials that are going to be placed inside this file are extremely sensitive. We have to encrypt this file and store it in travis.
Example ” .travis.yml” file:
Generating a Service Account in Google Cloud:
For creating a service account, go to your google cloud page site in the browser and then navigate to the “IAM & admin” page and then click on the service accounts and on that page click on the “Create Service account” button. Please find the example page:

Here, I have given the account name as “travis-deployer” but you can give any account name. Then I have assigned a role that the service account is going to have. I have been given the role of “Kubernetes Engine Admin”. After that when you click the save button, the JSON file will get downloaded automatically. This file has all account credentials. We need to encrypt this file and upload it to Travis CI.
Running Travis CLI in a Container
We need to download and install the Travis CLI, which is a program that I am going to use to encrypt that service account JSON file and tie it to the Travis CI account. To download the Travis CLI, you can go to “github.com/travis-ci/travis.rb”. Travis CLI needs to have Ruby installed on your local system. We have to get a Docker image that has Ruby pre-installed and then we can install Travis CLI here.
We have to execute the below docker commands:
1st command is running the image that has Ruby version 2.3. At the same time, I am going to start up a shell inside there. Also, I have set up a volume. The purpose of the volume is to eventually get the service account JSON file inside the container. Here, I am using $(PWD) and this is valid only if you are running on a UNIX-based system. In windows, you have to use ${pwd}.
For Linux:

For Windows:

After this command execution, you will enter into the shell and then type ls then, you will see the below folder:

Here, you are seeing the app folder that we set up as a volume. And then go to app folder with the command “cd app”, then you will see all of the project folders.

The next step is, I am going to install Travis using gem. Gem is a dependency manager for Ruby. So, I am using the gem program to install Travis. “—no-rdoc & “—no-ri” are optional flags. It restricts the documents to get installed along with this gem. It will make the installation faster.

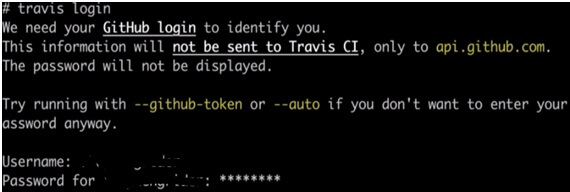
The next command is “travis login”. Here you have to login to your GitHub account(while signing up to a Travis CI if you have signed up using your GitHub account). Example image:
Now, the next step is to copy the JSON file (service account JSON file) into the volume directory(inside our app folder). Now, go you’re your /app folder and hit the below command:

While execution of this command, it will show the below messages:
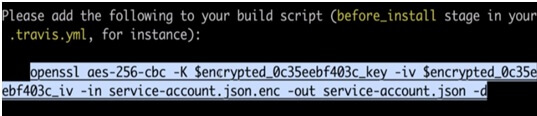
It means we have to add the OpenSSL commands in our .travis.yml file. This command will take the encrypted JSON file and then use the encrypted version of the file that is stored on the Travis CI servers and unencrypted. I will copy the entire command and will paste it into my travis YAML file.
Now the encrypted file you can upload to your Git repo. Now, inside of our app directory we will have only the encrypted JSON file. Make sure you delete the original JSON file after encryption is done.
We have to do any extra setup in our “.travis.yml” file. We have to tell Gcloud CLI that what project and what zone we want to operate on inside of our Gcloud account. And also, we have five of our Kubernetes cluster names that we have created in Gcloud.
Next, we have to log in to the Docker CLI. We have access to docker as we have specified docker as a service in our YAML file. The next part is now to build the image and will tag it with a temporary tag of “react-test”. I am going to specify the docker file to use for this “-f” followed with the relative path to the docker file and after that, I specified the build context. Build context is the client directory.
Now we are done with our before-install section. Now I am going to define the “script” section where is going to define how to run the actual tests for our project. In this script section, I am going to run the react-test image. Here I have added “-- --coverage”. It is going to produce a coverage report i.e. going to give Travis a signal that either everything ran successfully, or it crashed for some reason. Now we are done with the script section and our tests are running successfully.
Now Our “.travis.yml” file will look like as below:
.travis.yml file:
Travis Deployment
Now, I will explain the actual deployment assuming that all the tests successfully ran. To do the deployment, I am going to write a deployment script separate from the travis YAML file. Please note that Travis does not have a built-in provider for deploying code onto the Kubernetes Cluster.
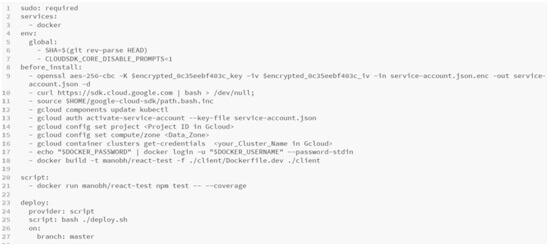
So, now in my .travis.yml file, I am going to write the deploy section and there will mention as below:
So, the above lines say that I am calling a custom script called “deploy.sh” and running the script for deployment. Also, I have set the option of the master branch. Because I want to do our deployment if we are pushing up the branch Master. So, our final .travis.yml file will look as below:
Final .travis.yml file:
Creating Deployment Script:
Now, let’s create a deploy.sh script. I will put a series of commands here i.e. going to build the images, tag them, push them and apply config.
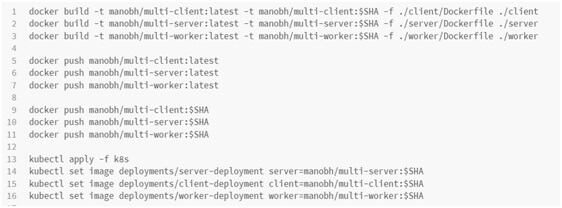
So, our deploy.sh file will look like as below:
Explanation:
- The first step is building the images. I have done a docker build for multi-client image, server image and worker image as well.
- Next step is I have to take those images and push them off to the docker hub. We have already logged in to the docker through the travis.yml file. So, I have written a docker push command for all the 3 images.
- The Next step is to take all of the different config files inside of the k8s directory, I have written kubectl apply commands.
- As soon as we set an image with the latest tag on our deployment, then It will not update the version as it is already running on the latest, so no change required. And also, we should not update the version manually. So, we need to have something that is done automatically.
- So, when I set our image on our deployment, I have provided the image name with a version tag. So, I have used the $SHA. This SHA variable is already defined as an environment variable in our travis.yml file. The current SHA is nothing but the “git rev-parse HEAD”. It determines the current commit SHA and assigns it to env. Variable.
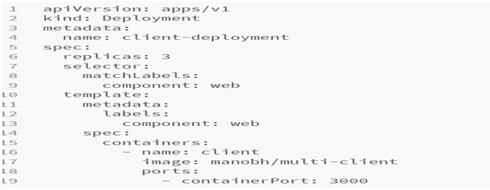
client-deployment.yml file:
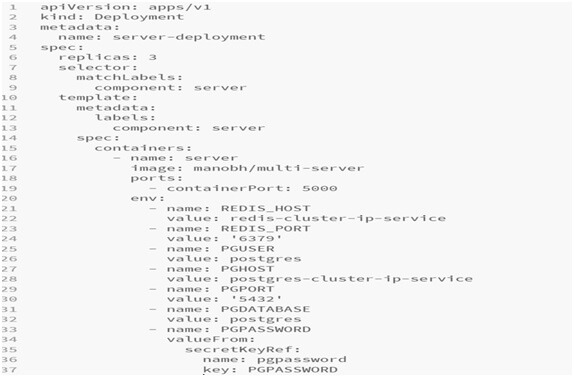
server-deployment.yml
worker-deployment.yml:

Now, we are ready with everything. We will push all these files onto the master branch on GitHub.
Travis CI is then automatically going to pick up our changes and run our travis.yml file and then eventually run the deploy.sh file. You can verify your deployment on the Google cloud page under the “Workloads”. You can see the deployments would have been created there. Then also you can open up your docker hub and verify our 3 images “multi-client”, multi-server” and “multi-worker”.
Now I will discuss about the Kubernetes Security with RBAC.
Kubernetes Security with RBAC
RBAC stands for Role-based access control. The purpose of RBAC is to limit who can access what different types of resources inside of Kubernetes cluster. Inside of the local Java software development environment of Minikube, the RBAC system is not enabled by default. So, in the local environment. Any pod could access the cluster directly and arbitrarily change the configuration. In other words, we could create a pod inside of our cluster locally. The local cluster that tried to access the Kubernetes cluster and arbitrarily create new sets of pods or new deployments or new secrets or delete stuff if it wanted to.
Now, you can imagine in a production environment. We generally like to kind of lock things down and make sure that unauthorized users or programs cannot change the configuration of our cluster.
So, the RBAC system is all about making sure that we have the ability o limit who can do what inside of our cluster. Locally with minikube, RBAC is not enabled.
Google Cloud enables RBAC by default. So, in production, we definitely have to deal with this security system. The main thing I want to point out here is the purpose of the Tiller Server is to modify the configuration of our cluster. So, it might create things or delete things, but we need to make sure that the Tiller has the correct set of permissions so that it can make all the different changes.
The RBAC system has a lot of intricacies to it. In Google Cloud, a user account or a service account just identifies you. It is only a “ClusterRoleBinding” that gives us the ability to do something. There is also another “RoleBinding”. Both allow having an authorized set of actions that you can make inside of your cluster.
So, for security, you need to create a service account and a clusterRoleBinding. Then you have to tie this clusterRoleBinding to that service account. Then you have to assign this service account to the Tiller Pod so that Tiller can change anything that it wants to across your entire cluster.
For Creating a service account, you have to use the below command:

This will create a new service account called tiller in the kube-system namespace.
To create a new clusterRoleBinding with the role “cluster-admin” and to assign it to service account “tiller”, please hit the below command:

You should run the above commands on your Google cloud shell.
These are the additional security setup that you can do in your Kubernetes cluster. You can learn about more our Kubernetes deployment with Helm setup.
Conclusion
Here, I have explained the most important features of Travis Deployment configurations including the Kubernetes security features of RBAC. Also, I have demonstrated only the deployment configuration part but the other core part of the application Redis configurations, you have to understand from the script screenshot that I have provided in this article.


