Introduction
Why we need Volume in Kubernetes?
Persistent volume claim (PVC) can have many benefits. Here, I want to let you know that what a volume is. Also, we will explore why do we actually need a volume with the Postgres, specifically.

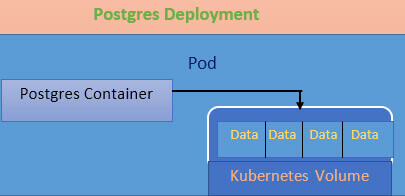
Refer to the image above. The deployment creates a Pod and within the pod, there is a single Postgres container. Within the container, there is a file system. It is completely isolated to only be accessed by the container. As, Postgres is a database just like a plenty of other databases. It takes in some quantity of the data and writes it to the file system. So basically, we can say that a request to write or save the data with Postgres is received in the container. PostgreSQL then processes it and stores it in the file system. As a result, the container has a file system and the file system has the information.
File system is generally created and maintained within a container. If in case, the container with a Pod wrapping is damaged, all the data inside it will be lost as well.
If there is only the copy of Postgres as one deployment with Pods, without any volumes, in this case if only the data is written to Postgres, and the container gets damaged, the pod will also be deleted by the deployment. As a replacement, a new pod will be created, although, it won’t have any of the previous data. File system won’t be carried over. If the deployment is initiated with a new pod, all the data is lost from inside of the Postgres database.
Data loss is always something that needs to be prevented. This is the issue now what I discussed. By letting the Postgres save the data only inside the file system which is maintained by the container, there could be chances of data loss if the Pod is damaged.
Please see the below image to understand more:

Here is how we can solve the issues related to the loss of the data if the Pod crashes. The solution to this problem is “Volume”.
Volumes can be used to get a consistent file system which can be accessed by the database Postgres. With the help of a volume, which is running on a host machine, if data needs to be written that comes into the container, in that case, Postgres might consider that it needs to be written a file system within the container. However, it will just be a “volume” that is present outside on the host machine.
The result of this is that if our original pod or the Postgres Container inside of it crashes for any reason, the deployment is going to delete that thing and will create a new pod with a new copy of Postgres inside of it. But we are going to make sure the new copy of Postgres that gets created gets access to the exact same volume and so it will have access to all of the data that had been written by the previous copy of Postgres that already existed. Please refer the below diagram for clear understanding:

That is why we use volumes, and this is how we are going to allow ourselves to save data with the database but will not have to worry about all the data inside there being deleted anytime that the container has to be restarted or crashes. Suppose in your deployment yaml configuration file, if you would have set “replicas: 2”, then we would end up with a situation where we will have two pods that will be accessing the same volume.
Having two different databases access the same file system without them being aware of each will be a disaster and will create problems. So, at no point in time, you are ever going to increment the replicas to two or more. So, here you are not able to scale up. For any reason, if you want to scale up your copy of Postgres and make it more available, then you have to go through some additional configuration steps besides just incrementing the number of the replicas.
Kubernetes Volumes Internals
In this section, we will explore the uses of volume to persist the data outside of a container. So that the data is persisted across restarts of a given container. Let’s look at the volumes in Kubernetes.
In Kubernetes, Volume is a referred to a specific type of object. A few of the common objects are Deployment, or a Java Software Development service. In Kubernetes, a configuration file can be written, which will create a volume. In Kubernetes, that object is something that allows a container to store some persistent data at the Pod level. In addition to the use of volumes, we also have access to two other types of data storage mechanisms that are “Persistent Volume” and “Persistent Volume claim”.
Note: Volume is very different than a persistent volume and persistent volume claim.
Let’s consider Postgres Deployment as in the below image. Deployement here will then manage a single pod. The pod will further have a single Postgres container. Refer to the image below:
When a volume in Kubernetes is created, a kind of data storage pocket is also created. It is present or is linked to a certain pod. You notice in the above diagram I am reflecting the volume that is going to store some amount of data as being kind of like inside the pod.
It essentially belongs to or is associated with the pod. Now, this Volume can be accessed by any container inside the pod. For example, if we have a Postgres container running, it can then store all of its data inside of the volume that belongs to the pod itself. Now the benefit using this volume is that if the Postgres container dies or crashes or gets restarted as a new container then the new Postgres container has access to all that data inside that same volume and it has access to all the data that the previous container had access to.
Limitations of Volumes in Kubernetes
But one problem here. The volume is tied to the pod. If the pod crashes, the volume is also damaged. Volume will only survive if the container restarts within the pod. So, now you got to know that in the world of Kubernetes, a volume is not really appropriate for storing data for a database. It definitely can work in the sense that the container can restart but we are still kind of vulnerable to anything goes wrong at the pod level itself.
Volume vs Persistent Volume(PV)
Persistent Volume claim and persistent volume are also objects. They are present in Kubernetes. Here is the image to depict the differences between PVC and PV.

On the left-hand side, there is a Postgres deployment with a volume. Whereas, on the right-hand side along with a persistent volume (PV), a type of long durable storage is also created. Although, it is not linked any Pod or any particular container. So, you can imagine that a PV is outside the pod and completely separate from the pod. If the container crashes for any reason or if it needs to be created or recreated for any reason, then the old container will get died and the new one can connect to that PV that exists outside of that Pod.
Now let’s consider the other case where the Pod gets deleted or recreated or get crashed due to any reason, then the old Pod completely disappears but the PV will stick around and when the new Pod gets created with a new copy of Postgres then that container is going to be able to connect to that PV that exists outside of that Pod. So, this is a big and noticeable difference between a normal volume and a persistent volume.
So, here I am talking about the life cycle of the volume itself. With a normal volume, it is tied to the life cycle of the Pod but with a PV, it is going to last for all the time or else until we as administrator manually delete. With a PV, we can recreate a container or Pod with no issues. The volume will still be going to stick around with all the data that we expect to have.
Persistent Volume(PV) vs Persistent Volume Claim(PVC)
If the pod configuration is put together, and we put a Pod, it will also require a persistent volume. And think of a system that is going to advertise a couple of different storage options. So different storage options that are being advertised are what we refer to PVC. So, PVC is an advertisement and it is not an actual volume. It cannot store anything. It is just an advertisement that says here are the different options that we will have access to for storage inside of a particular cluster.
So, we are going to write out inside of some config files the different persistent volume claims that are going to be available inside of our cluster. Now, we have to write a config file that says that there should be a 500 GB hard drive option available to all the different parts inside of our cluster. Also, we have to write out a config file that says there is a 1TB option i.e. available as well. Basically, a PVC is like an advertisement. It showcases that there is something you can use of the pod when it’s created.
When the users select a persistent volume and goes to the Kubernetes with the pod configuration, and requested to get a 500GB option from Kubernetes (it acts as a salesperson here). In this case, Kubernetes will get to the imaginary store, and will look the various options of PVs which are easily available.
So, inside of a Kubernetes cluster, we might have some number of PVs that have already been created. These are instances of hard drives actually that can be used right away for storage. A statically provision is a PV created beforehand, inside our cluster. A statically provisioned persistent volume is created beforehand.
PV can also be created on the fly with much ease, and in that case, it will be referred as a dynamically Provisioned persistent volume. It is a different option which might not be created beforehand.
Summary PVC: PVC is basically an advertisement of options. Any of those options can be asked inside of the Pod configuration. Kubernetes will explore the existing stores of PV to provide the volume created beforehand. Or, it may consider creating one dynamically on the fly.
PVC Demo
Persistent Volume Claim Configuration File Overview:
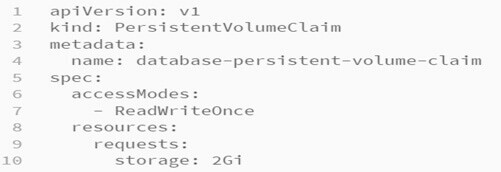
PVC config file will advertise the possible storage options which can be attached to a Pod configuration. A YAML file will be created, which is named as “database-persistent-volume-claim-yaml” file.
database-persistent-volume-claim-yaml file:
Explanation:
So, in the above file, I have put together the PVC configurations. A volume claim cannot be considered as an authentic instance of storage. We are going to attach this to our Pod config file and then pass it to Kubernetes. So, please notice the “spec” section in the above file. The configuration underneath the “spec” section says that if we attach this claim to a pod, then Kubernetes must find an instance of storage.
“AccessModes”: We have 3 different types of access modes. Here I have used “ReadWriteOnce”. This means that we want to get some instances of storage like a slice of your hard disk that can be used by a single node at a time. And to be more precise, a single node can use it, and both read and write information to that volume. We have also the accessMode as “ReadOnlyMany” which means that multiple nodes at the same time can read information from persistent volume.
And then “ReadWriteMany” means that we can both read and write information to the persistent volume by many nodes at the same time. I want to highlight the fact that the “accessModes” that we have specified in our config file clearly says that if we attach it to a Pod config file and then hands it off to the Kubernetes then Kubernetes is going to have to find an instance of storage that supports this access mode (in our case it is “ReadWriteOnce” access mode).
Resources: Under this resource, we are specifying the storage. With the “storage “ option, we are saying that Kubernetes is going to find a storage option either one that has provisioned ahead of time or one that is going to be created on the fly that has at least 2 GB of space or it has to have exact 2BG of space. We can change the “storage” number to any memory we need. For 2GB, we have to mention “2Gi” here.
There are also other possible options that we can put inside of our PVC file. I did not put these options because I am going to rely on the defaults for each of these. Let’s imagine what happens behind the scene when we hand the PVC off to the Kubernetes. Kubernetes has to find the pre-configured pre-created ahead of time persistent volume or make one on the fly.
Now I will explain to you what is going on behind the scene. Actually, Kubernetes is going to make a slice of your personal computer’s hard drive, the machine on which Kubernetes has been installed. Kubernetes occupies 1GB of the hard drive, which will be the Persistent Volume. PV gets handed back to the Pod. So, on your computer, you ask Kubernetes for some amount of storage i.e. just one place for Kubernetes to allocate that storage.
Kubernetes configuration depicts a lot, including where it decides to make this the default as well as where puts it on the hard drive. To perform this, we will need to go the terminal, and then we can execute the command below:

So, when we run get storageclass, then we can see all the different options on our computer that the Kubernetes has for creating a persistent volume. The image has a single option which is known as “standard”. This is the default option. If the storage class is not specified with our PVC, then in that case, the standard option is used by default.
With the “minikube-hostpath” option, Kubernetes decides how to provision or create this PV. If we want to see more options then you can execute command
“kubectl describe storageclass”
So, when you execute the above command it gives the below output:

The output tells us in a very broad term. We have a provisioner here i.e. “minikube-hostpath”. When Kubernetes is asked to create this PV, it looks on the host machine to minikube. It will also make a slice of our hard drive space. Things get more complicated when we move our cluster from our computer to a cloud environment.
So, when we are working with a cloud provider, we get many numbers of different options where some hard drive space or file system space can be sourced from. In a cloud or Production environment, if we create PVC config for 1GB of space, then Kubernetes will have many options available because every cloud provider like Azure or Google cloud provides different solutions for storing information. We can use any of the below options by letting Kubernetes know which one to choose:
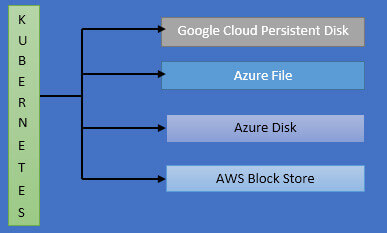
So, if we are hosting our application on Google cloud, the google cloud service called “ Persistent Disk” is going to be used to store information with our persistent volume. If our app is on Microsoft Azure, then we can use Azure file or Azure Disk to store information with our PV. For AWS, we have AWS block store. So, like these many options available in a cloud env.
But in our case, we are setting up the PVC in our local environment only without designating a storage class name. We did not specify that option because we are relying upon the Kubernetes’s default. So, this storageClassName option is available where we can customize Kubernetes is going to look to create the file system to allocate to our Pod.
Designating a PVC in a Pod Template
Now, I am going to create our Postgres deployment file as below:
postgres-deployment-yaml:
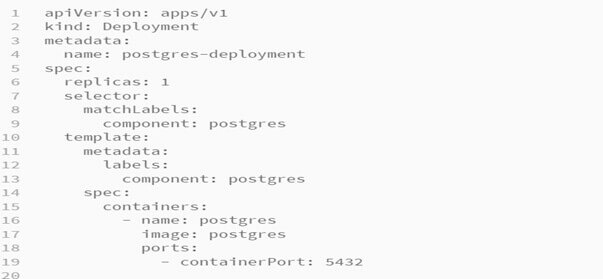
Please look at the “template” section of the above fie. This template is used for every pod i.e. created by this deployment. As “replicas” value I have set to 1, so there will always be one pod at a time. Now I am going to update the template section and will inform this pod that when it is created, it needs to request some type of long-term storage this is nothing but a persistent volume that meets all the requirements that are advertised by PVC configured in our database-persistent-volume-claim.yaml file.
Now, inside the “spec” section of our postgres-deployment-yaml file, I am going to add a new key-value pair. In the persistentVolumeClaim section, I will provide the name of our PVC file. I will be adding “volumes” of name “postgres-storage”.
Now our updated postgres-deployment-yaml file will look like as below:
Updated “postgres-deployment-yaml” file with Volumes configured:

Explanation:
The volumes configured in the above config file will set up the request on the Pod to get to Kubernetes. Then, it will ask for storage (which contains ReadWriteOnce access mode as well as 2GB memory) which fulfills all the requirements present inside the “database-persistent-volume-claim” object.
The volumes in the yaml config file are just to allocate the storage either in the local computer or if it is a production environment then storage will be allocated by the cloud provider. So, once we allocate that storage, then we need to actually assign it for use by all the different containers that are in use by our Pod. So, in addition to the “Volumes” section, I have also added some config to our container section as well.
Now please look at the “Containers” section in the above image. I have added “volumeMounts” which clarifies that after accessing the storage, now how to use that storage inside of the container. Notice that volume name and volume mount name are identical i.e. “postgres-storage” in our file. So, when we put the same name in the volumeMount, that means the particular storage that we have asked Kubernetes for in “volumes” entry section of our file, this piece of storage is going to be used for this particular volumeMount and hence the names are identical.
Then the next part is “mountPath”. This “mountPath” is designating where inside the container this storage should be made available. So, I have given the folder reference there and anything that the container stores at this folder inside the provided directory will be actually stored inside of our volume. This is very similar to the docker volume. So, in the mount path, I have designated the data directory that postgres uses for storing data on the hard drive. This is the actual data that we want to back up.
The nonpayment storage area for postgres is “/var/lib/postgresql/data”. This path I have given in the mountPath field. Another part is “subPath”. “subPath” choice means that any data inside the container that is collected center of the mount path is going to be stored inside of a folder called “postgres” inside of the actual Persistent volume claim. So, if we ran our application for few minutes and save some data to our Postgres database and then eventually open up our persistent volume, then we would see that all the data that were saved to “/var/lib/postgresql/data” folder is nested inside of a folder called “postgres” inside Persistent volume.
Note: I have given example here very specific to “PostgreSQL” database.
Applying a PVC:
Now, I am going to apply our configuration to a local cluster. So, I have put my two configuration files (postgres-deployment-yaml and database-persistent-volume-claim ) in a directory called k8s and now I am going to execute the below command:

Here k8s is my directory name where I have placed all the required config files and directly executed the apply command on the folder only. The below output I will be getting:

Please see the above output, it says that database-persistent-volume-claim is created, and our postgres-deployment is configured. Now, let’s see the status of our deployment and all of its pods. For getting the pod status, please execute command “kubectl get pods”.
Now, I am going to list out the different persistent volumes that have been created inside of our application. So, I am going to execute the below command:

Here “pv” stands for persistent volume. Now output we will get is as below:

On the right-hand side of the on a high result, you can understand the “CLAIM” i.e. using our “database-persistent-volume” claim that we have configured and status of that is bound which means that currently, it is in use. Now, to list out all the PVC, I am going to execute the below command:

This command will list out all the different claims that we have created. The output we will get as below:

Remember the claim name on the above output image is just an advertisement. In simple words, it is just saying that if we want, we can get. So, the persistent volume is an actual instance of storage that meets all the requirements that are laid out by the Persistent volume claim that we made.
If you want to delete the persistent volume claim or persistent volume, then you can clean up these volumes using the below command:
“kubectl delete pvc database-persistent-volume-claim”
“kubectl delete pv your Persistent Volume Name”
Summary: So, here if we write any data to Postgress db and then for some reason kill that pod then ideally it will not wipe out any other data that had been stored inside the database. So, you can test this yourself by saving any data to Postgres.
Conclusion:
Here in this article, you learned the internals of Kubernetes persistent volume claim and persistent volume. Also, this blog explained to you about the need for volumes in Kubernetes and demo on how to create and designate the PVC configuration files in Pod template through an example of Postgres deployment.
Reference:

Recent Blogs
Categories


