I am going to explain how you can be able to create declarative Rest Clients with Feign. And will illustrate how you will be able to call REST services using the Feign libraries. The interesting thing is that you can easily understand from this article that how Feign, Ribbon, and Eureka collaborate. If you do not know about Ribbon and Eureka, then please refer to our specific blogs on Eureka Service Discovery and Spring Ribbon.
What is Feign?
Feign is another part of the Netflix open-source software library i.e. easily usable within Spring Cloud. Feign allows us to write calls to Restful Services using a declarative style that results in no actual implementation code. Please be clear that here I am not talking about server-side code. I am referring to the client-side code that makes a call to server-side code that might be written in any technology or any programming language.
Feign declarative client is even easier than the “RestTemplate” that we normally use to call rest services. Spring Cloud provides an easy wrapper for using Feign. Now, I want to give you an example of RestClient i.e. part of the Spring framework. Please look at the example below code:
- See the first line where I obtain a rest template. We can do this by dependency Injection also. The next line is a string that represents a URL of a service that we would be calling.
- In the next line, I have used the getForObject() method and this results in the rest template making an HTTP get a call to the URL supplied in that first parameter. The second parameter in the getForObject() method is the expected data type of the return value or response. So, the template will instantiate an object of this class and will populate based on the return result. The result could be JSON or XML or some other format. The template will use automatically the correct HTTP message converter to handle all of the data type conversions.
- But, see there is nothing in the code to say whether we want JSON or XML as the response format. The last parameter in the method is the argument that is going to be substituted in the placeholder in the URL string. This rest template will take care of the URL encoding.
Now, Feign is an alternative to technology like the RestTemplate.
How Feign Works?
We can work with Feign by defining one or more Java interfaces for our REST client code. Within these interfaces, we have to define method signatures for the rest call that we would make. Then we have to annotate that interface with Feign annotation that describes the actual service call. Then next part is we have to annotate the individual methods with the Spring MVC annotation that describes how the service is defined on the server-side. This part is pluggable. If you prefer to use JAX/RS annotations, then you can be able to do that. But I will give an example with Spring MVC only.
Now at the run time, when the application starts, it will notice the Feign interfaces defined and during the application startup, Feign will automatically provide implementations of the interfaces that we have defined. And these automatic implementations will contain all of the code to make the remote calls and handle the response. To use these implementations, you have to do dependency injection of these interfaces where ever you need them. So, please see the below
So, notice the above code image. Here “InventoryClient” is an interface, not a class. Now, see the @FeignClient annotation. This marks this interface for special use by Feign. In the annotation, we have provided the URL and this URL is nothing but the base URL of the warehouse service we will be calling. In my code, see the 1st method i.e. getItems() method. The name of the method is not relevant here but the parameters and return type are important. This getItem() method takes no parameter but is expected to return a list of Item objects.
The main part is the “@RequestMapping” annotation. As you will be aware of this standard spring MVC annotation. It is ordinarily used on the server-side to explain what kind of incoming HTTP requests that a controller method should respond to. But in our Feign client case, it is used on the client-side to describe to feign that it needs to make the HTTP get a call to the “/inventory” resource. We are using these annotations to describe what the rest call looks like.
Now, look at the next method i.e. update () method, It represents a post request to “/inventory/ {sku}” where SKU is a variable (SKU means stock keeping unit). The body is expected to contain a JSON representation of an item object. It is not intended to return a result when it is successful. So, you can see in the above code snippet image that we have used the method signature and annotations to simply describe the API that we will be invoking.
Feign Runtime Implementations:
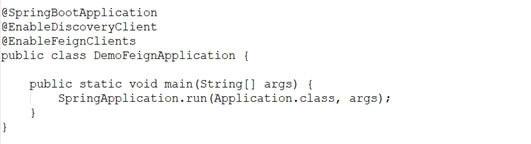
We have to enable Feign functionality via the “@EnableFeignClients” annotation in one of our spring configuration classes. When the application starts up, the Feign libraries will see the annotations and provide runtime implementations of exactly what we told it to build. Please see the below example:
What does @EnableFeignClients annotation do Internally?
Before the application is running, what you would see in your codebase are the interfaces annotated with the “@FeignClient”. But when you run the application, Feign takes over and automatically provides the run time implementation (illustrated in the blue box in the below image). Please look at the below image.
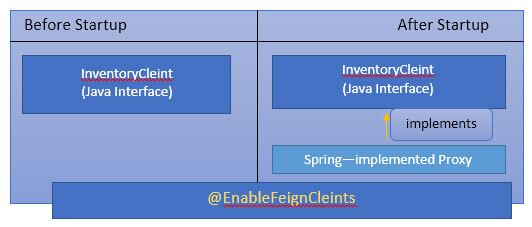
Please note that this is not the traditional code generation means some tool generates some code and we have to store it or maintain it. But this is different. This is automatic implementation of an interface provided at startup time. There is no storage necessary. Now to use such a service, we have to simply auto-wire it as a dependency into our other classes. We are coding to interface anyway and basing our dependency injection on the interface types rather than the concrete classes.
I want to mention that using RestTemplate would require unit testing. The nice thing with Feign is that we can eliminate the need to do unit testing simply because we have no code to do unit testing on. However, with both approaches, we have to still perform integration testing to make sure that all of our pieces work together correctly.
In my previous example, I have illustrated a hardcoded URL in the @FeignClient annotation. But instead of that, we can replace this with the same “Client ID” values that we get from Eureka. All of the Eureka clients report in with their relevant identifiers. And we have to simply indicate which one we are looking for in the annotation. Example:
- With Hardcoded URL: @FeignClient(url=”localhost:8080/warehouse”)
- Using Eureka “Client ID” instead: @FeignClient(“warehouse”)
In the above case using Eureka, we do not have to hardcode any configuring at all. So, I would say that the service discovery concept will work out very nicely.
The other interesting thing is that Ribbon is automatically enabled. The ribbon is going to automatically load balance between the clients in the same pools. Suppose if Eureka provides me with multiple warehouse clients, then Ribbon is going to automatically round-robin between them. So, Eureka gives our application all “Clients” that match the given “Client ID”. So, Eureka handles the configuration of the servers that are calling, and Ribbon handles the load balancing and Feign handles the actual code.
Feign starter is required at runtime. The “@FeignClient” annotation and the “@EnableFeignClients” annotation do not actually require any additional dependencies at compile-time, but they will require the below “spring-cloud-starter-openfeign” dependency at runtime and Feign integrates with Ribbon and Eureka automatically.
Feign dependency:

Demo on Feign Declarative REST clients:
Before starting with Feign, first, you have to start your common-config-server and the common-eureka-server. You can visit our separate blog for the Eureka server setup and config server setup. Check the Eureka server running in your local host.
1. First, create a Spring boot maven project. In the Pom file, add a dependency for “spring-cloud-starter-openfeign.”
2. In your Main Application configuration class and add the annotation @EnableFeignClients. Example:
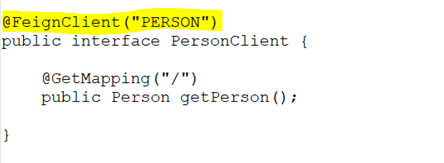
1. Then create a new interface in your demo package called “DemoClient” and annotate this class with @FeignClient annotation. Next, we have to provide the method signature that will be implemented by Feign and here we do not need to mention @ResponseBody annotation as this is implied. The main thing is we have to add a method with GetMapping to clarify that this is a • First, we have to add the dependency for the spring cloud Hystrix. There is a starter for.
Then, in one of our Configuration classes, we have to enable Hystrix by annotating the class with “@EnableHystrix” annotation. Now for actual Hystrix use, we have to use the “@HystrixCommand” annotation to wrap methods in a circuit breaker. Please look at the below example:
NOTE: You have to create one more spring boot application with the Profiles called “profiles: noun” in your bootstrap YAML file and then you have to provide the implementation for the getPerson() method with @GetMapping annotation. In this method, you can implement some logic. So, this method will
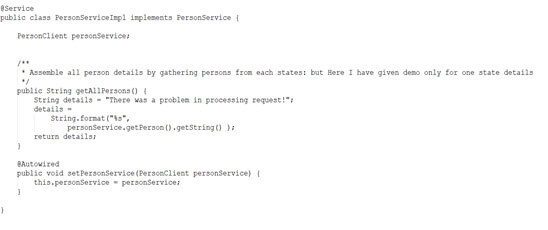
1. Now, in your service Layer, create a class called PersonService. I am doing here a setter injection of the PersonService. Depending on how you Build your PersonClient class, you may need to refactor the “getAllPersons()” method slightly.
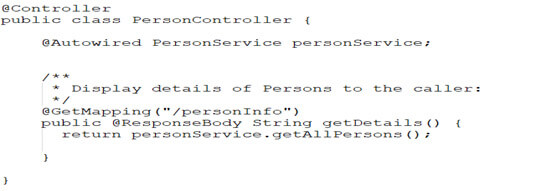
2. Now we have to write a controller class called “PersonController.java” to call the method that we have declared in the service class that will internally call the other service method called(getPerson()):Example:
3. Now you can run your application and test if it works perfectly. Hit the URL: http://localhost:8020/personInfo. The application will give you the personal details that you would have written in other services. So, here, it is using a declarative Feign client to make the Person call.
Spring Hystrix Overview:
I am going to explain to you about the Spring Hystrix and the circuit breaker pattern. Through this blog, you will learn how software circuit breakers protect against cascade failures and how to use spring cloud Netflix Hystrix annotation within our Java software development to implement circuit breakers. Also, I am going to illustrate how to establish simple monitoring of breakers using the Hystrix dashboard and turbine.
Let’s explore a scenario known as “Cascade failure”:
Whenever we have a large number of interacting services, there is always a possibility that one of them could be in a failed state for any reason. If we have 500 or more microservices, then we can depend on at least one to be in a failed state. The issue is the effect that the individual failures have on the other services. So, having a large number of services as dependencies can lead to “cascading failures”.
Microservices architecture is very vulnerable to this type of cascade failure. We have to take actions to isolate failures to prevent cascade failures from resulting in significant outages for a large percentage of the time. And this leads us to the “Circuit Breaker” Pattern. The main point of the Circuit breaker is to detect the failure condition and to isolate it. So, thereby it prevents cascade failures.
Hystrix -The Software Circuit Breaker Implementation
Hystrix is part of the Netflix open-source software set of libraries. Spring Cloud provides easy-to-use a wrapper to take advantage of Hystrix libraries. Just like a physical circuit breaker, Hystrix detects failure conditions. Let’s say we are calling service and we start to get repeated failures in a period. Then Hystrix will respond by opening the circuit. Here “opening” means Hystrix is not going to allow further calls to take place. The default behavior in Hystrix is 20 failures over any 5-second window of time.
Also using Hystrix, we can define what we want to do when the primary service call is not available. Fallbacks can be chained. We can have a primary action and if that does not work, then we can go to a fallback action and it that also does not work then we can go to the 3rd fallback. Hystrix is designed to reclose itself after an interval to see the service is available. By default, Hystrix will reclose the circuit after 5 seconds.
Hystrix Setup:
First, we have to add the dependency for the spring cloud Hystrix. There is a starter for this.

Then, in one of our Configuration classes, we have to enable Hystrix by annotating the class with “@EnableHystrix” annotation. Now for actual Hystrix use, we have to use the “@HystrixCommand” annotation to wrap methods in a circuit breaker. Please look at the below example:
Wrap methods in a Circuit breaker using “@HystrixCommand.
You can see the above code snippet image where I am using a Spring bean marked with “@Component” annotation. Any stereotype annotation can be used here. Then I have defined a “getStores()” method. Imagine the logic here that I have to make an external call from this method, and it is subject to failure. So, we have to mark this getStores() method with “@HystrixCommand” annotation. In this case, a fallback method is identified. The Fallback method needs to have a matching signature in terms of parameters and return types.
So, when the above code runs then depending upon the state of the circuit breaker, one of these two methods will get executed. If we are in a failed state, the fallback method will run. The “defaultStores()” method itself could be instantiated with Hystrix Command. Then it could indicate a tertiary fallback and there is no limit to the number of levels of fallbacks. But most real-time scenarios can be handled with one or two levels.
Failure/Recovery behavior can be easily customizable with Hystrix
Hystrix allows us is a good deal of fine-tuning regarding failure detection and recovery behavior. In the below example, I have adjusted the error threshold.
Customizable Recovery behavior:
In the above example, if Hystrix detects a 20% failure rate over a 10-sec moving window of time, it will trip the breaker. In our example, I have determined that 1sec reset time. Hystrix commands give us nice options for how we want the target logic to be invoked. The default behavior is “Synchronous Execution”. We execute the command and when it is done then we get the control back.
We also have the option of “Asynchronous Execution” where we can fire the command in a separate thread. This is the same that we can do with the spring’s “@Async” annotation except that we are adding the Hystrix circuit breaker features to it.
Also, Hystrix provides a “Reactive” model which is also asynchronous. It is better because here we do not need to query a future object to see if it is done unlike in the Asynchronous case. We can have an Observable that will be executed and as soon as the work is done the responding logic will be fired and therefore all we have to do is listen to the event.
Asynchronous Command Execution Example:
I am giving you an example of Asynchronous command execution via Hystrix. See the below code snippet:
The main difference is the Return type. Any return type based on a Java future tells Hystrix to invoke the method in a separate thread. Method callers have an immediate future and have the option to investigate the future to see if it happens.
Reactive Command Execution Example:
I am giving you an example of Reactive Command Execution via Hystrix. See the below code snippet:
Notice that in the above code, the return value is kind of observable. This instructs hystrix to use the reactive model for invocation. The caller of this code will get the observable and can subscribe to it as a listener. The listening code will be invoked automatically as soon as the call is complete. The method needs to return an observable result. This “Observable” is from JAX-RS. There are many useful properties available that you can set to fine-tune the behavior
Example:
execution.isolation.thread.timeOutInMilliseconds: How long should we wait for success.
circuitBreaker.requestVolumeThreshold: Number of requests in rolling time window(10 sec) that activate the circuit breaker
circuitBreaker.errorThresholdPercentage: Percentage of failed requests that will trip the breaker (default = 50%)
metrics.rollingStats.timeInMilliseconds: Size of the rolling time window(default =10sec)
Resetting the Circuit Breaker:
The Hystrix circuit breaker is designed to reset itself. The main thing is to control is how long we would like the circuit breaker to stay open before Hystrix tries to close it again. This is controlled by the “circuitBreaker.sleepWindowinMilliseconds” properties. We can also force the circuit breaker open using the “circuitBreaker.forceClosed” property. This is for manual purposes.
Monitoring:
We can monitor everything with Hystrix Dashboard and Turbine. Hystrix provides a built-in dashboard to check the status of the circuit breakers. For a large number of microservices, The Hystrix dashboard is not practical. So, the Turbine is the solution for this. It aggregates the streams of all of the other Hystrix enabled services.
DEMO: Implementing Hystrix Circuit Breaker (with Feign client and Eureka) In your Project:
1. First, you start your config-server and eureka-server. To learn how to implement these, then visit our Eureka Blog.
2. Create a new Spring Boot web application and name it “demo-client”. And in the Pom file, I have added the same dependency management for identifying the spring cloud parent Pom. And In the dependencies section of Pom, added the dependency for a group "org.springframework.cloud" an artifact "spring-cloud-starter-netflix-eureka-client”.
3. Then create the main application class called “MyClientApplication.java”. Then used the annotation “@EnableDiscoveryClient” to this class. Example:

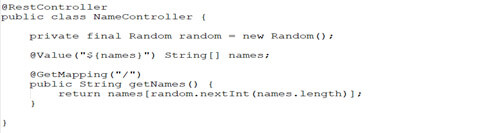
Then create a Rest controller class called “NameController.java”. An added string array of name's with @Value annotation. So that these name’s values can be read from our application.yml file. And in the controller class, I have added a controller method called “getNames()” with Get mapping. This method returns a string value from the “names” array with a dynamically chosen index. Example:
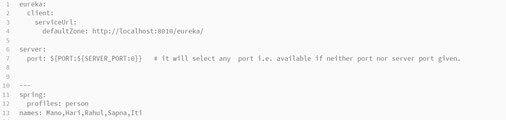
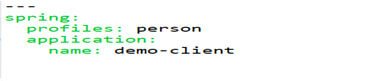
1. In your application.yml file in classpath root folder i.e. (src/main/resources), add “person” profile and also below details:
2. Then in your bootstrap.yml file, give your application name as below:
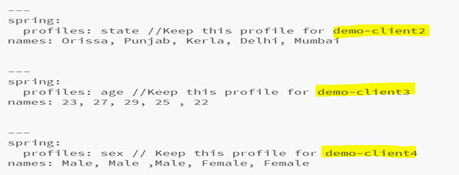
3. Now, you have to create again 3 spring boot applications similarly. So, please follow the same steps. It is easy for you can copy the entire software projects outsourcing that I create and then only change the below fields
Give application names for respective projects as: “demo-client2”, “demo-client3”, “demo-client4”
Change the application name in each of your application’s bootstrap.yml files.
You have to keep a different profiles for different applications. Please refer to the below image. Add these profiles in respective projects:
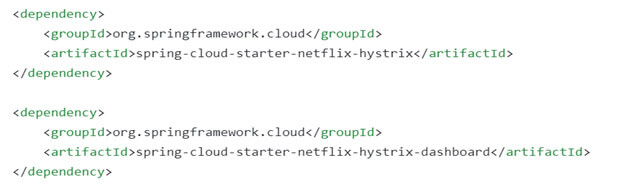
4. Start all your previous application(demo-client, demo-client2, demo-client3, demo-client4). Now, create a new Spring boot web application called “demo-client-final”. In your Pom file, add the below Hystrix dependencies. Here, I have added also the Hystrix Dashboard to our demo-client-final application.
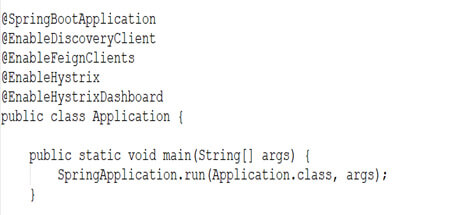
5. Create your application configuration class and add @EnableHystrixDashboard annotation to your Application configuration class
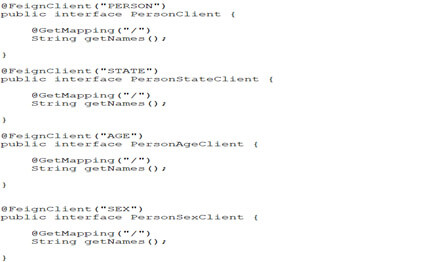
6. Now, create all 4 interfaces with @FeignClient annotation in your dao layer like below:
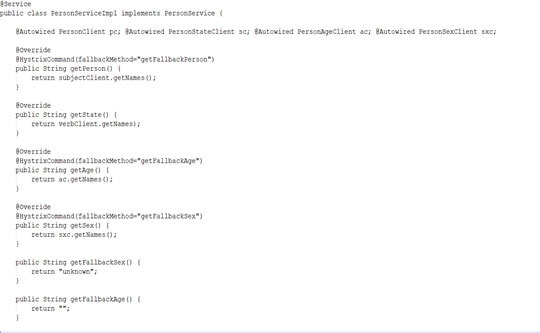
7. There are the PersonService interface and PersonServiceImpl implementation class that wraps calls to the Feign clients. I am using Hystrix here in PersonServiceImpl. Suppose here we do not want to have an Age in our details. So, if the Age service is failing, modify the getAge() service to run within a Hystrix Command. Establish a fallback method that will return an empty Age value. Example:
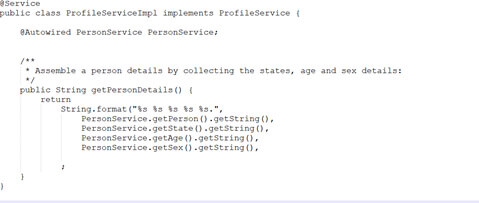
8. Now, we have to create a Profile Service impl. A class where we will call all methods of the PersonService interface so that we can get a complete profile of a person.
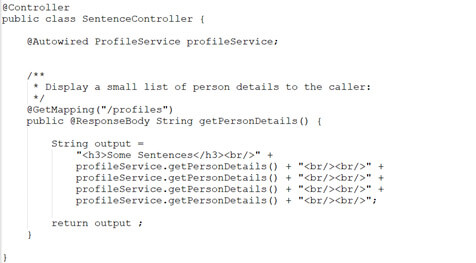
9. Now, create a controller class to call our ProfileService interface’s getPersonDetails() method so that we can get the age, state, name and sex of each person.
Example:
10. Now, launch your demo-client-final application and test it to make sure it works by accessing the URL (http://localhost:8020/profiles) in your browser. The application should work but the “Age” call is now going through a Hystrix circuit breaker.
11. Now, stop the Age service. Refresh the URL (http://localhost:8020/profiles). The profile should appear without age. Restart the Age service. Once the Eureka registration is complete and the circuit breaker re-closes, the demo-client-final application will once again display age in the profile details.
Conclusion:
So, finally, at the end of our discussion, you learned how Feign provides a very easy way to call RESTful Services. Feign integrates with Ribbon and Eureka automatically. Also, you learned how Hystrix circuit breakers protect against cascade failure and how easy it is to add a Hystrix circuit breaker to our application.
Reference:
https://cloud.spring.io/spring-cloud-netflix/multi/multi_spring-cloud-feign.html
https://cloud.spring.io/spring-cloud-netflix/multi/multi__circuit_breaker_hystrix_clients.html

Recent Blogs
Categories


